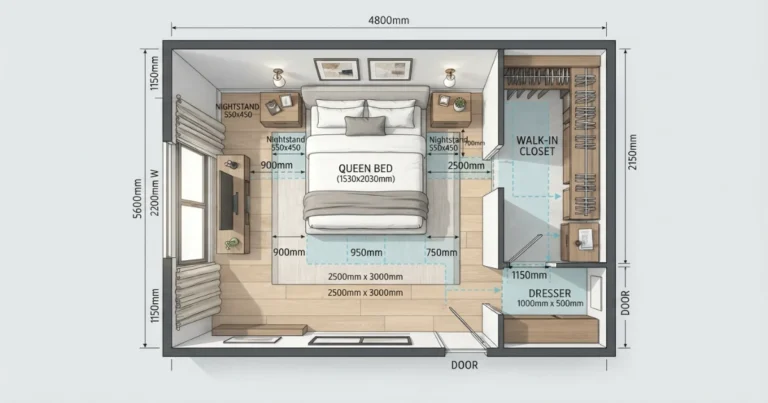
Find the exact rod width, length and panel count for any window.
Enter your window dimensions, choose a length style and fullness, and get an instant curtain size recommendation — using the same stack-back and fullness ratios interior designers rely on. No guesswork, no measuring tape math, and no returning panels that turn out too narrow or too short once they’re finally hung.
Standard curtain sizes by window width.
These estimates assume standard rod width style, 2x fullness and floor-length drop for an 84 inch floor-to-window-top. Use the calculator above for your exact window. If your ceiling is unusually tall, your floor-to-window-top measurement will differ from these defaults, so treat the table as a starting reference rather than a final order.
| Window Width | Rod Width | Fabric Width Needed | Standard Panels | Buy |
|---|---|---|---|---|
| 24 in | 36 in | 72 in | 2 panels | 2 × 54″ |
| 36 in | 48 in | 96 in | 2 panels | 2 × 54″ |
| 48 in | 60 in | 120 in | 3 panels | 3 × 50″ |
| 60 in | 72 in | 144 in | 3 panels | 3 × 54″ |
| 72 in (sliding door) | 84 in | 168 in | 4 panels | 4 × 50″ |
| 96 in (bay window) | 108 in | 216 in | 4 panels | 4 × 54″ |
Four curtain lengths — and when to use each.
The end point of the curtain matters as much as the width. Here is what each length style looks like and which rooms it suits best.
Sill Length
Curtains end right at the windowsill. Practical for kitchens, above radiators, or window seats where fabric can’t hang lower. It’s also the easiest length to keep clean, since the fabric never brushes against furniture, pets, or foot traffic below the window.
Best for: kitchens, radiatorsApron Length
Ends 4-6 inches below the sill. A softer transitional look that works well over furniture placed under the window. It reads as slightly more finished than sill length while still keeping clear of desks, dressers, or window seating below.
Best for: furniture beneath windowFloor Length
Curtains skim the floor with about half an inch of clearance. The most versatile, timeless choice for almost any room. It suits both casual and formal spaces and tends to age well as decor trends shift around it.
Best for: most living rooms & bedroomsPuddle Length
Fabric pools 1-3 inches on the floor for a formal, dramatic effect. Best for low-traffic, statement rooms. It requires extra fabric and more frequent cleaning, so it suits formal dining rooms and sitting rooms more than hallways or entries.
Best for: formal dining, low trafficSee how curtain proportions change by window.
These steps cover the essentials: measuring the window, mounting the rod wide and high, and choosing fullness before you order fabric.
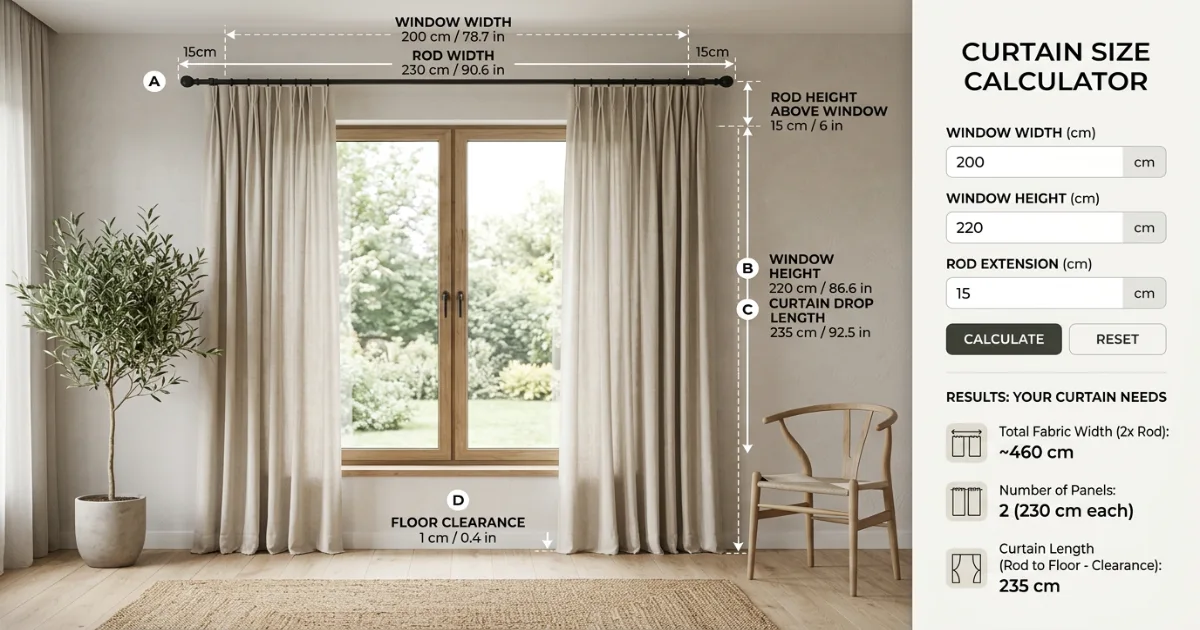
Measure the window
Start with window width and floor-to-window-top distance before choosing style. Write both numbers down along with the frame height, since all three feed into the rod, drop and fullness calculations later.
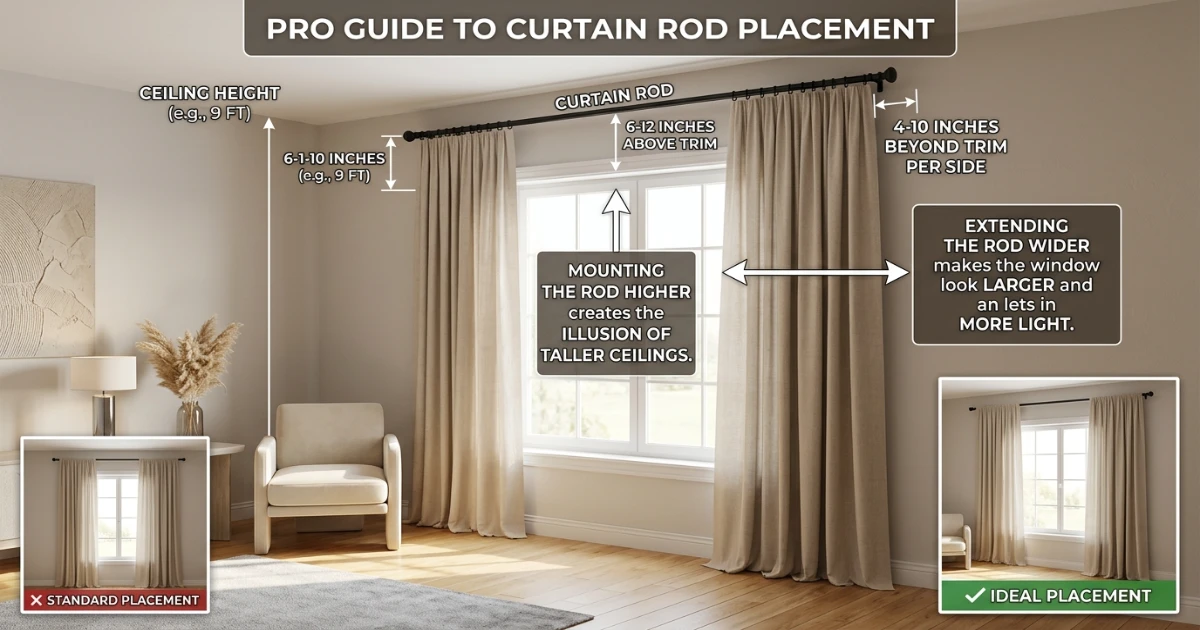
Mount wide and high
Extending the rod beyond the frame and closer to the ceiling makes the window look larger. This is usually the single change that gives the biggest visual improvement for the smallest cost.
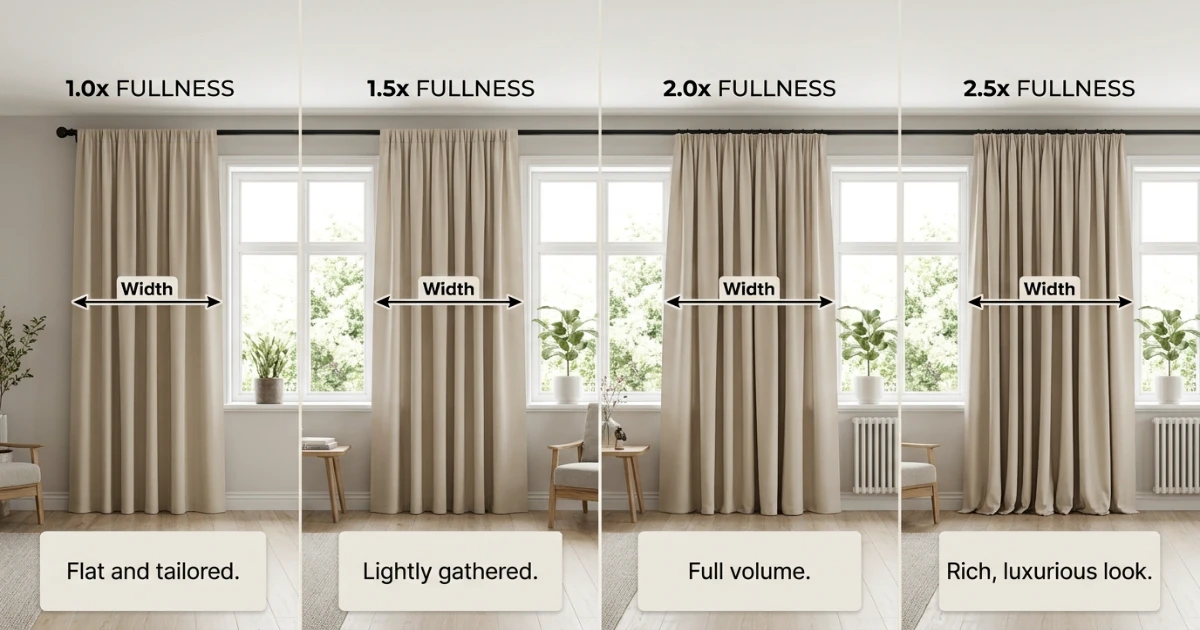
Choose fullness
More fabric width relative to the rod creates a richer, more gathered look. Thinner sheers can get away with less fullness, but heavier drapery almost always looks better with more folds rather than fewer.
How to measure for curtains — the complete guide.
The most common curtain mistake is buying panels that are too narrow and too short. Skimpy, hovering curtains make a window look smaller and cheaper. When in doubt, mount the rod wider and higher, and buy more fullness than you think you need. It is far easier to hem a curtain that is slightly too long or trim a rod that is slightly too wide than it is to fix fabric that runs short in either direction.
Step 1: Measure the window width
Measure the outer width of the window frame from outside edge to outside edge. This is your baseline — the rod and curtains will always be wider than this number, never narrower, or the window will look boxed in. Use a metal tape measure rather than a fabric one for accuracy, and measure at three points across the frame — top, middle, and bottom — since older window frames are rarely perfectly square. If the three measurements differ, use the widest one so the rod clears the frame at every point.
Step 2: Decide how wide the rod should extend
A rod mounted flush with the frame blocks light and makes curtains look cramped when open. The standard rule is to extend the rod 4 to 6 inches beyond the frame on each side, so curtains can stack fully off the glass and let in maximum daylight. For a wider, more dramatic look, extend 8 to 12 inches on each side — this is especially effective in small rooms because it visually widens the window. Keep in mind that wall space, light switches, or adjacent corners can limit how far you can realistically extend a rod, so check for obstructions before finalizing a bracket position.
Step 3: Choose a length style
Measure from the planned rod height down to your target end point: the sill, 4-6 inches below the sill (apron), the floor, or a few inches past the floor for puddling. Floor length is the safest, most universally flattering choice for living rooms and bedrooms. Sill and apron lengths are more practical over furniture, radiators or kitchen counters. When measuring for floor length, measure with the floor covering already in place — thick rugs or newly installed flooring can shift the true floor-to-rod distance by half an inch or more, which is enough to make a curtain look noticeably too short.
Step 4: Set the fullness ratio
Fullness is the ratio between the flat fabric width and the rod width. A ratio of 1.5x is common for lightweight sheers that are meant to filter light rather than fully close. 2x is the standard for everyday drapery — a rod that’s 60 inches wide needs 120 inches of total fabric. For a rich, formal, pinch-pleat look, use 2.5x to 3x fullness, which requires noticeably more fabric and often more panels. Fullness also affects how well curtains close at night: a lower ratio may leave gaps or thin patches of light along the seams, while higher fullness ensures the fabric overlaps generously when drawn shut.
Step 5: Calculate panels needed
Retail curtain panels are usually sold in fixed widths, most commonly 50 to 54 inches. Divide your total fabric width requirement by the panel width to find how many panels to buy. A 120 inch fabric width at 54 inches per panel rounds up to 3 panels; most people arrange these as 1.5 panels per side or adjust panel count to keep symmetry across both sides of the rod. If your total comes out to an odd number, it is usually worth rounding up to the next even number so both sides of the window match, rather than leaving one side visibly thinner than the other.
Step 6: Mount the rod at the right height
Mounting height changes how tall the window and room feel. A standard mount sits 4 to 6 inches above the window frame. A “high and wide” mount — 8 to 12 inches above the frame, closer to the ceiling — is a popular trick for making ceilings feel taller and windows feel larger, especially effective in smaller rooms with limited natural light. Before drilling, check that the bracket height leaves enough clearance for the curtain header style you’ve chosen; grommet and pinch-pleat headers sit slightly higher above the rod than a rod-pocket style, which can shift your final drop measurement by an inch or two.
Step 7: Layer for light control and privacy
Many rooms benefit from two layers rather than one: a sheer or lightweight curtain for daytime privacy and light diffusion, paired with a heavier drapery or blackout panel for evenings. This is typically done with a double rod or a single rod with a traceable double track, and it means measuring fullness and fabric width separately for each layer since sheers and heavier fabrics behave differently once gathered. Bedrooms and media rooms tend to benefit most from this layered approach, while bathrooms and kitchens often need only a single, practical layer.
Step 8: Avoid the most common sizing mistakes
Beyond narrow and short panels, a few other mistakes come up repeatedly. Mounting the rod directly on the window frame instead of the wall above it is one of the most frequent, since it blocks light and makes the window look smaller rather than larger. Ordering curtains based on the window’s glass measurement instead of the planned rod width is another, since the two numbers are rarely the same once stack-back and extension are factored in. Finally, choosing a length style before confirming what sits beneath the window — a radiator, a low bookcase, a window seat — can lead to curtains that catch on furniture every time they’re drawn.
Curtain hardware types: rod pocket, grommet and pinch pleat
- Rod pocket — a sewn channel the rod slides through, creating a soft, gathered header. Simple and budget-friendly, but harder to slide open and closed, and best suited to curtains that will stay mostly in one position.
- Grommet top — metal rings sewn into the header that slide smoothly along the rod, creating uniform, structured folds. The most popular modern choice, and generally the easiest to open and close daily without wearing down the fabric.
- Pinch pleat — tailored, stitched pleats at the header that create a formal, structured, tailored look. Common in higher-end drapery and hotel-style rooms, and often paired with traverse rods or hidden tracks for a cleaner finished appearance.
- Tab top / tie top — fabric loops or ties that hang the curtain from the rod, giving a relaxed, casual look best suited to café curtains or informal spaces, though they tend to bunch less evenly than grommets when drawn fully open.
Curtain buying rules that prevent a return trip to the store.
A calculator gives the best starting numbers, but the final purchase still depends on fabric weight, room light needs, ceiling height and how the curtains will actually be opened and closed day to day. The rules below cover the details that a single width-and-length measurement can’t capture on its own, and they’re worth reviewing even after you’ve settled on a size from the calculator above.
For most windows, mount the rod 4 to 6 inches above the frame and 4 to 6 inches beyond each side, choose floor length with about half an inch of floor clearance, and buy enough fabric width for 2x fullness. Round up to the next standard panel size rather than down. If you’re unsure between two lengths or two panel counts, the larger option almost always looks more finished once the curtains are actually hanging in the room.
Never buy exactly rod width
Flat panels equal to the rod width look thin and stingy once hung. Always buy enough combined panel width to reach at least 1.5 to 2 times the rod width, since fabric loses width to folds and gathers the moment it’s clipped or threaded onto the rod.
Round length up, not down
A curtain that’s slightly too long can be hemmed. A curtain that’s too short cannot be fixed. When between two standard lengths, always choose the longer one, and remember that most fabrics shrink slightly the first time they’re washed.
Match fabric weight to function
Lightweight linen or voile suits sheers meant for filtered light. Heavier cotton, velvet or blackout-lined fabric is better for bedrooms and rooms that need real light control, and it also drapes with a fuller, more substantial look at the same fullness ratio.
Check the rod’s weight rating
Heavier drapery and multiple panels need a sturdier rod and stronger brackets. A rod that sags under the fabric’s weight undermines even a perfectly sized curtain, so confirm the maximum load rating before committing to a heavy fabric or a wide multi-panel setup.
Finally, always order swatches or small fabric samples before buying full panels for a large window. Colour and texture look different under a store’s lighting than they will next to your own walls, furniture and daylight direction, and a swatch is a far cheaper way to catch a mismatch than a full return of four floor-length panels.
Helpful room planning topics.
Curtains rarely stand alone in a room’s design. Once you know your panel count and length, it helps to plan the surrounding elements at the same time — rug scale beneath the window, wall colour behind the fabric, and furniture proportions relative to the new framing. Getting these elements to agree with each other is usually what separates a room that feels intentionally designed from one that feels like it was furnished piece by piece over time. Use these supporting pages from the HomeStyle Calculator homepage to plan the rest of the room.
Six things interior designers always check before buying curtains.
Mount wide, not narrow
Extending the rod well beyond the frame is the single easiest way to make a window and room feel bigger, and it costs nothing extra beyond a slightly longer rod. Designers often push this further than homeowners expect, sometimes extending brackets nearly to the edge of the wall itself.
Buy more fullness than feels necessary
Skimpy curtains are the most common styling mistake. Err toward 2x to 2.5x fullness even if the budget calculation suggests less, since the difference in how the fabric folds and catches light is noticeable the moment the curtains are hung.
Steam, don’t iron
Curtains hung straight from the packaging often have crease lines. A handheld steamer relaxes the fabric in place without the risk of scorching from a hot iron, and it works directly on the rod so you don’t need to take panels down first.
Match hardware finish to fixtures
Rod and bracket finish should echo the room’s existing metal tones — brushed brass, matte black or brushed nickel — for a coordinated, intentional look. Mismatched hardware finishes are a small detail that reads as unfinished even when everything else in the room is well chosen.
Consider a blackout liner separately
Rather than buying only heavy blackout curtains, pair lighter decorative panels with a separate blackout liner behind them for flexibility between daytime light and nighttime darkness. This also makes it easier to update the room’s look later without replacing the light-blocking layer.
Order swatches before committing
Fabric colour shifts dramatically under different lighting. Order a physical swatch and view it in the room at both day and night before ordering full panels, ideally pinning it near the window for a few days to see how it reads at different times.
Two practical products to use after calculating your curtain size.
The calculator gives you the required rod width, curtain drop and panel count. These two Amazon searches help you compare hardware and ready-made curtain sets that match those measurements.
Adjustable Curtain Rod Set
Use the calculator’s finished rod-width result to compare adjustable rods with enough extension and support for your curtain panels.
- Compare the rod’s full adjustable range with your result
- Check bracket projection, finials and center support
- Confirm weight capacity for lined or blackout curtains
84-Inch Blackout Curtain Panel Pair
A practical Amazon search for common floor-length blackout curtain sets sold as two panels.
- Check whether the listing width is per panel or per pair
- Compare the calculator’s total fabric width with both panels
- Verify header style and exact finished length before buying
Affiliate disclosure: As an Amazon Associate, HomeStyle Calculator may earn from qualifying purchases. Prices, availability, panel quantities and exact dimensions may change, so verify the current Amazon listing before ordering.
Curtain sizing questions — answered.
12 calculators for every room decision.
Every tool uses professional designer formulas. Free, instant, no sign-up — just enter your room and get the exact answer.
Bookmark HomeStyle Calculator for every window in the house.
From a single kitchen window to floor-to-ceiling sliding doors, our free tools give you the exact rod width, length and panel count before you order fabric.