Find out exactly how many bags of grout you need.
Enter your tile size, joint width and depth, and the area to be tiled, and get an instant grout weight and bag count — using the same industry coverage formula tile installers rely on. No more running short mid-job or buying three bags too many.
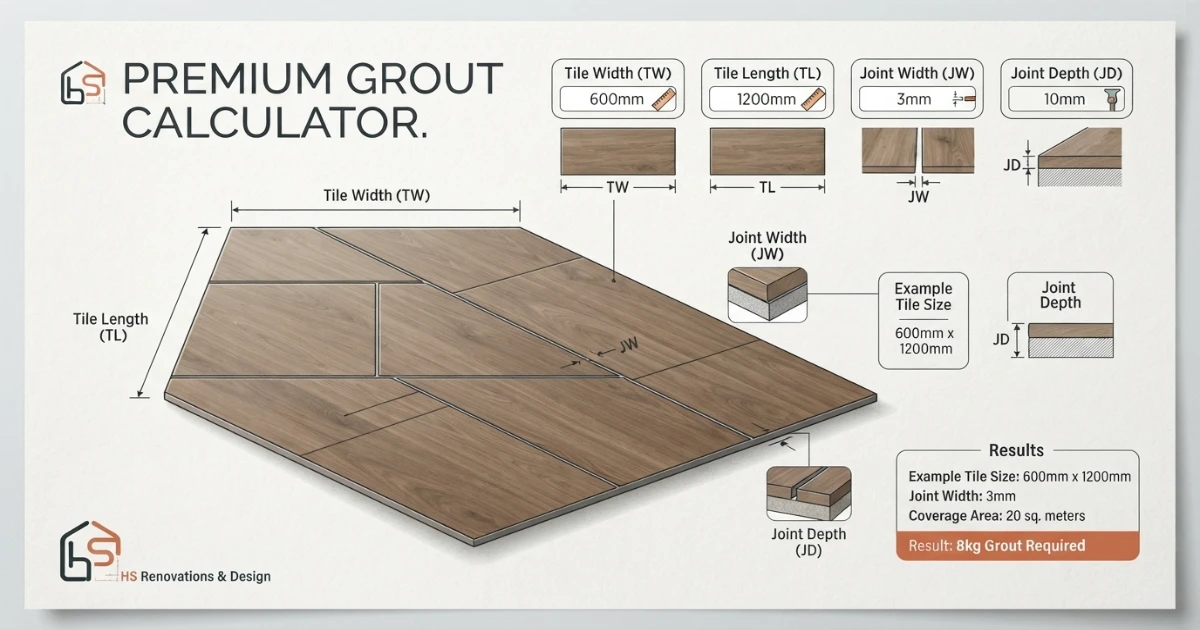
Grout needed (lbs) = ((tile width + tile length) ÷ (tile width × tile length)) × joint width × joint depth × area × 106. Divide by bag size — 25 lb for sanded, 10 lb for unsanded — and round up.
Grout needed per 100 square feet, by tile size and joint width.
These figures assume a 3/8 inch joint depth and sanded grout. Use the calculator above for a total matched to your exact tile, joint and room size.
| Tile Size | Joint Width | Grout per 100 sq ft | Bags per 100 sq ft (25 lb) | Notes |
|---|---|---|---|---|
| 4×4 in mosaic | 1/8 in | ~230 lb | 10 bags | Small tile needs far more grout per area |
| 6×6 in | 1/8 in | ~155 lb | 7 bags | Common for bathroom walls |
| 12×12 in | 1/8 in | ~83 lb | 4 bags | Most common floor tile size |
| 12×24 in | 1/8 in | ~62 lb | 3 bags | Popular large-format plank tile |
| 18×18 in | 1/16 in | ~28 lb | 2 bags | Rectified edge, thin joint |
| 24×24 in | 1/16 in | ~21 lb | 1 bag | Large format, minimal grout lines |
Three grout types — and which joint width each one suits.
Grout type affects bag size, price and the minimum joint width it can be used with. Here is what each type is built for.
Sanded
Contains fine sand for strength in wider joints, resisting shrinkage cracks. The standard choice for joints 1/8 inch or wider on floor tile.
25 lb bag · joints ≥1/8 inUnsanded
A smoother, sand-free formula for narrow joints where sand could scratch polished or delicate tile edges, such as glass or marble.
10 lb bag · joints <1/8 inEpoxy
Resin-based and highly resistant to staining, cracking and moisture. Costs considerably more but suits kitchens, showers and heavy-use areas well.
~17 lb unit · any joint widthNeed tile too?
If you still need to calculate tile quantity and boxes before grouting, the Tile Calculator handles that step first.
See Tile CalculatorSee how grout needs change by tile and joint.
These steps cover the essentials: measuring the tile and joint, choosing a grout type, and confirming bag count before you buy.
Measure tile and joint
Start with tile width, length, joint width and joint depth before calculating coverage. Joint depth usually matches tile thickness.
Choose a grout type
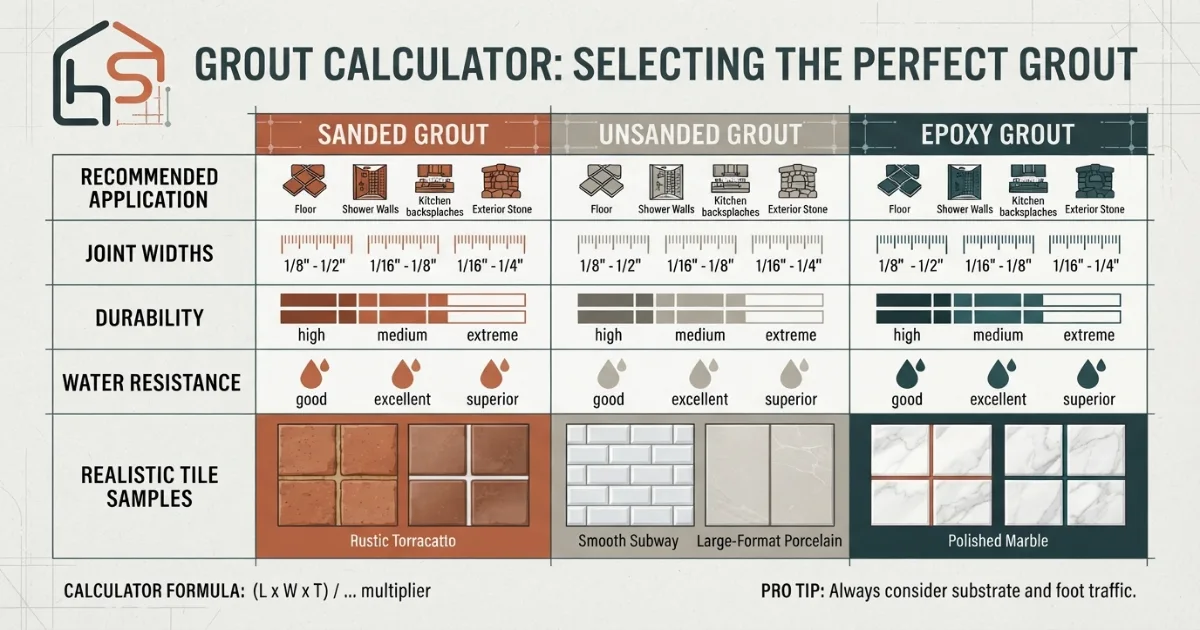
Joint width usually determines whether sanded or unsanded grout is appropriate, while epoxy works at any width.
Confirm bags needed
Round up to full bags and add a waste allowance so a small miscalculation doesn’t halt the job mid-way.
How to calculate grout needed — the complete guide.
The most common grout mistake is assuming grout needs scale with tile count instead of joint length. Two rooms of the same square footage can need wildly different amounts of grout depending on tile size alone — small tile has far more total joint length per square foot than large-format tile, even at the same joint width.
Grout is one of the easiest tile-project materials to underbuy, because it’s tempting to estimate it the same way you’d estimate tile itself — by square footage alone. In reality, grout fills the joints between tiles, not the tile surface, so the total length of joint per square foot of coverage matters far more than raw area. A small mosaic tile with the same joint width as a large-format plank tile can need four or five times as much grout for the same room, which is why a tile-size-aware formula, not a flat per-square-foot rule, gives a far more reliable estimate.
Step 1: Measure the tile’s width and length
Measure the tile itself, not the room, in inches. A 12 by 12 inch tile and a 12 by 24 inch tile behave very differently in the grout formula even though both are common floor tile sizes, since the larger tile has proportionally less joint length per square foot of coverage.
Step 2: Set the joint width
Joint width is the visible gap between tiles, commonly ranging from 1/16 inch for rectified, straight-edge tile up to 1/2 inch or more for rustic or handmade tile with more size variation. Rectified tiles, cut to a very precise edge, typically use the narrowest joints, while natural stone and handmade tile need wider joints to accommodate size differences between pieces without the layout looking crooked.
Step 3: Set the joint depth
Joint depth is how deep the gap between tiles runs, and it typically matches the tile’s own thickness, commonly around 3/8 inch for standard ceramic or porcelain tile. Thicker tile, such as some natural stone or paver-style products, has a deeper joint and therefore needs proportionally more grout to fill it completely, even at the same joint width.
Step 4: Apply the standard coverage formula
The widely used industry formula for pounds of grout needed is: ((tile width + tile length) ÷ (tile width × tile length)) × joint width × joint depth × area in square feet × 106, with all tile and joint dimensions in inches. This formula accounts for the fact that smaller tiles have more total joint length per unit area, which is the single biggest driver of how much grout a job actually needs.
Step 5: Measure the area to be grouted
Measure the room or surface width and length being tiled, in feet, and multiply for total square footage. For irregular areas, split the space into simple rectangles, calculate each separately, and add the totals together rather than trying to average an irregular shape into one width and length.
Step 6: Add a waste allowance
Add roughly 10 percent to the calculated grout weight to account for mixing waste, spillage, uneven application and future repairs. Rooms with many corners, niches or thresholds should lean toward the higher end of a 5 to 15 percent waste range, since more cutting and edge work tends to waste more mixed grout than a simple, open rectangular room.
Step 7: Choose sanded, unsanded or epoxy grout
Sanded grout, containing fine sand for added strength, is the standard choice for joints 1/8 inch or wider, since the sand helps prevent shrinkage cracking as the grout cures in a wider gap. Unsanded grout is smoother and better suited to joints narrower than 1/8 inch, particularly on polished, glass or delicate tile edges that sand could scratch during application. Epoxy grout, a resin-based product rather than a traditional cement-based one, resists staining, cracking and moisture significantly better than either cement-based option, making it a strong choice for kitchens, showers and other high-moisture or high-traffic areas, despite its considerably higher price per unit.
Step 8: Convert pounds needed into bags
Divide the total calculated grout weight, including waste allowance, by the bag size for your chosen grout type — commonly 25 pounds for sanded grout and 10 pounds for unsanded grout, though epoxy grout is often sold in smaller units around 15 to 18 pounds. Always round up to the next full bag, since a partial bag still needs to be purchased whole in nearly every case.
Step 9: Avoid the most common grout ordering mistakes
Estimating grout by flat square footage rather than accounting for tile size is the most frequent mistake, often leading to a significant under-purchase on small-tile jobs. Forgetting to add a waste allowance is a close second, since even a well-calculated amount rarely accounts for spillage and future touch-ups. Buying the wrong grout type for the joint width — sanded grout in a very narrow joint that could show scratches, or unsanded grout in a wide joint prone to shrinkage cracking — is a subtler mistake that can affect the finished look and durability of the job rather than just the shopping list.
Grout color and sealing considerations
- Color-matched grout — a grout color close to the tile itself minimizes the visual grid, making the floor read as one continuous surface rather than a busy pattern of individual tiles.
- Contrasting grout — a grout color that stands out from the tile emphasizes the pattern and layout, which some homeowners prefer for a more graphic, defined look.
- Sealing cement-based grout — sanded and unsanded cement grouts are porous and typically need a sealer after curing to resist staining, particularly in kitchens and bathrooms.
- Epoxy grout and sealing — epoxy grout is inherently non-porous and generally doesn’t require a separate sealer, which can offset some of its higher upfront material cost over time.
Grout buying rules that prevent a second trip to the store.
A calculator gives the best starting numbers, but the final purchase still depends on tile size, joint width and grout type working together correctly. The rules below cover the details worth checking even after settling on a bag count from the calculator above.
Apply the tile-size-aware coverage formula, add 10 percent waste, and round up to full bags of the correct grout type for your joint width. When in doubt between two bag counts, buy the larger amount from the same production batch.
Never estimate by area alone
Grout needs scale with total joint length, not floor area. Always factor in tile size, not just square footage, before ordering.
Match grout type to joint width
Sanded for joints 1/8 inch and wider, unsanded for narrower joints, to avoid both scratching and shrinkage cracking.
Buy from the same production batch
Grout color can shift slightly between batches. Buy enough bags from one batch for the whole job to avoid a visible color mismatch.
Round up, then round up again
Add a waste allowance first, then round the final weight up to the next full bag — never down, even if the leftover is small.
Helpful room planning topics.
Grout is usually the last step in a tile project. Once you know your bag count, it helps to double check the tile quantity and layout that came before it. Use these supporting pages from the HomeStyle Calculator homepage to plan the rest of the project.
Six things tile installers always check before grouting.
Let thinset cure fully first
Wait the full recommended cure time, often 24 to 48 hours, before grouting, since grouting too early can dislodge tiles that haven’t fully set.
Mix small batches at a time
Cement-based grout starts curing quickly once mixed. Mixing smaller batches prevents waste from grout that hardens before it’s applied.
Test grout color on a scrap tile
Grout color can look different once fully cured than it does wet. Test on a scrap piece before committing to the full job.
Clean haze promptly, not the next day
Grout haze is far easier to remove within a few hours of application than after it fully cures overnight.
Seal cement grout after full cure
Wait for full cure, typically 2 to 3 weeks, before sealing sanded or unsanded grout to avoid trapping moisture underneath the sealer.
Keep an extra bag for future repairs
A sealed, unopened bag from the same batch makes future crack or chip repairs far easier to color-match than reordering later.
Grout calculation questions — answered.
More calculators for every room decision.
Every tool uses professional designer formulas. Free, instant, no sign-up — just enter your room and get the exact answer.
Bookmark HomeStyle Calculator for every room in the house.
From a small mosaic backsplash to a whole-floor tile job, our free tools give you the exact grout weight and bag count before you buy.