Space Around Dining Table: The 36-Inch Rule
Calculate the real space around dining table edges for sitting, standing, passing, storage and doors—then see the result in a proportional live diagram.
How much clearance belongs around a dining table?
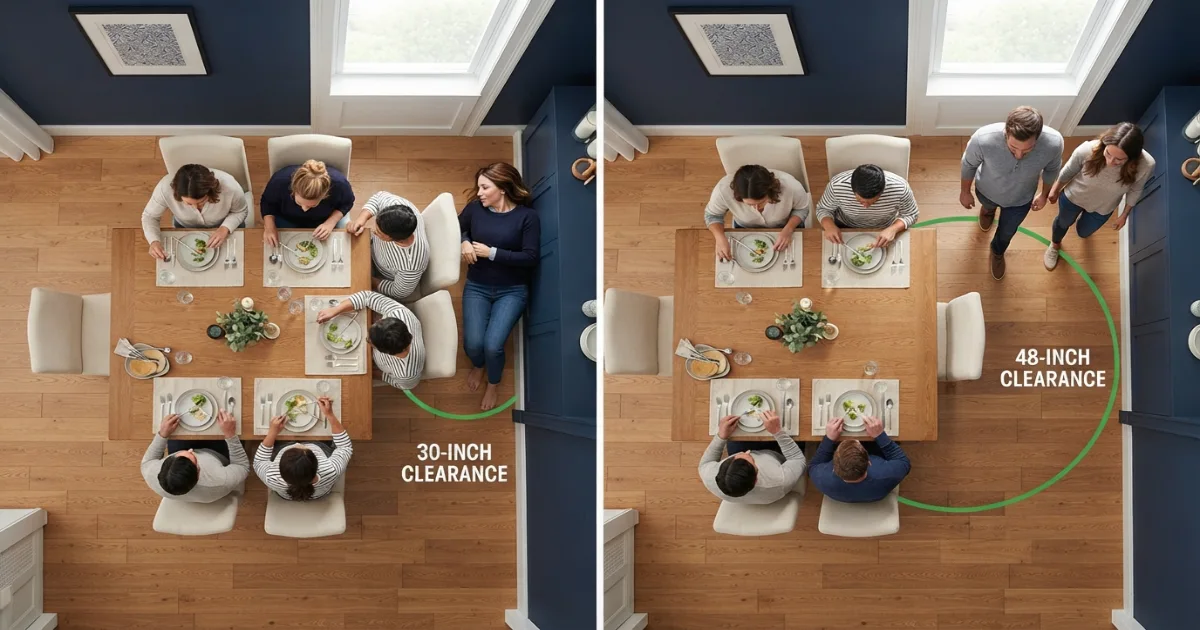
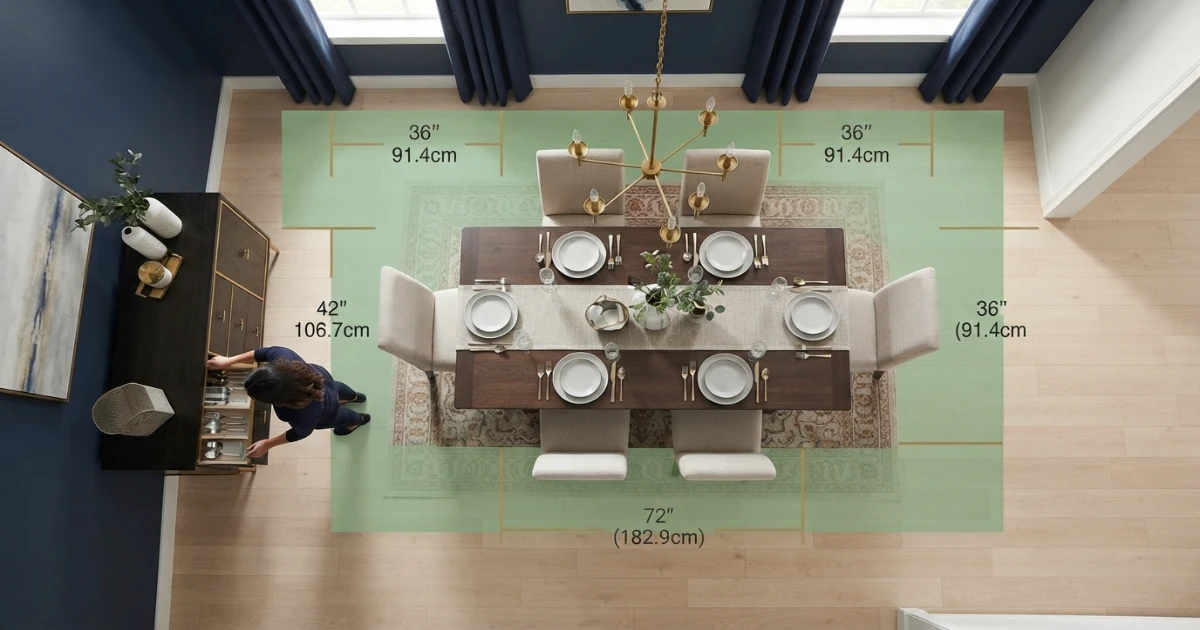
Plan about 36 inches of space around dining table edges as an everyday starting point. Measure from the tabletop edge to the nearest wall, sideboard or fixed obstruction. This usually supports chair use, but it does not guarantee easy passing behind an occupied chair.
Use roughly 42 inches where someone passes occasionally and about 48 inches for a regular route. A 30- to 32-inch edge can work in a constrained, low-traffic location with compact chairs, but it needs a full-scale test. Different sides may use different clearances; protect the busiest side first.
Dining table clearance chart
Use this space around dining table chart to match a distance with the activity expected on that side. These are planning categories, not universal code guarantees.
| Table-edge clearance | Likely function | What it may support | Main limitation |
|---|---|---|---|
| 24–29″ | Severely constrained | Possible tucked chair or unusual fixed seating | Normal chair pullback and exit may fail |
| 30–32″ | Tight chair edge | Compact chair on a low-traffic side | Difficult passing behind occupied seat |
| 36″ | Everyday baseline | Sitting, standing and basic chair movement | Passing can still be close with deep chairs |
| 42″ | Shared edge | Chair use plus occasional passing | May not suit two-way or mobility-heavy traffic |
| 48″ | Active passage | More comfortable regular movement behind chairs | Large chairs or open storage may need more |
| 54–60″+ | Generous or complex zone | Busy route, service, mobility or multiple operations | Project-specific requirements still control |
How much clearance does your layout leave?
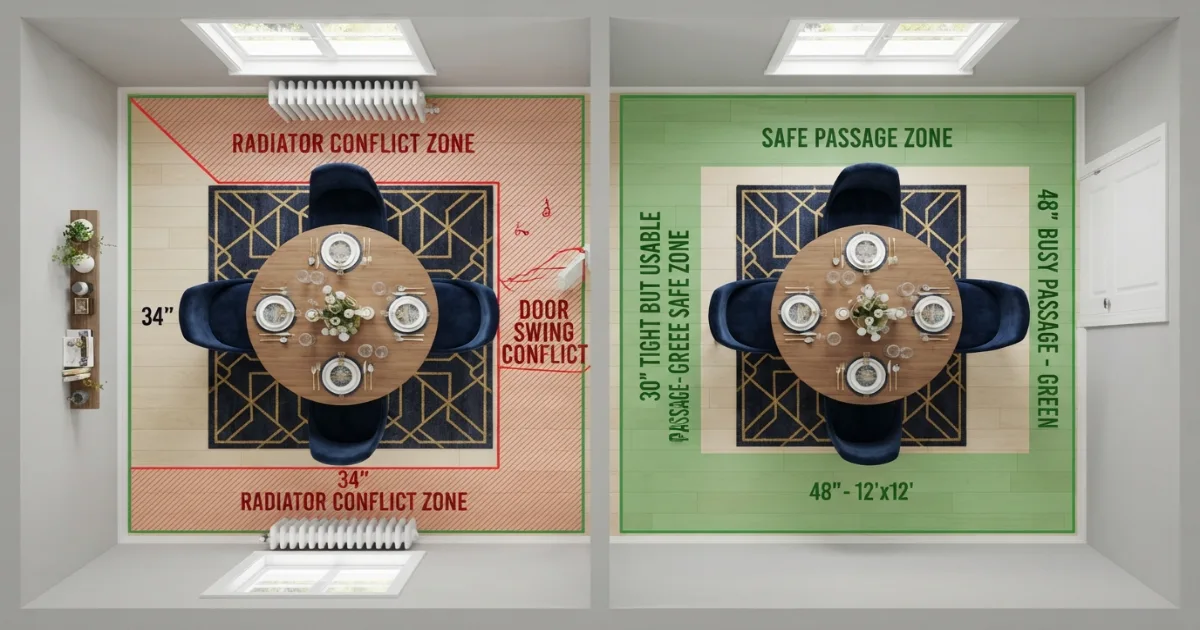
Enter the room, table and sideboard. The tool tests both rectangular orientations, calculates equal side gaps and draws the plan to scale.
The sideboard is placed on the right wall. Clearance is measured to its front, not the wall behind it.
This table leaves 48 inches at the ends and 40 inches at the sides.
The lengthwise orientation meets the selected baseline after the sideboard is subtracted.
Two practical setup aids
After calculating space around dining table edges, use these broad Amazon searches to compare current measuring and floor-marking tools. Verify live specifications and surface compatibility.
Laser Distance Measure
A compact laser measure can speed up wall-to-wall, sideboard and doorway checks. Use a physical tape for short furniture details and to confirm critical readings.
- Check inch and fractional display options.
- Confirm minimum and maximum range.
- Repeat measurements from fixed reference points.
- Do not aim at people or reflective hazards.
Low-Tack Floor-Safe Painter Tape
Mark the tabletop, chair backs, door swing and passage boundary at full size. Confirm the tape is appropriate for the exact floor finish and test an inconspicuous area.
- Choose visible color contrast.
- Check removal-time instructions.
- Do not leave tape beyond maker guidance.
- Photograph the tested layout before removal.
Affiliate disclosure: As an Amazon Associate, HomeStyle Calculator may earn from qualifying purchases at no extra cost to you. Availability and specifications can change.
Understanding the 36-inch dining-table rule
The 36-inch rule is a practical way to reserve space around dining table edges for ordinary chair use. Room & Board currently recommends at least three feet around all sides, while IKEA publishes a minimum reference near 32 inches and says more is better. The difference reflects purpose: a minimum comparison is not the same as a comfortable route.
What it usually supports
With a moderate chair, 36 inches often lets a diner pull out, sit, move toward the table and stand again. It provides a consistent first screen for table shopping: add 72 inches to both tabletop dimensions and compare the result with the usable room.
Example: a 72 × 40-inch table with 36 inches on every side needs a 144 × 112-inch zone. That number excludes a sideboard, radiator, door swing or busier route unless those obstructions already define the measured room.
What it does not guarantee
It does not guarantee that another adult can walk comfortably behind a deep occupied chair. It does not include open drawers, serving activity, a mobility device, a high chair, a person carrying dishes or two-way traffic. It also is not a substitute for accessibility standards or local code.
Use the rule as a baseline, then widen the sides that perform more work. A well-planned table may be deliberately off-center.
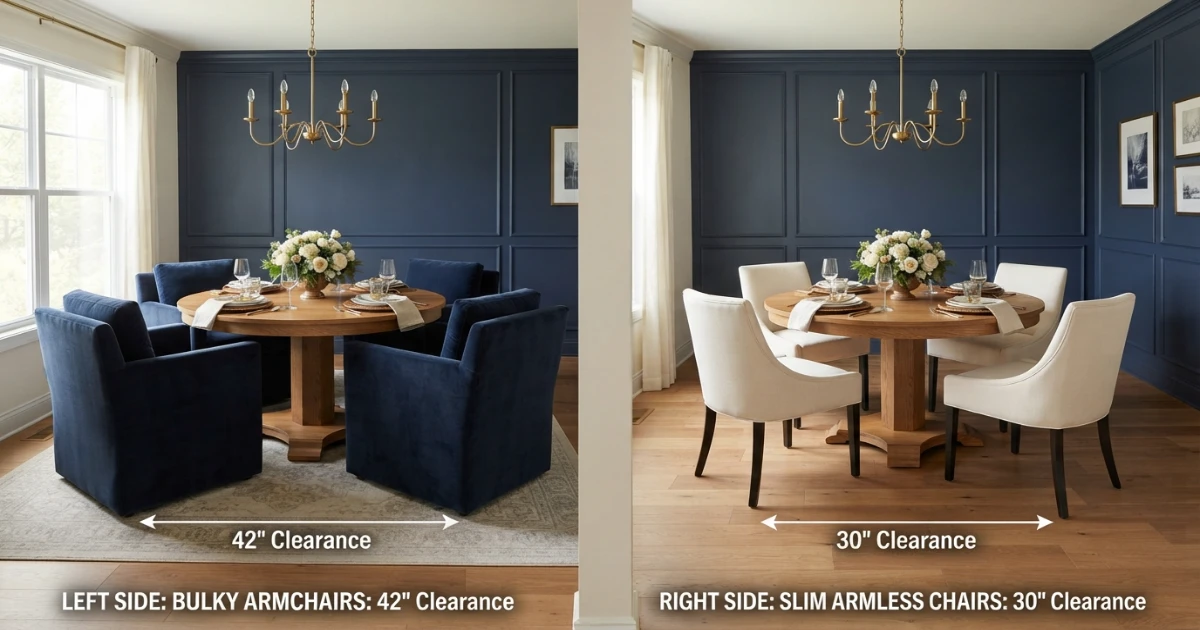
Measure seated, pulled-back and passing positions
Real space around dining table layouts changes as chairs move. Measure at least three chair states instead of treating the chair as a fixed tucked object.
Tucked position
This shows the smallest visual footprint, but it is not the working layout. Check whether arms clear the apron and whether the base allows full tucking.
Occupied position
Measure from tabletop edge to the actual chair back while a household member sits naturally. Cushion compression and body position affect this depth.
Standing position
Pull the chair to the location used for standing and leaving. The rear legs or casters may cross the original 36-inch boundary.
When to use 42, 48 or more inches
Increase space around dining table edges wherever the clearance zone must support two activities at once: a seated diner plus a passing person, an open door, serving from storage or a kitchen approach.
42 inches
This is a useful step up for occasional passing behind many moderate chairs. It adds six inches beyond the basic baseline, which can materially improve a shared edge. Test it with the largest regular chair and the people who use the room.
48 inches
This is a stronger target for a regular passage behind occupied chairs. It gives 12 inches more than the baseline, but broad chairs, mobility needs, serving trays or opposing traffic can still justify more.
54–60 inches or project-specific
Busy service, two-way movement, public settings and accessibility-conscious plans require more detailed analysis. Do not turn a residential rule into a universal compliance statement.
Sideboards, doors, drawers and radiators
Storage can quietly consume the planned space around dining table edges. Measure to the sideboard front, then add the operation performed in front of it.
Sideboard and buffet
A closed 18-inch cabinet reduces the usable room by 18 inches. If drawers open 16 inches and someone stands in front, the event footprint is larger. Decide whether storage is used during meals or only occasionally. The chair nearest the cabinet must be able to stand without trapping the user.
Sliding doors remove a swing but not the standing zone. Wall-mounted cabinets preserve visible floor but still project at chair-back height.
Door swing and entry route
Draw the complete door arc and handle. The table, occupied chair and pulled chair should remain outside the required operation. An open doorway without a leaf still needs a protected approach; avoid making every entrant squeeze behind a diner.
Radiators, window projections and floor vents also define real boundaries. Maintain maker safety and airflow guidance rather than using the wall behind them as the clearance line.
Clearance does not need to be equal on every side
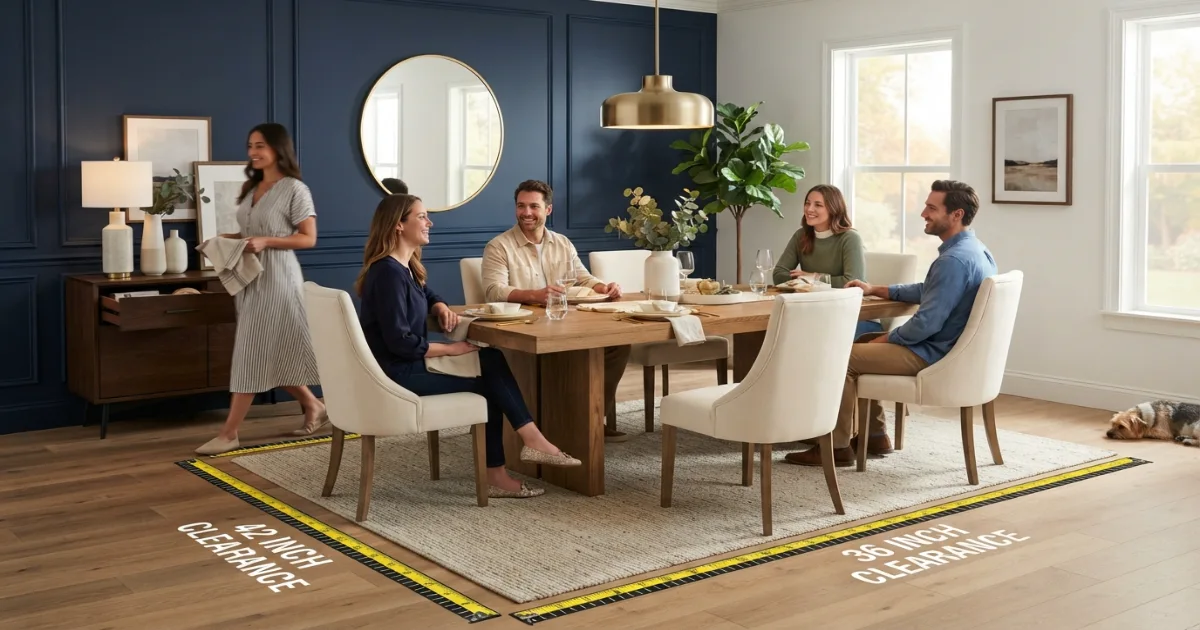
In a compact room, equal space around dining table edges may waste the quiet side and compress the active side. An asymmetric layout can be more functional.
Tighten the low-traffic edge
A tested 30- to 32-inch wall side may be acceptable with a slim chair when nobody passes behind it. Shift the recovered inches to the kitchen approach, doorway or storage side. Do not tighten both sides until every regular diner can stand and exit.
Choose furniture that supports the plan
Use slim armless chairs, a table with clear chair bays and storage that does not swing into the route. An extendable table can preserve daily clearance and use a tighter temporary layout for guests. Visual lightness helps appearance but does not change the measured footprint.
Banquettes, benches and high chairs
Some seating behaves differently from a loose dining chair. The tabletop-edge formula is still a useful first screen, but the final test must follow how each person enters, sits and leaves.
Fixed banquette
A wall banquette does not need chair pullback behind the sitter, so it can recover valuable floor area. However, diners may need to slide sideways, the table base must allow knee access, and an end diner should not trap everyone else. Measure the seat-front-to-table gap, cushion compression, table overhang and the open entry end. Keep the opposite side generous enough for loose chairs and the main route.
Loose bench
A backless bench looks shallow when tucked beneath a table, but it moves outward when people sit. Tape its working position, not only its storage position. Long benches also encourage several diners to stand at once, so the exit side may need more room than a single chair. Confirm that table legs do not block the bench from tucking or force the end users into a corner.
High chair or booster
A freestanding high chair can project farther than an adult chair because of its rear legs and tray. Add the caregiver’s approach and the space needed to lift or buckle a child. Keep it away from a door swing, hot serving route and unstable furniture. If a booster attaches to a dining chair, measure the combined occupied depth and follow the manufacturer’s installation limits.
Plan every extendable-table state
An extension leaf changes more than tabletop length. It can reduce end clearance, move the table under a pendant, reposition legs and add chairs exactly where the room is tightest. Record the closed, everyday and fully extended dimensions before buying.
Daily state
Design the everyday layout for easy circulation rather than permanently accepting the guest-day compromise. Center the closed table only if that protects the active route. Store leaves where they can be reached without moving the table, and check whether the extension mechanism itself needs temporary working space.
For example, a 60-inch table in a 12-foot-long usable zone leaves 42 inches at each end. Extending it to 84 inches reduces that to 30 inches. The table may physically fit, yet the end seats and doorway route can become impractical.
Guest state
Tape the full top, every extra chair and all occupied chair backs. If the event layout intentionally drops below the everyday target, identify which route stays open and whether diners can exit without asking several people to stand. A temporary furniture move can be sensible; blocking an entry, heat source or required route is not.
Also check leaf seams, base position and the usable chair width at the ends. A capacity label does not prove that the added seats or the resulting space around dining table edges work in your room.
Rug, lighting and floor-transition checks
Dining rug
The rug should remain beneath the rear chair legs through normal sitting and standing movement; otherwise a leg can catch the edge. Test the actual chair pullback, then choose a rug that extends beyond the tabletop far enough for that motion. A rug border does not replace required room clearance—the chair still needs space beyond the table.
Pendant or chandelier
Centering a light on the room can conflict with an intentionally offset table. Establish the best furniture position first, then coordinate the fixture with the tabletop. For an extendable table, decide whether the light aligns with the daily state, the extended state or an adjustable track. Verify fixture height separately from floor clearances.
Floor changes and thresholds
A thick rug edge, raised threshold or uneven transition can affect chair movement and mobility. Keep frequently moved chair legs on one consistent surface where possible. Tape alone will not reveal rolling resistance or snagging, so test with the real chair and rug pad before final installation.
Dining-table clearance buying checklist
Dimensions to collect
- Finished usable room length and width, excluding fixed projections.
- Exact tabletop length, width or diameter in every extension state.
- Table-base footprint, apron height and clear chair bays between legs.
- Chair width, total depth, occupied back position and pullback position.
- Sideboard depth, handles, open drawer depth and standing zone.
- Door arcs, main traffic route, radiator and floor-vent boundaries.
Tests to complete
- Calculate both table orientations rather than assuming the visual favorite.
- Tape the full table and occupied-chair envelope at floor level.
- Walk the route while another person sits in the largest regular chair.
- Open every nearby door, drawer and appliance in the taped plan.
- Repeat the test for guest leaves, high chairs and mobility equipment.
- Confirm delivery access and exact product specifications before ordering.
The purchase is ready only when the measured space around dining table furniture supports the room’s busiest realistic state—not merely an empty room with every chair tucked away.
How to calculate dining-table clearance
1. Measure the usable room
Record finished surfaces and subtract sideboards, radiators and fixed projections.
2. Measure the tabletop
Use exact length and width, or diameter. Record every extended state separately.
3. Test orientation
Match each tabletop dimension with the corresponding usable room dimension, then rotate.
4. Subtract and divide
Room minus table, divided by two, gives equal clearance on opposite sides.
5. Widen busy sides
Shift the table or reduce its size to protect walking, doors and storage operation.
6. Tape every state
Mark table, occupied chairs, pulled chairs, door arcs and passing boundaries.
The 36-inch rule is not a complete accessibility standard
Residential planning guidance and regulatory compliance answer different questions. The U.S. Access Board provisions for covered dining surfaces address clear floor or ground space, forward approach, knee and toe clearance, surface height and scoping. An accessible route and turning or maneuvering needs may also affect the surrounding plan.
Use the U.S. Access Board Chapter 9 and other applicable project requirements when accessibility standards apply. For a private home, plan around actual users: chair transfer, mobility devices, caregiver assistance, reach, vision and the safest route may require more than a generic chart.
Common dining-table clearance mistakes
Measuring from tucked chairs
General clearance starts at the tabletop edge. Then the moving chair is tested inside that zone.
Using 36 inches everywhere
A busy route may need 42–48 inches; a quiet tested edge may use less. Function should vary the plan.
Ignoring the sideboard front
The cabinet—not the wall behind it—is the boundary, and open doors or drawers add another state.
Forgetting table extension
Every leaf changes end clearance, chair count, leg position and sometimes the lighting relationship.
Trusting a scaled photo
Wide-angle product images hide pinch points. Use drawings, exact dimensions and floor tape.
Treating guidance as code
Residential comfort rules do not replace accessibility standards, local rules or project review.
Five clearance examples
72 × 40 table in a 14 × 10 ft room
The room is 168 × 120 inches. End clearance is (168 − 72) ÷ 2 = 48 inches; side clearance is (120 − 40) ÷ 2 = 40 inches. Chair use passes the baseline and the ends can support a stronger route.
60-inch round in an 11 × 11 ft room
The room is 132 inches square. (132 − 60) ÷ 2 = 36 inches on every side. It fits exactly at the baseline before storage, trim or a wider passage is added.
48-inch round in a 10 × 10 ft room
The room is 120 inches square. (120 − 48) ÷ 2 = 36 inches. The result has no tolerance beyond the baseline; a 42-inch top leaves 39 inches on each side.
84 × 40 table in a 12 × 12 ft room
End clearance is (144 − 84) ÷ 2 = 30 inches; side clearance is 52 inches. The ends are tight while the sides are generous. A shorter table or open adjoining zone is better for daily use.
15-inch sideboard in a 12-foot room
The usable axis becomes 129 inches. A 60-inch table leaves (129 − 60) ÷ 2 = 34.5 inches from the opposite wall and sideboard front if centered. Shift or reduce the table to achieve a 36-inch chair edge.
How much space should you leave?
Use 36 inches from the tabletop edge as the practical starting point, 42 inches for an occasional shared route and about 48 inches for regular passing behind occupied chairs. Treat 30–32 inches as a tested tight edge, not an equal substitute for a normal walkway.
The right space around dining table furniture protects the actual chair, route, door and storage states. Calculate each axis, test both orientations, widen the busiest side and tape the complete layout. Use the Dining Table Size Calculator if the room does not support the planned tabletop.
Planning references
Room & Board currently recommends at least three feet around all table sides; IKEA publishes a 32-inch minimum buying reference and says more is better. See Room & Board dining-room guidance and IKEA dining-table planning guidance. Product dimensions, chairs and project requirements vary.
Space around dining table FAQs
How much space should be around a dining table?
About 36 inches from the tabletop edge to a wall or fixed obstruction is a practical everyday starting point. Use roughly 42 to 48 inches where someone regularly passes behind occupied chairs, and treat 30 to 32 inches as a tighter low-traffic edge that needs an actual chair test.
What is the 36-inch rule for dining tables?
The rule means planning approximately 36 inches from every tabletop edge to the nearest wall or fixed furniture. It provides basic chair-use room, but it may not provide comfortable passing behind a seated person or space to open storage.
Is 30 inches enough behind a dining chair?
Thirty inches can work on a tight low-traffic side with a compact chair, but it usually does not support easy passing behind an occupied seat. Test the actual chair in occupied and pulled-back positions before accepting it.
How much space is needed to walk behind dining chairs?
Around 42 inches may support occasional passing behind many dining chairs, while about 48 inches is a stronger target for a regular route. Chair depth, body size, mobility needs and traffic frequency can require more.
Do I measure clearance from the table or chair?
Use the tabletop edge as the consistent origin for general room-planning measurements. Then test the actual occupied chair back and pulled-back position inside that zone, because chair depth varies.
How far should a dining table be from a sideboard?
Start around 36 inches from table edge to sideboard front for chair use, then add space if drawers or doors open, someone serves from the cabinet or people pass through the same zone. Measure handles and open projections too.
How far should a dining table be from a doorway?
Keep the table and occupied chairs outside the door swing and protected entry route. A busy doorway often benefits from 42 to 48 inches or more from the table edge, depending on chair depth and door operation.
Can dining-table clearance be different on each side?
Yes. A low-traffic wall side may use a tighter tested clearance while a kitchen approach or through-route receives more. An asymmetric layout is better than centering the table and compressing the busiest path.
Does the 36-inch rule meet accessibility requirements?
Not automatically. The 36-inch planning rule is residential layout guidance, not a complete accessibility or code standard. Covered projects may require clear floor space, accessible routes, knee and toe clearance, surface height and other provisions.
Where can I calculate dining table clearance?
Use the clearance calculator on this page for exact room and table dimensions, then use the HomeStyle Calculator dining table size calculator when you also need a recommended tabletop size.