Find the right chandelier for any ceiling.
Enter your dining table, room dimensions, foyer ceiling height or kitchen island length, choose the fixture’s purpose and style, and get an instant diameter and mounting height — using the same proportion rules lighting designers rely on. No more chandeliers that swallow a small room or disappear under a tall one.
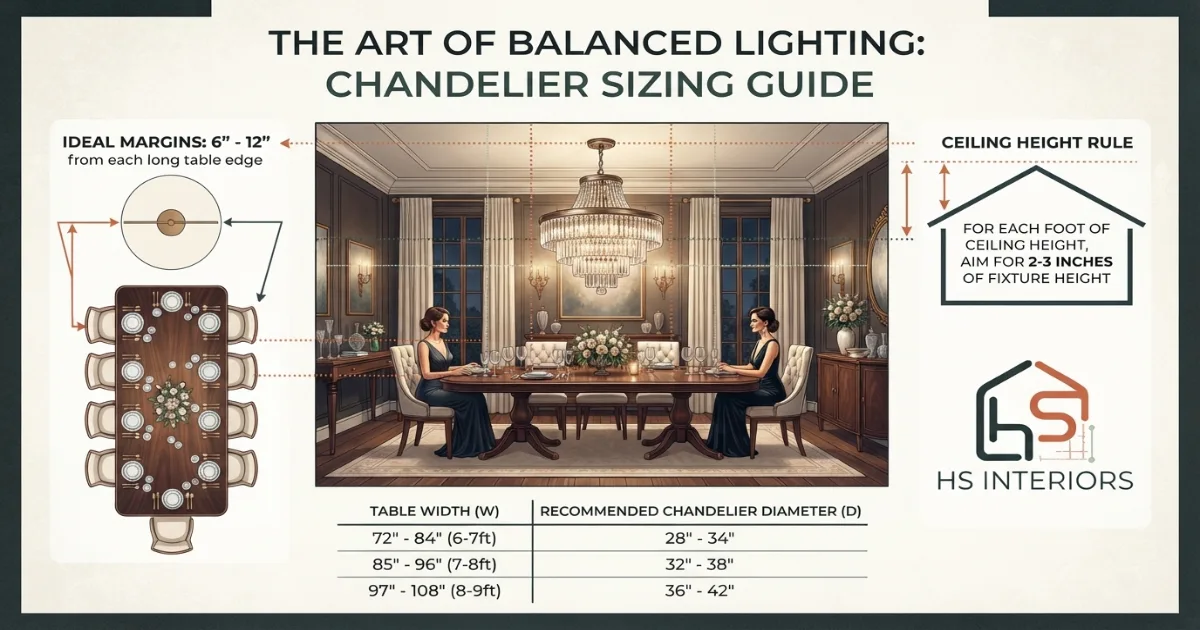
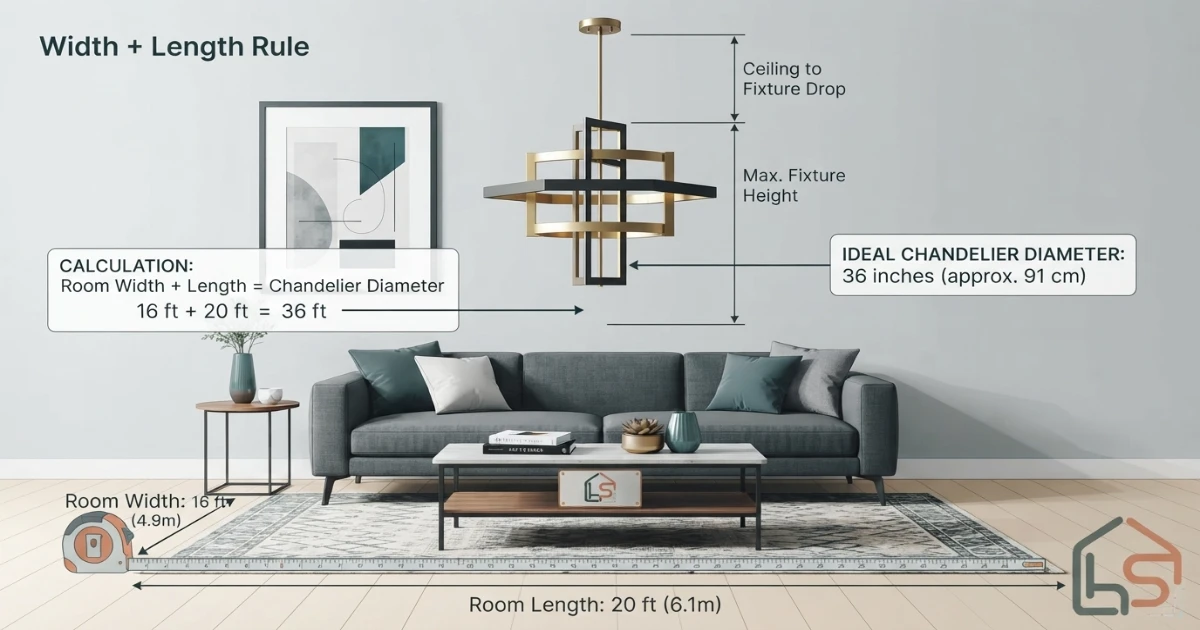
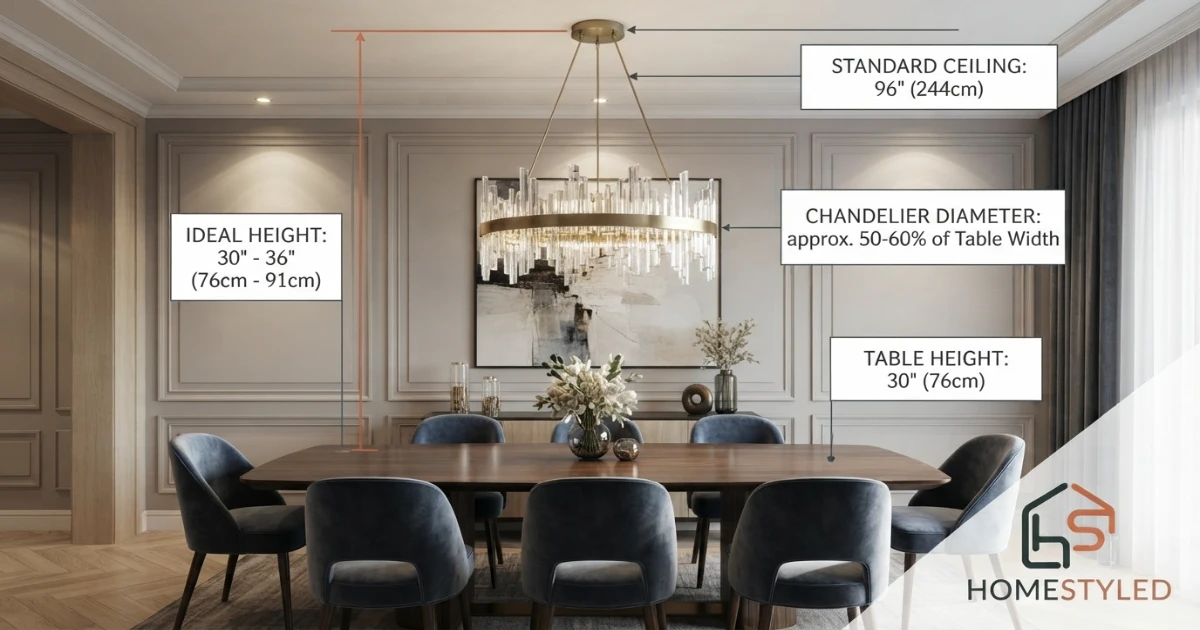
Add a room’s width and length in feet to get the chandelier’s diameter in inches. Above a dining table, stay about 12 inches narrower than the tabletop. Hang the fixture 30 to 36 inches above the table, adding roughly 3 inches per extra foot of ceiling height.
Standard chandelier sizes by purpose and room dimension.
These estimates assume a classic fixture style. Use the calculator above for a size matched to your exact table, room or island dimensions.
| Purpose | Room / Furniture Size | Recommended Diameter | Mounting Height | Notes |
|---|---|---|---|---|
| Dining table | 60–72 in table | 20–30 in | 63–66 in (drop 30–36 in) | Stay 12 in narrower than table |
| Living / dining room | 12×14 ft (26 ft sum) | ~26 in | 84 in minimum clearance | Width + length = diameter |
| Great room / large room | 16×20 ft (36 ft sum) | ~36 in | Ceiling-height dependent | Consider two smaller fixtures |
| Foyer / entryway | 10–12 ft ceiling | 25–36 in | 84 in minimum clearance | Diameter ≈ 2.5–3× ceiling ft |
| Two-story foyer | 18–20 ft ceiling | 36–44 in | Chain to reach ~84 in | Use adjustable chain, not fixed rod |
| Kitchen island | 72–96 in island | Fixture spans ~66% of length | 66–72 in (drop 30–36 in) | Linear bar or 3–4 pendants |
Four common chandelier placements — and the rule each one follows.
Where a chandelier hangs changes the proportion rule that applies to it. Here is what each purpose is built for and the sizing logic behind it.
Dining Table
Sized to stay narrower than the table on every side so seated guests aren’t crowded by the fixture. Hung with a drop long enough to sit well above eye level while seated.
Width: table width − 12 inRoom / Living Space
Follows the width-plus-length rule: adding the room’s two dimensions in feet gives a diameter in inches that reads as proportional to the space as a whole, not just the furniture below it.
Diameter: room W + L (ft → in)Foyer / Entryway
Scaled to the ceiling height rather than the floor plan, since a foyer’s defining feature is verticality. Taller ceilings support a larger fixture and a longer chain drop.
Diameter: ceiling ft × 2.5–3Kitchen Island
A linear fixture or row of pendants sized to about two-thirds the island’s length, leaving clearance on each end so the light spreads evenly without overwhelming the counter.
Span: ~66% of island lengthSee how chandelier size changes by placement.
These steps cover the essentials: measuring the room or furniture, applying the right ratio or sum formula, and confirming mounting height before you buy or install.
Measure the table or room
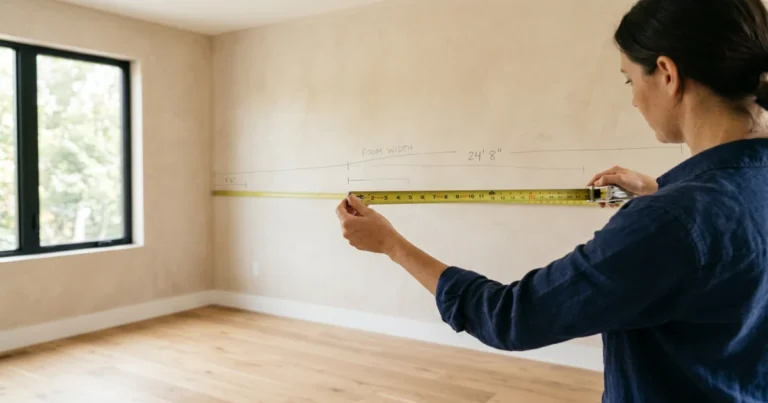
Start with table width, or room width and length, before choosing a chandelier. Note ceiling height and the electrical box location.
Apply the right formula
Dining tables need a margin on each side, while whole rooms follow the width-plus-length-in-feet rule for a balanced diameter.
Confirm mounting height
Keeping at least 7 feet of floor clearance in walkways, and 30 to 36 inches above a tabletop, keeps the fixture safe and functional.
How to choose a chandelier size — the complete guide.
The most common chandelier mistake is choosing a fixture sized for the ceiling opening rather than the room it fills. A chandelier that looks fine in a showroom, where it hangs alone against a tall white wall, can look tiny in a furnished room or oversized in a small one. Sizing against the room’s actual footprint, not the fixture’s standalone appearance, is what keeps the proportions right.
Step 1: Measure the room, table or island
Start by measuring the width and length of the room the chandelier will hang in, or the width of the dining table, or the length of the kitchen island, depending on the fixture’s job. Also note the ceiling height and the location of the existing electrical box, since a chandelier can only be centered where the wiring allows unless you plan to have an electrician relocate it. For a room with an irregular shape, use the widest rectangular footprint that contains the main seating or dining area rather than the full irregular perimeter.
Step 2: Apply the width-plus-length rule for whole rooms
For a chandelier meant to light an entire living room, family room or open-plan dining area rather than sit directly above one piece of furniture, add the room’s width and length together in feet, then use that number as the chandelier’s diameter in inches. A 12 by 14 foot room, for example, sums to 26 feet, suggesting a chandelier around 26 inches across. This formula scales naturally: a small 10 by 10 foot room calls for a compact 20 inch fixture, while a large 18 by 22 foot great room calls for a substantial 40 inch fixture, or a pair of smaller ones spaced across the ceiling instead of one oversized piece.
Step 3: Apply the narrower-than-the-table rule for dining fixtures
Above a dining table, subtract roughly 12 inches total from the table’s width, splitting that margin evenly so the chandelier reads as clearly narrower than the table on both the left and right sides. A 72 inch table therefore suits a chandelier in the 24 to 36 inch range depending on style, while a compact 48 inch table calls for something closer to 20 to 24 inches. This margin keeps the chandelier from crowding place settings or interfering with anyone standing to reach across the table, and it avoids the visually top-heavy look of a fixture that spans edge to edge with the tabletop.
Step 4: Choose a fixture style and adjust accordingly
A minimal or open-frame chandelier, built from thin metal or exposed bulbs, can sit at the larger end of the calculated range without feeling heavy, since there’s little solid visual mass beyond the light sources themselves. A classic tiered or candelabra-style fixture sits in the middle of the range. A statement chandelier, with a large drum shade, dense crystal strands or an oversized sculptural form, effectively adds visual weight beyond its physical dimensions, so sizing the fixture itself slightly smaller than the calculated maximum usually keeps the room feeling balanced rather than crowded.
Step 5: Set the mounting height for the room’s purpose
Above a dining table, the bottom of the chandelier should sit 30 to 36 inches above the tabletop for a standard 8 foot ceiling, which keeps the fixture well above eye level for seated guests without pushing it up near the ceiling where it loses visual impact. For every additional foot of ceiling height beyond 8 feet, add roughly 3 inches to that drop. In an open room without a table beneath it, the priority shifts to floor clearance: keep the lowest point of the chandelier at least 7 feet, or 84 inches, above the floor in any area people walk through, and higher still if anyone in the household is unusually tall.
Step 6: Size a foyer or entryway chandelier to the ceiling height
A foyer chandelier is sized differently from the other categories because its defining feature is height rather than floor area. As a starting point, multiply the ceiling height in feet by roughly 2.5 to 3 to get a suggested diameter in inches: a 10 foot ceiling suits a fixture around 25 to 30 inches, while a 14 foot ceiling supports something closer to 35 to 42 inches. In every case, keep the lowest point of the fixture at least 7 feet above the floor, and check that a person opening the front door with an armload of packages still has clear headroom.
Step 7: Handle two-story and cathedral foyers
In a two-story entry or a great room with a cathedral ceiling, the ceiling height can run to 18 or 20 feet or more, which changes both the sizing and the installation approach. The diameter formula still applies loosely, but most designers cap a single fixture around 40 to 48 inches even in very tall spaces, since anything larger becomes difficult to source, ship and safely mount. Instead of a fixed-length rod, use an adjustable chain or cable system so the chandelier’s height can be fine-tuned after installation, and confirm the fixture hangs roughly at or slightly above the level of the second-floor landing so it reads as part of both floors rather than sitting awkwardly low or high.
Step 8: Size a linear fixture or pendant row for a kitchen island
Over a kitchen island, the goal is even light across the counter rather than a single dramatic centerpiece. A linear chandelier or bar fixture should span roughly two-thirds of the island’s length, leaving clearance at each end so the fixture doesn’t overhang the island’s short sides. If using multiple pendants instead of one linear piece, space them evenly with roughly 24 to 30 inches between centers, and keep the outermost pendants inset a few inches from the island’s ends. Hang the fixture 30 to 36 inches above the countertop, low enough to focus light on the work surface but high enough that it doesn’t interfere with anyone standing at the island.
Step 9: Plan wattage and bulb count before buying
A chandelier’s stated size doesn’t guarantee adequate light output on its own. As a rough starting point, plan for roughly 1.5 to 2 watts of equivalent incandescent brightness per square foot of room area for general ambient lighting, then adjust upward for dining and task areas where more direct light is useful. Most dining chandeliers carry between 4 and 8 bulbs, and pairing the fixture with a dimmer switch lets the same chandelier work for both a bright, functional dinner and a softer, more atmospheric evening setting without needing a second fixture.
Step 10: Confirm the ceiling can support the fixture’s weight
Larger chandeliers, especially those with substantial metal frames, crystal strands or multiple tiers, can weigh considerably more than they appear to from a product photo. Standard residential electrical boxes are rated for lighter fixtures; anything heavier than about 50 pounds typically needs a fixture-rated box mounted to a ceiling joist or a separate support brace, which a licensed electrician can install if the existing box isn’t rated for the load. Always check the manufacturer’s listed weight against the box’s rating before finalizing a purchase, particularly for statement-style fixtures.
Step 11: Adapt for sloped or vaulted ceilings
A chandelier mounted directly to a sloped or vaulted ceiling through a standard rigid rod will hang at an angle rather than straight down, which looks unintentional and can strain the mounting hardware over time. Most chandeliers rated for sloped ceilings include, or can be paired with, a sloped-ceiling adapter kit that uses a swivel joint to let the fixture hang plumb regardless of the ceiling’s pitch. Because a sloped ceiling is higher at the fixture’s attachment point than at the center of the room, plan for a longer drop length than a flat-ceiling calculation would suggest, and remeasure the finished height once the fixture is hung rather than relying on the flat-ceiling formula alone.
Step 12: Consider multiple smaller fixtures over one oversized piece
In a very large room, an elongated dining table, or a great room with a long great-room table, a single chandelier sized to the width-plus-length formula can become impractically large, expensive or heavy to install safely. In these cases, two or three smaller matching fixtures spaced evenly along the table’s or room’s length often look more proportional and provide more even light coverage than one giant piece. As a rule of thumb, divide the calculated diameter by 1.5 to 2 for each of two fixtures, or by roughly 2.5 for each of three, and space them with equal gaps so the arrangement reads as a considered composition rather than a mismatched cluster.
Step 13: Match finish and scale to nearby fixtures
A dining chandelier rarely hangs in visual isolation. If a kitchen island pendant, foyer fixture or wall sconces are visible from the same sightline, keeping the metal finish consistent, such as brushed brass throughout or matte black throughout, reads as more intentional than mixing several different finishes in adjoining rooms. Scale matters too: a delicate, thin-armed chandelier paired with heavy, oversized pendants nearby can look mismatched even if both are individually well-sized for their own space, so it’s worth stepping back and considering the whole sightline rather than sizing each fixture in isolation.
Step 14: Account for low ceilings
In rooms with an 8 foot ceiling or lower, a traditional chandelier with a long drop can eat into the minimum clearance needed above a table or walkway. In these spaces, a semi-flush chandelier, which mounts close to the ceiling with only a few inches of drop, achieves a similar decorative effect without sacrificing headroom. When calculating diameter for a semi-flush fixture, the same width-plus-length or table-width formulas still apply; only the drop length changes, typically to 4 to 10 inches rather than 30 or more.
Step 15: Plan for cleaning and long-term maintenance
Larger and more ornate chandeliers, particularly those with crystal or glass elements, accumulate dust and require more maintenance than a simple drum-shade fixture. Before committing to a heavily detailed statement piece, consider how it will be cleaned: some fixtures lower on a pulley system for easier access, while others require a tall ladder or professional service. This is less a sizing question than a livability one, but it often influences which size and style within the calculated range makes the most sense for a given household.
Step 16: Recheck the size once the room is furnished
A chandelier calculated against bare room dimensions can look different once furniture, rugs and window treatments are in place, since a fully furnished room reads visually smaller than an empty one. If possible, hold off on final measurements until major furniture placement is settled, or revisit the calculation afterward. As with wall mirrors, taping the fixture’s diameter onto the ceiling with painter’s tape before ordering gives a far more reliable sense of scale than picturing the size from a product listing alone.
Chandelier buying rules that prevent an oversized ceiling.
A calculator gives the best starting numbers, but the final purchase still depends on ceiling height, wiring location, and how the fixture interacts with the furniture below it. The rules below cover the details worth checking even after settling on a size.
For most rooms, add the width and length in feet to get the chandelier’s diameter in inches, keep the lowest point at least 7 feet above the floor, and choose a fixture finish that matches the room’s existing metal tones rather than introducing a new one.
Size to the room, not the box
Use the room’s actual footprint or the table’s actual width, not the fixture’s appearance alone in a showroom, to judge whether a size will work.
Keep 7 feet of floor clearance
In any area people walk through, the lowest point of the chandelier should sit at least 84 inches above the floor to avoid a hazard.
Confirm the electrical box rating
Heavier fixtures need a joist-mounted, fixture-rated box rather than a standard lightweight ceiling box; check the manufacturer’s listed weight first.
Plan for sloped ceilings early
A sloped-ceiling adapter kit and a longer drop length are usually needed to keep the fixture hanging straight rather than at an angle.
Helpful room planning topics.
A chandelier rarely stands alone in a room’s design. Once you know your size, it helps to plan the surrounding elements at the same time — wall color beneath the fixture, furniture scale at table height, and rug placement below it. Use these supporting pages from the HomeStyle Calculator homepage to plan the rest of the room.
Six things designers always check before buying a chandelier.
Tape the diameter on the ceiling first
Cut a circle of paper or use painter’s tape to mark the fixture’s exact diameter overhead. This catches sizing mistakes far faster than imagining the size from a product listing.
Center on the table, not the room
Above a dining table, center the chandelier over the table itself rather than the room’s geometric center, since the two rarely align exactly.
Add a dimmer for every dining chandelier
A dimmer switch lets one fixture handle both bright everyday use and softer evening entertaining without needing a second light source.
Size up in open-plan spaces, not down
A larger chandelier in an open-plan living and dining area reads as intentional; an undersized one tends to look lost against the surrounding space.
Check the box rating before falling for a heavy piece
A statement chandelier with crystal or a dense metal frame often needs a joist-mounted, fixture-rated electrical box rather than a standard one.
Match finish across the sightline
If a foyer fixture, island pendants and dining chandelier are all visible from one vantage point, keeping their metal finish consistent reads as more deliberate.
Chandelier sizing questions — answered.
More calculators for every room decision.
Every tool uses professional designer formulas. Free, instant, no sign-up — just enter your room and get the exact answer.
Bookmark HomeStyle Calculator for every ceiling in the house.
From a dining room chandelier to a two-story foyer fixture, our free tools give you the exact size and mounting height before you buy.