Find the right island for any kitchen.
Enter your available wall run, island length, kitchen width or overall kitchen footprint, choose a seating height, and get an instant recommendation for island size, seating capacity and walkway clearance — using the same proportion rules kitchen designers rely on. No more islands that block traffic or leave no room to cook.
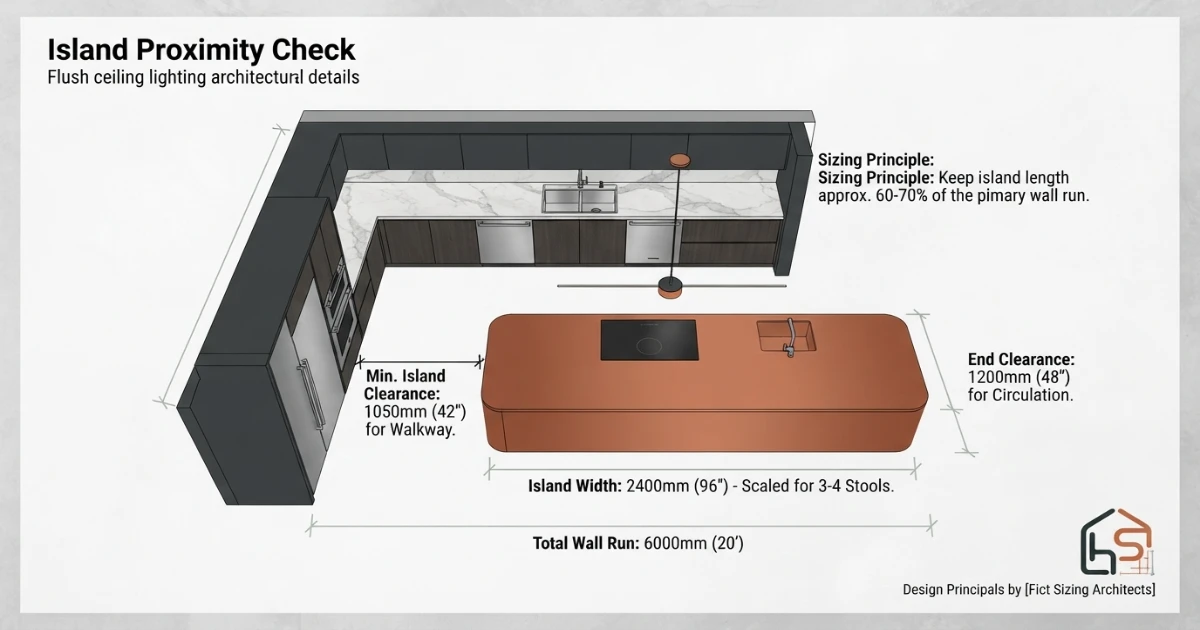
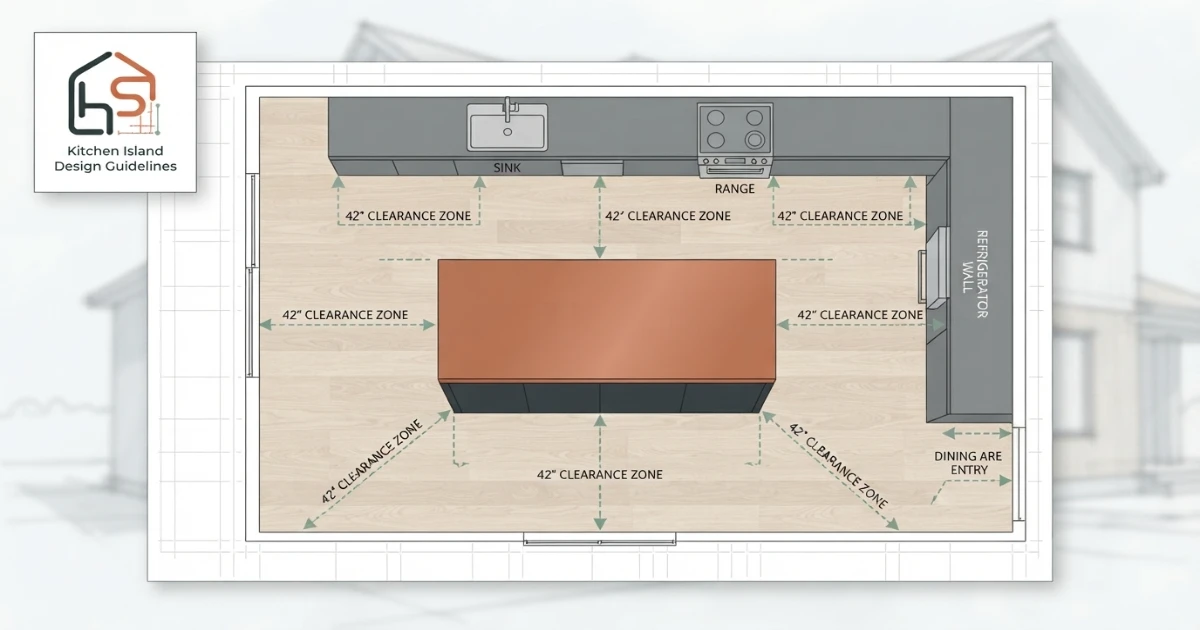
Subtract 42 inches of clearance from each end of the open wall run to get a workable island length. Keep at least 42 inches of clearance on every side, 48 inches for two cooks. Plan roughly 24 inches of counter width per seat.
Standard island sizes by kitchen dimension and purpose.
These estimates assume counter-height seating. Use the calculator above for a size matched to your exact kitchen run, width or overall footprint.
| Purpose | Kitchen Dimension | Recommended Island | Clearance | Notes |
|---|---|---|---|---|
| New island | 12–14 ft wall run | 72–96 in long, 36 in deep | 42 in each end | Run − 84 in = island length |
| Seating capacity | 84 in island | 3 seats at 24 in each | 36 in behind stools | Length ÷ 24 in = seat count |
| Walkway clearance | 10–11 ft kitchen width | Island depth up to 30 in | 42 in both sides | Width − 84 in = max depth |
| Walkway clearance | 13+ ft kitchen width | Island depth up to 42 in | 48 in for two cooks | Wider kitchens allow larger islands |
| Full kitchen fit | 10×10 ft (100 sq ft) | Minimum viable, 60–72 in island | 42 in minimum | Smallest footprint for a fixed island |
| Full kitchen fit | 14×16 ft (224 sq ft) | 96–120 in island | 48 in comfortable | Room for prep sink or cooktop |
Four things you might be solving for — and the rule each one follows.
What you’re sizing changes the formula that applies. Here’s what each purpose is built for and the logic behind it.
New Island
Sized against the open wall run so it leaves 42 inches of clearance on every end, keeping the kitchen’s main walkway usable while the island still fits comfortably.
Length: wall run − 84 inSeating Capacity
Follows the 24-inch-per-seat rule, so a known island length translates directly into how many people can comfortably sit and eat at the counter.
Seats: length ÷ 24 inWalkway Clearance
Works backward from the kitchen’s total width to find the largest island depth that still leaves the recommended clearance on both sides.
Depth: width − (2 × 42 in)Full Kitchen Fit
Checks the kitchen’s overall footprint against the 10-by-10-foot minimum most designers use before recommending a fixed island at all.
Feasibility: W + L (sq ft check)See how island size changes with clearance and layout.
These steps cover the essentials: measuring the available run, applying the right clearance rule, and confirming seating before you build or buy.
Measure the wall run or kitchen
Start with the open floor run, or the kitchen’s overall width and length, before choosing an island size. Note appliance and door swing locations.
Apply the right clearance rule
New islands need clearance at each end of the run, while depth against kitchen width determines how far the island can extend toward the counters.
Confirm seating and overhang
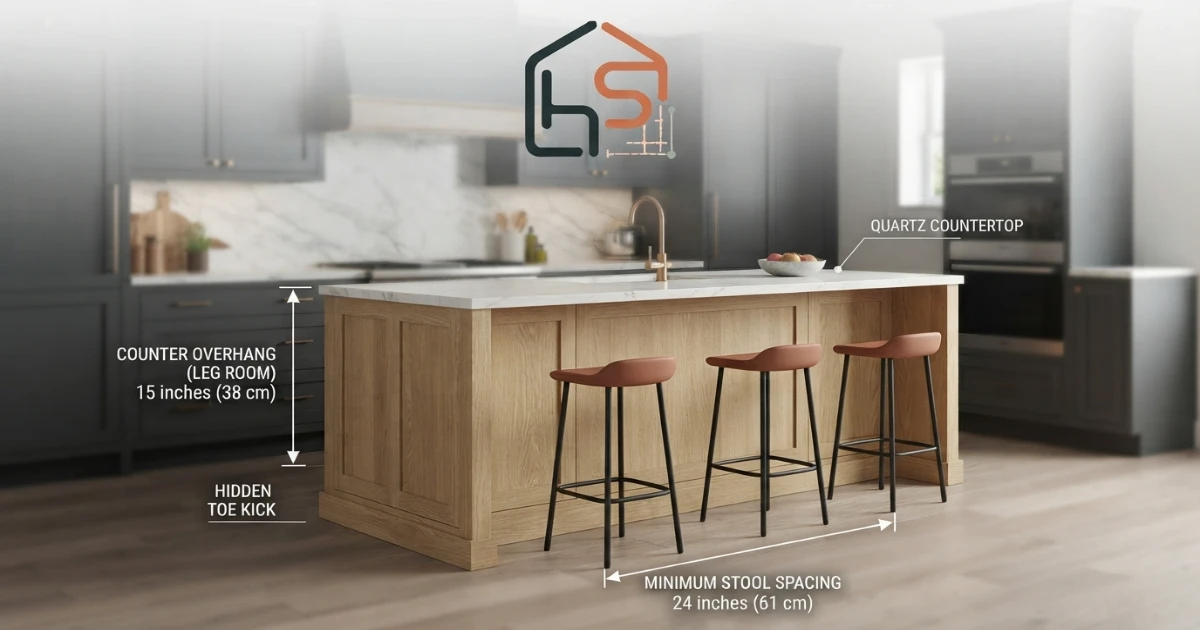
Planning 24 inches per seat and the right overhang for counter or bar height keeps stools comfortable without crowding the walkway.
How to size a kitchen island — the complete guide.
The most common island mistake is sizing the island to the floor plan drawing instead of the clearance a real body needs to move around it. An island that looks balanced on paper can leave barely enough room to open the dishwasher or squeeze past someone at the stove. Sizing against required clearance first, then fitting the island into what’s left, is what keeps a kitchen functional.
Step 1: Measure the available run or kitchen footprint
Start by measuring the length of the open wall run where the island will sit, or the kitchen’s overall width and length if you’re checking whether an island fits at all. Note the location of existing appliances, doorways and door swings, since an island can only be centered where those elements allow. For an L-shaped or galley kitchen, measure the narrowest point between the island’s intended location and the opposite counter, not just the widest part of the room.
Step 2: Apply the clearance-first rule for a new island
Subtract roughly 42 inches from each end of the available wall run to find a workable island length, leaving 84 inches of total clearance split between both ends. A 14 foot, or 168 inch, run therefore suits an island around 84 inches long. In a busy kitchen where two people cook at once, or where the island sits on a route to another room, increase that clearance to 48 inches per side instead of 42.
Step 3: Check island depth against kitchen width
For the island’s depth, or how far it extends from front to back, subtract twice the clearance distance from the kitchen’s total width. An 11 foot, or 132 inch, wide kitchen with 42 inches of clearance on each side supports an island depth up to about 48 inches, though most working islands stay closer to 36 to 42 inches to leave a comfortable margin. Narrower kitchens under 10 feet wide usually can’t support a full working island without dropping below the recommended clearance.
Step 4: Plan seating capacity around the 24-inch rule
Divide the island’s length by 24 inches to estimate how many stools will fit comfortably, since each seated guest needs roughly that much counter width for elbow room. An 84 inch island seats about three people, while a 120 inch island seats five. Leave a few extra inches at each end of the seating run so the outermost stool isn’t pushed flush against an adjacent wall, appliance or cabinet.
Step 5: Choose a seating height and match the overhang
A standard 36 inch counter height needs about 15 inches of overhang beyond the cabinet base to give a stool user’s knees room underneath. A 42 inch bar height needs closer to 12 inches of overhang, since taller stools sit with the footrest higher and closer to the counter’s edge. An island used only for food prep, with no stool seating planned, doesn’t need any overhang at all and can be sized purely around clearance and workspace.
Step 6: Confirm the minimum kitchen size for a fixed island
Most designers recommend at least a 10 by 10 foot kitchen, or about 100 square feet, before adding a permanent island, since anything smaller usually can’t fit both a reasonably sized island and the required clearance on every side. In a kitchen close to that minimum, a smaller mobile cart or rolling island often works better than a fixed, plumbed-in piece, since it can be moved out of the way when extra floor space is needed.
Step 7: Decide whether the island needs plumbing or electrical
An island built purely for prep space and seating needs no utilities beyond an outlet or two for small appliances. Adding a sink, cooktop, or dishwasher to the island means running water, drain and gas or electrical lines under the floor to reach it, which is far easier and cheaper to plan before a slab is poured or a subfloor is finished than to retrofit afterward. Decide on this early, since it can change the island’s footprint and its distance from the main plumbing wall.
Step 8: Account for door swings and appliance clearance
An island positioned too close to the refrigerator, oven or dishwasher can block the appliance door from opening fully, even if the straight-line clearance measurement looks adequate. Check the open-door depth of every nearby appliance, not just its closed footprint, and make sure the island leaves room for that door to swing without hitting a stool or the island’s edge.
Step 9: Consider a waterfall or mixed-height countertop
Some islands use a waterfall edge, where the countertop material wraps down the sides to the floor, or a stepped design with two different counter heights, one for prep and one for seating. A stepped island effectively splits the depth calculation into two zones: a 36 inch prep-height section and a narrower 12 to 15 inch overhang section at bar height, which changes the total footprint needed compared with a single flat countertop.
Step 10: Recheck the size once the kitchen is laid out in full
An island calculated against bare room dimensions can feel different once cabinetry, appliances and lighting are placed, since a fully built kitchen reads visually smaller than an empty floor plan. If possible, mark the island’s footprint with painter’s tape on the actual floor before finalizing cabinetry orders, and walk the space to confirm the clearance feels right in practice, not just on paper.
Kitchen island rules that prevent a cramped kitchen.
A calculator gives the best starting numbers, but the final layout still depends on appliance placement, plumbing runs, and how the island interacts with the rest of the kitchen. The rules below cover the details worth checking even after settling on a size.
Subtract 84 inches of total clearance from your available wall run to get a workable island length, keep at least 42 inches of clearance on every side, and plan for plumbing or electrical before the floor is finished if the island will include a sink or cooktop.
Size to clearance, not the drawing
Use required walkway clearance as the starting constraint, then fit the island into what’s left rather than sizing it first and hoping clearance works out.
Keep 42 inches on every side
Increase to 48 inches if two people cook at once or if the island sits along a main walkway through the kitchen.
Plan utilities before the floor
A sink, cooktop or dishwasher in the island needs plumbing and electrical run under the floor, which is far easier to plan early than to retrofit.
Check appliance door swings
Measure the open-door depth of nearby appliances, not just their closed footprint, so the island doesn’t block a door from opening fully.
Helpful room planning topics.
A kitchen island rarely stands alone in a kitchen’s design. Once you know your size, it helps to plan the surrounding elements at the same time — pendant lighting above the island, stool style at counter height, and flooring beneath it. Use these supporting pages from the HomeStyle Calculator homepage to plan the rest of the room.
Six things designers always check before building an island.
Tape the footprint on the floor first
Mark the island’s exact length and depth with painter’s tape and walk around it. This catches clearance mistakes far faster than imagining the size from a floor plan.
Center on the run, not the whole room
Center the island on the usable wall run and adjacent counters rather than the kitchen’s geometric center, since the two rarely align exactly.
Leave extra room near the dishwasher
A dishwasher door needs to fully open next to the island without a stool or the island’s edge blocking it — check this clearance separately from general walkway space.
Size up in open-plan kitchens, not down
A larger island in an open-plan kitchen and living space reads as intentional; an undersized one tends to look lost against the surrounding space.
Decide on utilities before the slab is poured
A sink or cooktop on the island needs plumbing and electrical planned early — retrofitting after the floor is finished is far more disruptive.
Match stool spacing to real people, not just math
The 24-inch-per-seat rule is a starting point — test it with the actual stools you plan to use, since wider armchairs or stools need more room.
Kitchen island sizing questions — answered.
More calculators for every room decision.
Every tool uses professional designer formulas. Free, instant, no sign-up — just enter your room and get the exact answer.
Bookmark HomeStyle Calculator for every room in the house.
From a new kitchen island to seating capacity and walkway clearance, our free tools give you the exact size before you build or buy.