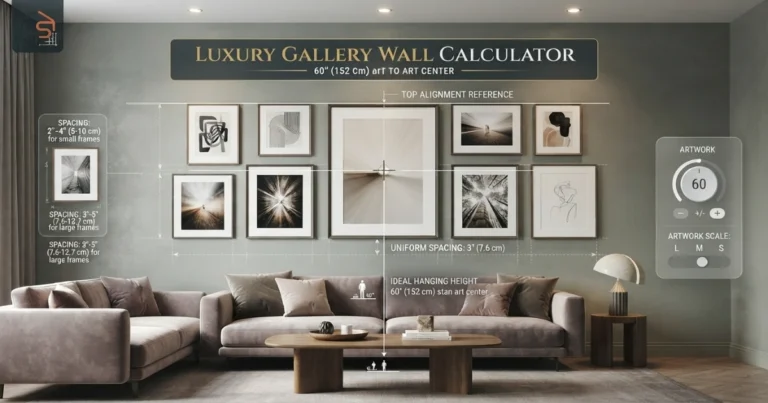
Find the Right Mirror Size for any Wall.
Enter your vanity, console or wall width, choose the mirror’s purpose and frame style, and get an instant size recommendation — using the same margin and proportion rules interior designers rely on. No more mirrors that look too small or too heavy for the furniture below them.
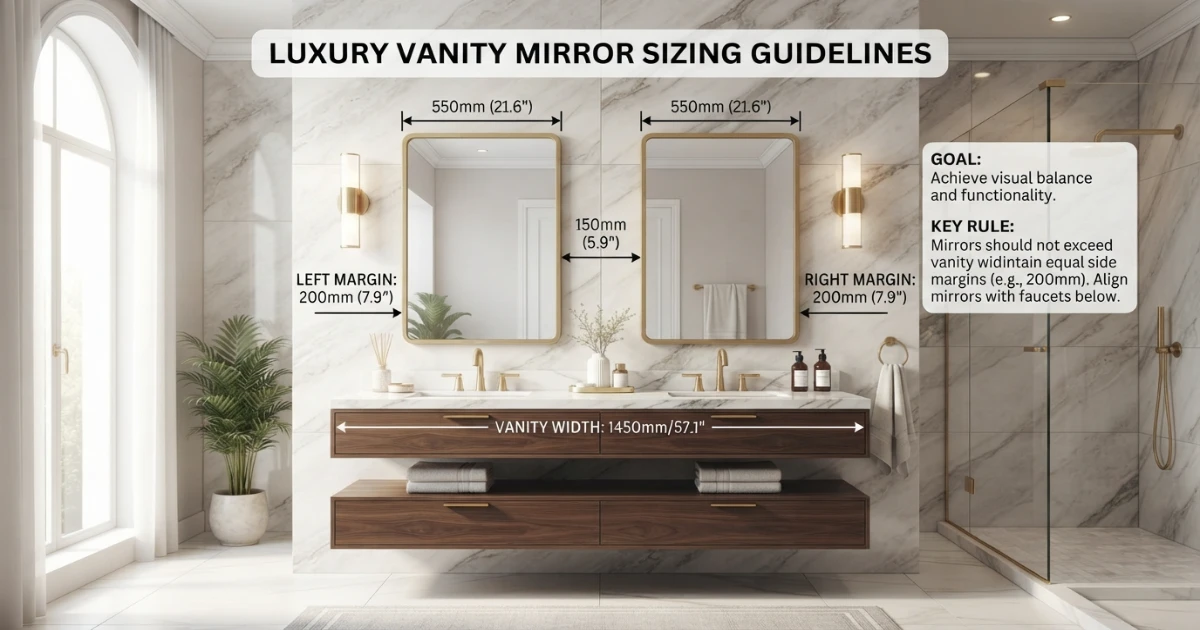
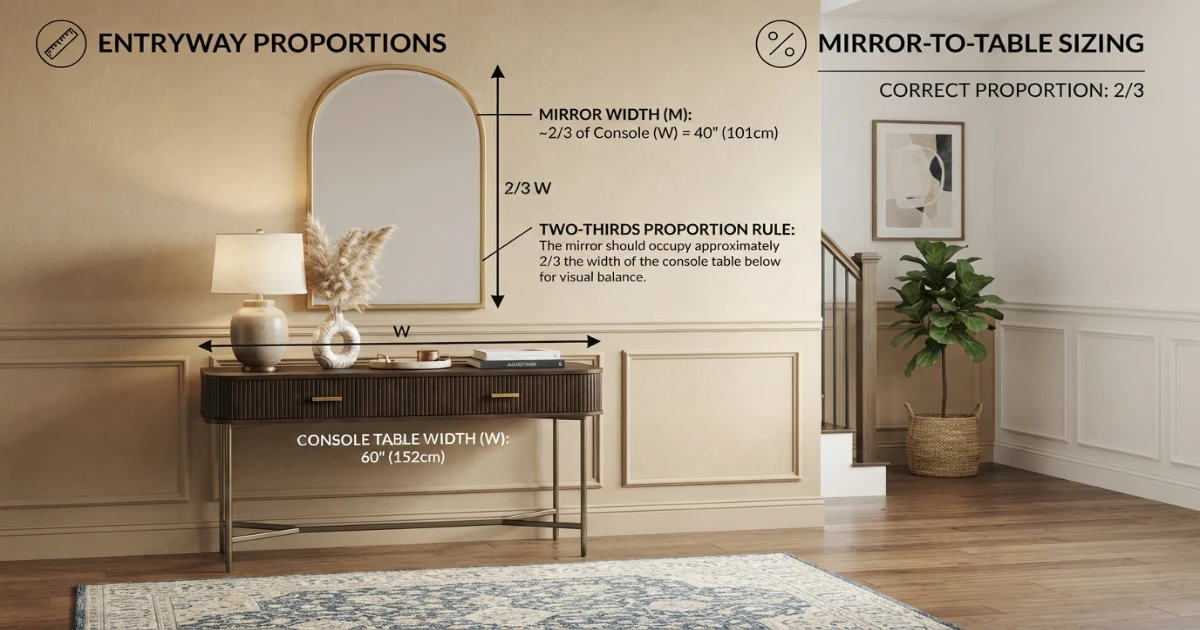
A mirror above furniture should be 2 to 4 inches narrower than the piece on each side for a vanity, or about two-thirds the width of a console or dresser. A full-length mirror should stand at least 60 to 65 inches tall.
Standard mirror sizes by purpose and furniture width.
These estimates assume a standard frame style. Use the calculator above for a size matched to your exact furniture or wall width.
| Purpose | Furniture / Wall Width | Recommended Mirror Size | Hanging Height (center) | Notes |
|---|---|---|---|---|
| Single vanity | 30–36 in | 24×30 to 30×32 in | 65–67 in | Leave 3–4 in per side |
| Double vanity | 60–72 in | 2 × 24×30 in or 1 × 54×34 in | 65–67 in | Two mirrors or one wide |
| Console / entry table | 36–42 in | 26×34 in | 58–60 in | Two-thirds rule |
| Bedroom dresser | 48–60 in | 34×40 in | 60–64 in | Slightly taller for dressing |
| Full-length (leaning) | Any wall | 24×65 to 30×72 in | Floor-standing | Taller than the user by a few inches |
| Narrow entryway | 24–30 in | 20×30 in | 58–60 in | Round or arched work well |
Four common mirror placements — and the rule each one follows.
Where a mirror hangs changes the proportion rule that applies to it. Here is what each purpose is built for and the sizing logic behind it.
Vanity Mirror
Sized a few inches narrower than the vanity on each side so the counter’s edges stay visible. Hung slightly higher than eye level since the counter already raises the sightline.
Margin: 2–4 in per sideConsole / Dresser
Follows the two-thirds rule: the mirror reads as proportional when it’s noticeably narrower than the furniture beneath it, rather than edge-to-edge with it.
Width: ~66% of furnitureFull-Length
Sized to the person using it, not the furniture around it. A mirror a few inches taller than the tallest household member shows the full body without stepping back.
Height: user height + 3–5 inEntryway
A smaller, often round or arched mirror hung near eye level, sized to fit a narrow hallway or entry wall rather than to any specific piece of furniture below it.
Width: 20–30 in typicalSee how mirror size changes by placement.
These steps cover the essentials: measuring the furniture or wall, applying the right margin or ratio, and confirming hanging height before you buy or mount.
Measure the furniture
Start with vanity, console or wall width before choosing a mirror. Note faucets, sconces and outlets that could limit placement.
Apply the right ratio
Vanities need a margin on each side, while consoles and dressers follow the two-thirds width rule for a balanced look.
Confirm hanging height
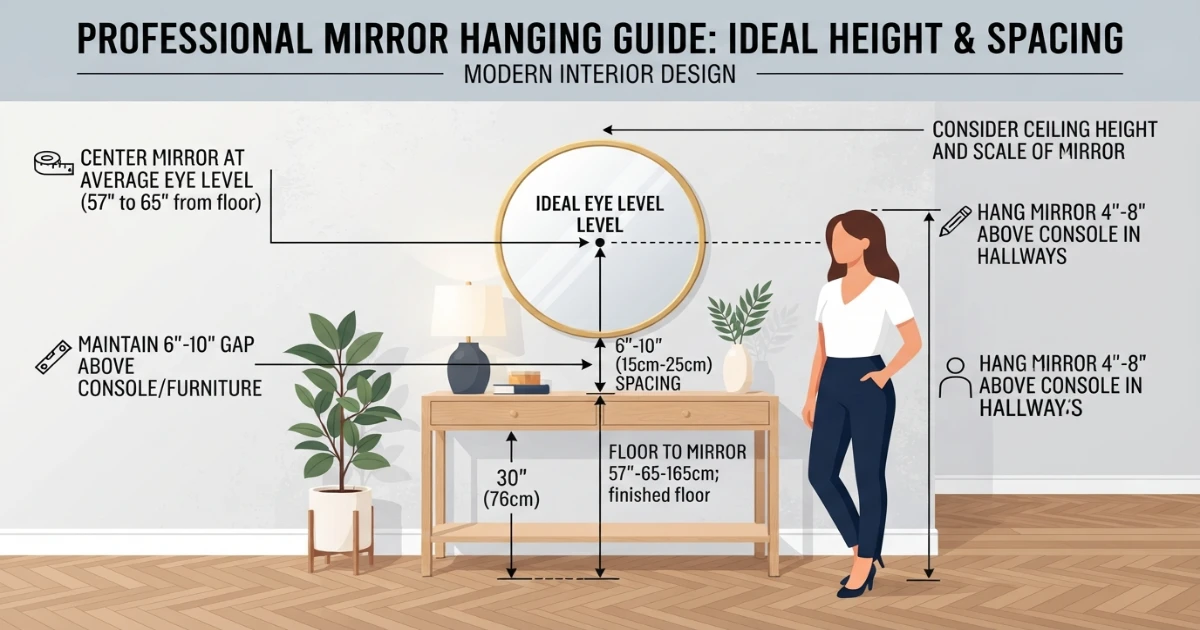
Centering the mirror near eye level, and slightly higher above vanities, keeps the reflection useful for everyone in the household.
How to choose a mirror size — the complete guide.
The most common mirror mistake is matching the mirror exactly to the furniture width below it, or worse, choosing one that’s wider. A mirror that stops a few inches short of the vanity or console edge on each side almost always looks more intentional and better proportioned than one that spans edge to edge.
Step 1: Measure the furniture or wall
Measure the width of the vanity, console table or dresser the mirror will hang above, or the width of the wall segment for a standalone entryway mirror. Note the position of any sconces, outlets or backsplash tile that could limit how wide or how low the mirror can sit.
Step 2: Apply the right ratio for the mirror’s purpose
Above a vanity, subtract about 2 to 4 inches of margin from each side of the counter width, since a mirror flush with the counter edges tends to look oversized and can crowd sconces mounted on either side. Above a console table, dresser or sofa, the classic two-thirds rule works well: the mirror’s width should be roughly two-thirds the width of the furniture below it, keeping the piece looking grounded rather than top-heavy.
Step 3: Choose a frame style
A minimal or frameless mirror can sit slightly larger relative to the furniture without feeling heavy, since there’s no visual bulk beyond the glass itself. A statement frame, such as a thick wood or ornate metal design, effectively adds inches to the piece’s visual footprint, so sizing the glass itself a little smaller than you would for a minimal frame usually keeps the overall proportions balanced.
Step 4: Set the height for the mirror’s purpose
Most wall mirrors look best with their center hung at 57 to 60 inches from the floor, which approximates eye level for an average standing adult. Vanity mirrors are the exception, typically hung a few inches higher, with a center around 65 to 67 inches, since the vanity counter and faucet already raise the practical sightline for washing and grooming.
Step 5: Size a full-length mirror to the person, not the furniture
A full-length mirror is sized differently from the other categories, since its job is to reflect a person rather than balance a piece of furniture. The mirror should be at least as tall as the tallest regular user, ideally a few inches taller, so the full body is visible without needing to step back several feet. A width of 24 to 30 inches is typical, wide enough to see a full outfit without needing to angle the body awkwardly.
Step 6: Plan for weight and mounting
Larger mirrors, especially those with statement frames, can be significantly heavier than they appear. Confirm the wall material and use appropriate anchors, and for anything above roughly 3 feet in either dimension, consider mounting into at least one wall stud in addition to anchors for extra security.
Mirror shapes: rectangular, round, arched and irregular
- Rectangular — the most versatile shape, working with the width and margin rules above almost everywhere in the home.
- Round — softens a room full of rectangular furniture and windows; size the diameter at the upper end of the rectangular guideline since round shapes read as visually smaller.
- Arched — a good middle ground for entryways and hallways, adding height without the full visual weight of a tall rectangular mirror.
- Irregular / organic — best used as a single statement piece rather than paired symmetrically, and generally sized closer to the console or wall width itself since the irregular edge already breaks up visual weight.
Step 7: Double vanities – one large mirror or two separate ones?
Double vanities present a sizing decision that goes beyond simple margins. If you choose two mirrors, each should follow the single-vanity rule: width 2 to 4 inches narrower than the half-vanity counter width it sits above. Two mirrors reinforce symmetry and make cleaning individual glass surfaces easier. However, the space between them – usually the width of a center faucet or shared counter area – must be considered. The gap should ideally be at least 6 inches to prevent the mirrors from feeling crowded and to leave room for a centered light fixture or sconce.
If you prefer a single large mirror spanning the entire vanity, the width should be calculated from the full counter width, still with a margin of 2 to 4 inches on each end. This option creates a seamless, expansive look that works especially well in larger bathrooms with high ceilings. The height of a single wide mirror can be slightly lower than two separate ones because the horizontal stretch already fills the wall; a common height is between 30 and 36 inches. In either case, the bottom edge of the mirror(s) should clear the faucet by at least 2 to 3 inches for a clean visual transition from counter to mirror.
Step 8: Sizing mirrors for open-plan living and dining areas
In open-plan spaces where a mirror might hang above a sideboard, buffet, or bar cart rather than a traditional vanity or console, the two-thirds rule still applies, but the room’s overall scale becomes more important. A mirror that follows the furniture proportion perfectly can still look lost if the wall itself is very tall or wide. In such cases, add 10–15% to the calculated width and height to ensure the mirror holds its own against the surrounding architecture.
Dining room mirrors are often placed to reflect a chandelier or outdoor view; here, the mirror’s width should typically match the width of the dining table or the hanging light fixture above it, whichever is wider. This creates a deliberate vertical axis that makes the room feel anchored. A round or oval mirror above a round dining table often feels more organic than a rectangle, while a rectangular mirror suits a long rectangular table better.
Step 9: Mirrors and natural light – placement to brighten a room
One of the most powerful uses of a mirror is to bounce daylight deeper into a space. To do this effectively, place the mirror on a wall perpendicular to a window, not directly opposite it. Directly opposite can create glare and wash out the reflection with brightness. A perpendicular placement catches light from the window and redirects it across the room, amplifying daylight without causing discomfort.
The mirror’s size for this purpose depends on the window’s width. As a rule of thumb, the mirror’s width should be roughly half to two-thirds the width of the window it is reflecting. A mirror that is too small will not catch enough light to make a difference; one that is too large will dominate the wall. If the room lacks a suitable perpendicular wall, a leaning full-length mirror placed near the window at an angle can achieve a similar light-bouncing effect while also serving as a functional piece.
Step 10: How to measure for an arched or cathedral-top mirror
Arched mirrors add architectural interest but require slightly different measurements. The width still follows the standard margin or two-thirds rule, but the height must be measured both at the sides (the straight vertical portion) and at the peak of the arch. When hanging an arched mirror above furniture, ensure the straight vertical section is high enough that the arch does not start below the sightline of the tallest household member – otherwise the reflection may feel cut off at the top.
A good guideline is to position the arch’s base (where the curve begins) at least 60 inches from the floor. The overall height at the peak should then be checked against the ceiling; leave at least 6 inches of wall space above the arch to avoid a cramped look. For arched mirrors above a vanity, the same bottom-clearance rules apply: the mirror’s lowest point should be 2–3 inches above the faucet or backsplash.
Step 11: Mirror frame depth and its effect on perceived size
The depth (how far the frame projects from the wall) changes how large a mirror looks. A thin, flush frame (less than 0.5 inches deep) blends into the wall and makes the glass area appear larger. A deep, chunky frame (1 inch or more) casts shadows and creates a visual border that can make the mirror feel smaller and heavier. For rooms with limited wall space, a thin frame or frameless mirror helps the piece feel airy. For rooms with high ceilings or large expanses of empty wall, a deeper frame can add the substance needed to balance the space.
When choosing a mirror with a deep frame, it’s often wise to size up by about 5–10% in width and height compared to a thin-framed equivalent, to compensate for the frame’s visual encroachment. The calculator above includes a “frame style” toggle that adjusts the recommended size based on this principle.
Step 12: Using multiple mirrors in one room – layout rules
When using more than one mirror in the same room – for example, matching mirrors above twin vanities, or a series of smaller mirrors along a hallway – several layout rules keep the display cohesive. First, identical mirrors should be hung at the same height, measured from the floor to their centers. A difference of even 1 inch is noticeable. Second, the spacing between mirrors should be consistent: in a hallway, leave at least 1.5 times the mirror’s width between each piece so they read as a collection rather than a disjointed row.
For non-identical mirrors (e.g., a round mirror above a dresser paired with a full-length leaning mirror nearby), unify them through frame finish – both in brushed brass, for example – or through a similar visual weight. Avoid pairing a heavy, ornate gold mirror with a wafer-thin frameless mirror in the same room unless you are intentionally creating an eclectic look, in which case the contrast should be dramatic enough to feel purposeful.
Step 13: How ceiling height changes mirror sizing
Standard 8-foot ceilings generally look best with mirrors that are less than 40 inches tall; taller mirrors can make the ceiling feel lower by shortening the visible wall above the mirror. In rooms with 9-foot or higher ceilings, you have more freedom to use taller mirrors – up to 48 inches or more – without making the room feel compressed. In vaulted or cathedral-ceiling spaces, a mirror that is taller than it is wide can help emphasize the verticality of the room, but make sure the top of the mirror does not rise above the point where the wall meets the slope, or the mirror will appear to float awkwardly.
Step 14: Anti-fog, defogger pads, and bathroom mirror longevity
In bathrooms, condensation after showers can make a mirror unusable for minutes or longer. Anti-fog coatings are a simple solution, but they wear off over time and need reapplication. A more durable option is an electric defogger pad installed behind the mirror; these warm the glass slightly to prevent condensation. When planning a bathroom mirror, check whether the electrical outlet is nearby and whether the mirror’s mounting location allows for the pad’s thickness (usually about 0.2 inches). The pad should be at least 2 inches smaller on all sides than the mirror itself to remain hidden, so factor that into your size choice if you plan to add one.
Step 15: Leaning mirrors – size, safety, and style
Leaning mirrors are a popular, renter-friendly choice because they require no wall drilling. However, they still need to be proportioned to the wall and the room. A leaning mirror should be at least 60 inches tall to function as a full-length piece, but the width can be narrower – 20 to 26 inches works well in tight spaces. The mirror should lean against the wall at roughly a 5- to 10-degree angle; anything steeper makes the reflection distort and increases the risk of tipping. Always secure a leaning mirror with an anti-tip strap fixed to the wall, especially in homes with children or pets.
The bottom of the mirror should sit directly on the floor, not on a rug, for stability. If you want the mirror to lean above a piece of low furniture, the furniture should be deep enough that the mirror’s base can sit on it fully without overhanging. In this configuration, measure the mirror’s height from the furniture surface rather than the floor, and ensure the top does not exceed two-thirds the height of the wall from that point.
Step 16: Mirror sizing for home gyms and dance studios
Home gyms and practice spaces require different sizing logic. The primary goal is to see your full body during movement, so wall-mounted mirrors should start about 12 inches above the floor and extend to at least 6 feet high. Width is determined by the available wall space; multiple panels are often joined edge-to-edge to create a seamless expanse. For a single user, a mirror 48 to 60 inches wide is usually sufficient. For two people exercising side by side, aim for 72 to 96 inches. Use frameless panels for gym mirrors to avoid visual breaks, and confirm the wall can support the weight of multiple large mirrors.
Step 17: Mirror placement near doors and high-traffic zones
Mirrors placed where doors swing open present a safety hazard and a maintenance headache. Avoid hanging a mirror on a wall that the door swings toward, and check that the mirror’s edge is at least 4 inches clear of the door’s arc. In narrow hallways, a mirror hung at the very end can make the space feel longer, but make sure it is out of the path of people carrying laundry baskets or bags. A slim, vertical mirror (24 inches wide, 48+ inches tall) works well here without protruding into the walkway.
Step 18: Mirror size and the psychology of space
Interior design research consistently shows that mirrors influence our perception of room size and comfort. A mirror placed to reflect an attractive view or a clean, organized area makes the room feel larger and calmer. Conversely, a mirror that reflects a cluttered desk or an unmade bed doubles that visual noise and can make the room feel chaotic. The size of the mirror determines how much of the reflected scene is captured: a large mirror opposite a beautiful window maximizes the benefit, while a small mirror hung at an angle can selectively frame a single pleasing element, like a vase of flowers or a piece of art.
Mirror buying rules that prevent a top-heavy wall.
A calculator gives the best starting numbers, but the final purchase still depends on frame finish, wall material, and how the mirror interacts with nearby lighting. The rules below cover the details worth checking even after settling on a size.
For most furniture-mounted mirrors, size the mirror a few inches narrower than the piece below it, hang the center near eye level (or a bit higher above a vanity), and choose a frame finish that matches the room’s existing metal or wood tones rather than introducing a new one.
Leave margin, don’t match exactly
A mirror flush with the furniture edges below it tends to look oversized. Keep a visible margin on each side for a more intentional, finished look.
Match frame finish to fixtures
Mirror frame and hardware finish should echo the room’s existing metal tones, such as brushed brass or matte black, for a coordinated result.
Check weight and wall anchors
Large or heavily framed mirrors need proper wall anchors, and ideally at least one mounting point into a stud, to hang securely long term.
Consider anti-fog backing for vanities
Bathroom vanity mirrors benefit from an anti-fog or defogger backing, which keeps the mirror usable immediately after a hot shower.
Helpful room planning topics.
A mirror rarely stands alone in a room’s design. Once you know your size, it helps to plan the surrounding elements at the same time — wall color behind the frame, lighting placed to avoid glare, and furniture scale beneath it. Use these supporting pages from the HomeStyle Calculator homepage to plan the rest of the room.
Six things designers always check before buying a mirror.
Tape the outline before buying
Cut paper or tape to the mirror’s exact dimensions and hold it on the wall. This catches sizing mistakes far faster than imagining the size from a product listing.
Place mirrors to reflect light, not clutter
A mirror opposite a window bounces natural light into the room. A mirror opposite a cluttered or awkward view simply doubles that clutter.
Avoid centering directly over a light source
A mirror hung directly beneath a sconce or light fixture can create harsh glare. Offsetting slightly, or choosing sconces mounted beside the mirror instead, avoids this.
Size up in small rooms, not down
A larger mirror in a small room reflects more light and space than a small one. Undersized mirrors in small rooms tend to disappear rather than help.
Check swing clearance for leaning mirrors
A leaning full-length mirror needs a few inches of clearance from the wall at its base and should be secured with an anti-tip strap, especially in homes with kids.
Match multiple mirrors in the same room
If a room has more than one mirror, such as a vanity mirror and a full-length mirror, keeping frame finish consistent between them reads as more deliberate than mixing styles.
Mirror sizing questions — answered.
More calculators for every room decision.
Every tool uses professional designer formulas. Free, instant, no sign-up — just enter your room and get the exact answer.
Bookmark HomeStyle Calculator for every wall in the house.
From a powder room vanity to a full-length dressing mirror, our free tools give you the exact size and hanging height before you buy.