Find the Right Blind Size for Any Window.
Enter your window width and height, choose the window type and mount style, and get an instant blind size, mounting depth, and light gap — using the same measuring rules window treatment installers rely on. No more blinds that bind against the frame or leave gaps of light around the edges.
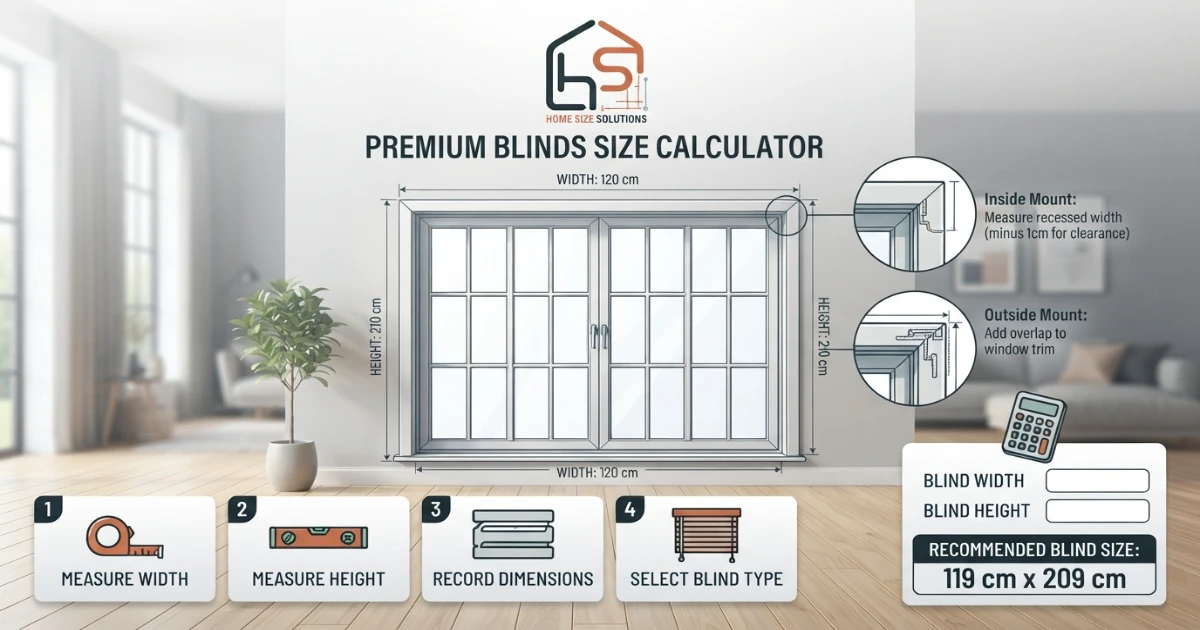
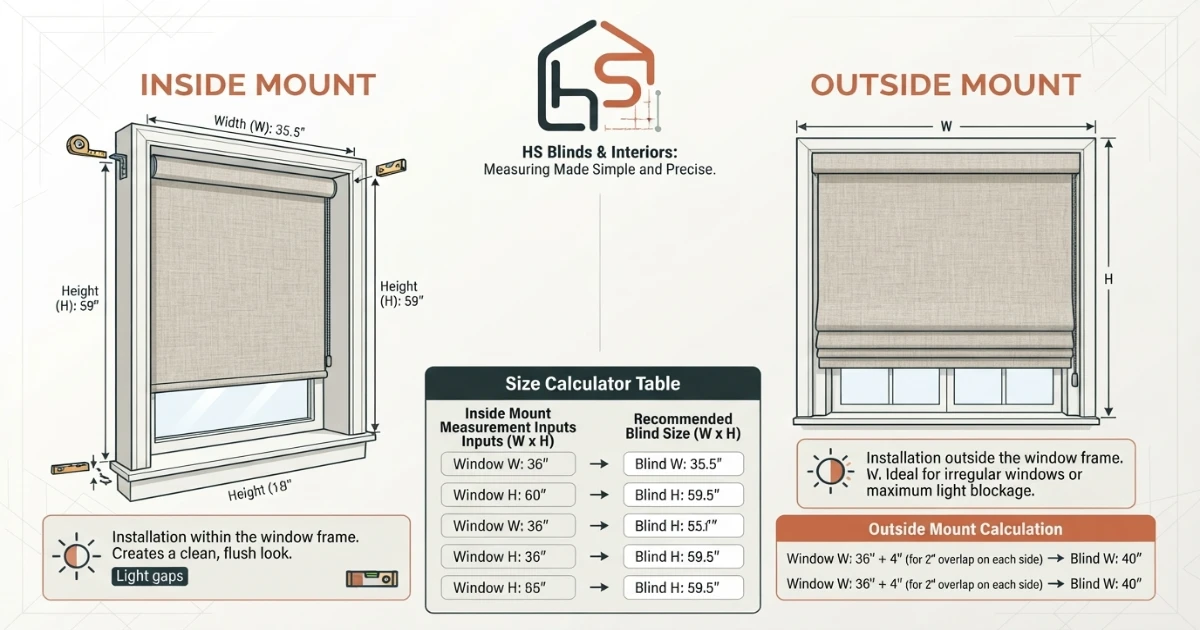
For inside mount, deduct about a quarter to half an inch from the frame width. For outside mount, add 3 to 4 inches to the width and height so the blind overlaps the frame on every side.
Standard blind sizes by window type and mount.
These estimates assume a standard inside or outside mount. Use the calculator above for a size matched to your exact window dimensions.
| Window Type | Frame Size | Inside Mount Size | Outside Mount Size | Notes |
|---|---|---|---|---|
| Standard window | 36×48 in | 35.5×47.75 in | 39×51 in | Most common residential size |
| Large window | 48×60 in | 47.5×59.75 in | 51×63 in | Confirm frame depth first |
| French door panel | 24×66 in | 23.5×65.75 in | 27×69 in | Measure each panel separately |
| Sliding door | 72×80 in | Not recommended | 76×83 in | Vertical blinds or panel track |
| Bay window pane | 24×54 in | 23.5×53.75 in | 27×57 in | Mount each pane independently |
| Small/bathroom window | 24×36 in | 23.5×35.75 in | 27×39 in | Consider moisture-resistant material |
Four common window types — and the sizing rule each one follows.
A window’s type changes the measuring approach and mounting considerations that apply to it. Here is what each type needs and the sizing logic behind it.
Standard Window
The simplest case: measure the frame’s width and height directly and apply the standard inside or outside mount deduction or addition.
Deduct ¼–½ in for inside mountFrench Door
Each door panel is measured individually rather than the whole frame, with extra clearance planned around handles and hinges.
Measure each panel separatelySliding Door
Usually fitted with vertical blinds or a panel track rather than a horizontal blind, sized to the full opening width plus clearance to slide.
Full opening width + slide clearanceBay Window
Made up of several angled panes, each measured and mounted separately since a single blind rarely spans the angled configuration.
Measure each pane independentlySee how blind size changes by mount type.
These steps cover the essentials: measuring the frame, choosing inside or outside mount, and confirming depth and clearance before you order.
Measure the window frame
Start with width and height measured in three places each before choosing a mount type.
Choose inside or outside mount
Inside mount deducts a small margin for clearance, while outside mount adds overlap on every side.
Confirm mounting depth
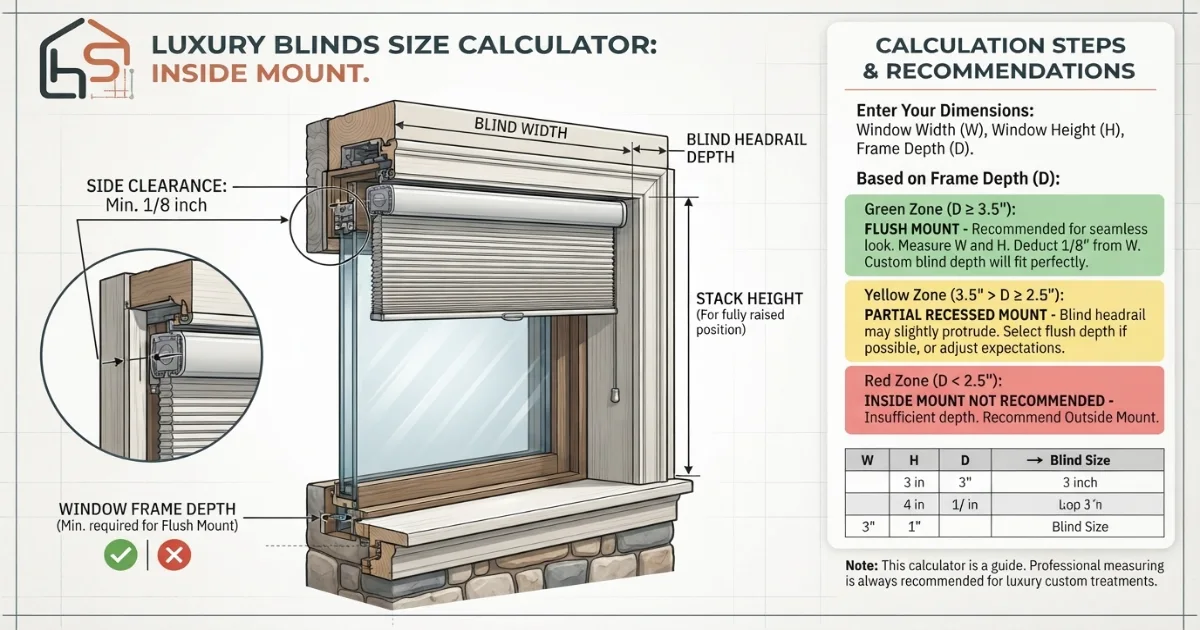
Inside mount blinds need at least 2.5 inches of usable frame depth to clear handles and hardware.
How to measure for blinds and shades — the complete guide.
The most common blinds measuring mistake is using a single width measurement instead of measuring the frame in three places. Window frames are rarely perfectly square, especially in older homes, and a frame can be a quarter inch narrower at the bottom than at the top due to settling or original construction tolerances. Measuring at the top, middle, and bottom, then using the smallest width for an inside mount, is what actually prevents a blind from being too wide to fit anywhere along its height.
Step 1: Measure the window frame in three places
Measure the width at the top, middle, and bottom of the window opening, and the height at the left, middle, and right. Window frames are frequently slightly out of square, particularly in older homes where the building has settled over decades, and even new construction can have minor tolerances from the framing and drywall process. For an inside mount, always use the smallest of the three width measurements and the longest of the three height measurements, since these represent the tightest and most conservative fit across the whole opening.
Step 2: Decide between inside mount and outside mount
Inside mount blinds sit within the window frame itself, creating a clean, built-in look that shows off attractive trim or molding around the window. Outside mount blinds attach to the wall or the face of the trim surrounding the window, extending beyond the opening on every side. Outside mount is the better choice when the frame is too shallow for an inside mount, when the frame itself is uneven or unattractive, when maximum light-blocking or privacy is the priority, or when a window needs to visually appear larger than its actual opening.
Step 3: Confirm the frame has enough depth for an inside mount
Inside mount blinds typically need at least 2.5 inches of usable, unobstructed depth within the frame to operate properly and clear any window crank, lock hardware, or interior trim detail. Measure this depth directly with a tape measure pressed into the frame, not estimated by eye, since even half an inch of missing depth can prevent the headrail brackets from being installed correctly or cause the blind to interfere with opening a casement or crank-style window.
Step 4: Apply the correct width deduction for inside mount
Once the smallest width measurement is confirmed, most manufacturers deduct an additional quarter to half an inch total from that number before manufacturing the blind. This deduction accounts for the wood, vinyl, or aluminum slats expanding slightly with humidity and temperature changes throughout the year, and it prevents the blind from binding against the frame sides during operation. Skipping this deduction is a common reason a seemingly correctly measured inside mount blind won’t tilt or raise smoothly once installed.
Step 5: Apply the correct width and height addition for outside mount
For an outside mount, add 3 to 4 inches to the measured window width, split evenly as 1.5 to 2 inches of overlap on each side, so the blind blocks the light gaps that would otherwise show along the frame’s outer edges. Add a similar 3 to 4 inches to the height, primarily to extend above the window opening enough to conceal the headrail and mounting brackets, with a smaller allowance at the bottom if the blind needs to reach or overlap a sill.
Step 6: Choose room-darkening or blackout sizing for maximum light control
A room-darkening or blackout outside mount extends the overlap further than a standard outside mount, typically 2 to 2.5 inches per side rather than 1.5 to 2 inches, specifically to minimize the light leakage along the edges that a standard overlap doesn’t fully eliminate. This wider overlap is especially useful in bedrooms, media rooms, or nurseries where consistent darkness matters more than in a general living space, though it does mean the blind’s visible footprint on the wall is noticeably larger than the window opening itself.
Step 7: Measure French doors panel by panel
A French door, whether a single door or a pair, should be measured at the glass opening of each individual panel rather than treating the whole door frame as one continuous opening. This is because each panel typically needs its own blind or shade so that one panel can open and close independently of the other, and because the door’s central meeting stile and any cross-bars interrupt what would otherwise be one continuous glass area. Leave clearance around the door handle and hinge side so the blind’s headrail and mounting brackets don’t interfere with the door’s normal swing and latch operation.
Step 8: Choose the right treatment for a sliding glass door
A sliding glass door’s wide opening and frequent operation make it a poor candidate for a standard horizontal blind sized like a typical window. Vertical blinds, which stack to one side when open, or a panel track shade system, which uses large fabric panels that slide along a track, are both purpose-built for this wider format and allow the full door to remain accessible. When sizing either option, measure the full width of the opening, including any fixed side panel, and add a few inches of clearance on the stacking side so the panels or vanes have room to gather without blocking the operable door panel.
Step 9: Measure each pane of a bay or bow window separately
A bay window is made up of three or more window units set at angles to each other, and a bow window uses a gentler continuous curve of several panes. In both cases, measure each individual pane’s width and height separately rather than trying to measure the bay as one combined opening, since the angles between panes mean a single flat blind cannot span the transition without an awkward gap or overlap. Mounting each pane’s blind on its own separate headrail, rather than trying to link them, allows each section to be raised and lowered independently, which is usually more practical given that bay windows often face different sun exposure across their width throughout the day.
Step 10: Account for corner windows and unusual configurations
Corner windows, where two window units meet directly at an interior or exterior corner with no wall space between them, need extra care in mounting since standard headrail brackets typically require a small amount of side clearance to install and operate the tilt or lift mechanism. In tight corner configurations, a low-profile headrail or a specialty corner-window bracket may be necessary, and it’s worth confirming clearance with a tape measure before ordering rather than assuming a standard bracket will fit.
Step 11: Choose a mounting depth appropriate to the blind type
Different blind types require different amounts of mounting depth even within the general 2.5 inch inside-mount guideline. A basic 1-inch aluminum mini blind needs relatively little depth and clears most standard frames easily. A cellular or honeycomb shade, a wood blind with wider 2-inch slats, or a shade with a decorative valance built into the headrail may require closer to 3 to 4 inches of usable depth to operate and look proportional once installed. Always check the specific product’s stated mounting depth requirement against your own measured frame depth before ordering, rather than relying on a single general rule for every product type.
Step 12: Plan for obstructions within the window frame
Casement window cranks, tilt-latches on double-hung windows, and interior security locks can all reduce the usable depth or width available for an inside mount blind, even when the frame itself measures deep enough on paper. Open and close any window hardware fully before finalizing measurements, and confirm the blind’s headrail and brackets won’t obstruct the crank’s full range of motion or a lock’s ability to engage properly once the blind is installed.
Step 13: Decide on headrail and valance style for outside mount
An outside mount blind’s headrail is visible above the window rather than tucked inside the frame, so the choice between an exposed headrail, a fabric-wrapped valance, or a decorative cornice becomes a visible design decision rather than a hidden mechanical detail. A wider valance or cornice can further increase the overall height addition beyond the standard 3 to 4 inches, so factor in the specific product’s headrail height when finalizing the exact mounting position on the wall.
Step 14: Consider motorization and its effect on sizing
Motorized blinds and shades sometimes require a slightly deeper headrail to house the motor and battery or wiring compartment compared to a standard manual lift mechanism. If considering motorization, particularly for hard-to-reach windows or a multi-window automated system, confirm the specific motorized headrail’s depth requirement, since it can occasionally exceed the 2.5 inch minimum that works for basic manual inside mount blinds.
Step 15: Order a sample or swatch before committing to a large order
Color and material rendered on a screen rarely matches the exact tone and texture in natural light at a specific time of day in a specific room. Before ordering multiple windows’ worth of custom blinds, request a physical sample or swatch and hold it against the actual window at different times of day, since lighting conditions dramatically affect how a fabric or wood tone reads once installed at scale across an entire room.
Step 16: Recheck every measurement before finalizing a custom order
Custom-sized blinds are typically manufactured to order and are difficult or impossible to return once cut to a specific dimension, unlike stock sizes sold at big box retailers. Before submitting a final order, remeasure the window a second time, ideally with a second person double-checking the figures, and confirm the mount type, width, height, and any specific hardware clearance notes are all correctly recorded, since a single transposed number can result in an expensive, non-returnable mistake.
Step 17: Match blind style to the room’s function and light needs
A kitchen or bathroom benefits from moisture-resistant materials like faux wood, vinyl, or PVC rather than real wood or fabric that can warp or mildew in humid conditions. A bedroom or media room often benefits from a room-darkening or blackout mount for better light control during the day. A home office or living room with computer or television screens benefits from adjustable-slat blinds that can redirect glare without fully blocking the view, rather than a solid roller shade that only offers an all-or-nothing light choice.
Step 18: Factor in cleaning and maintenance when choosing a style
Horizontal blinds with individual slats collect dust on every slat and require regular wiping or vacuuming with a brush attachment to stay looking clean. Cellular shades and roller shades have fewer crevices and are generally easier to keep dust-free with an occasional wipe. In kitchens especially, where grease and cooking residue can settle on nearby window treatments, an easy-to-wipe material is often a more practical long-term choice than a delicate fabric that requires professional cleaning.
Step 19: Coordinate multiple windows in the same room or sightline
When several windows are visible from the same room or sightline, keeping a consistent mount type, color, and slat or panel style across all of them reads as more intentional than mixing inside mount on one window and outside mount on another purely because of a frame depth difference. If one window in a group has insufficient depth for an inside mount, it’s often worth switching the entire group to outside mount for visual consistency, rather than leaving one window looking noticeably different from its neighbors.
Step 20: Reconfirm sizing after any window replacement or renovation
If windows are ever replaced, resized, or the surrounding trim is updated during a renovation, previously ordered blinds should be remeasured against the new opening rather than assumed to still fit. Even a seemingly minor trim update, such as adding thicker casing or replacing a window with a slightly different frame profile, can shift both the available depth and the exact width and height enough to require a new blind order rather than reusing existing hardware.
Blinds buying rules that prevent a binding or gappy fit.
A calculator gives the best starting numbers, but the final order still depends on frame depth, hardware clearance, and how the blind interacts with nearby windows. The rules below cover the details worth checking even after settling on a size.
For most windows, measure width and height in three places each, deduct a quarter to half an inch for inside mount or add 3 to 4 inches for outside mount, and confirm at least 2.5 inches of usable frame depth before ordering an inside mount blind.
Measure three times, use the tightest fit
Use the smallest width and longest height measured across the frame, since window openings are rarely perfectly square.
Confirm frame depth before inside mount
At least 2.5 inches of usable depth is needed to clear hardware and operate the blind smoothly.
Custom orders are usually final
Remeasure a second time before submitting, since custom-cut blinds typically can’t be returned once manufactured.
Match style across visible windows
Keep mount type and finish consistent across windows visible from the same room to avoid a mismatched look.
Helpful room planning topics.
Blinds rarely stand alone in a window’s overall treatment. Once you know your size, it helps to plan the surrounding elements at the same time — curtains layered over the blind, wall color around the frame, and furniture placement beneath the window. Use these supporting pages from the HomeStyle Calculator homepage to plan the rest of the room.
Six things installers always check before ordering blinds.
Measure in three places, every time
Frames are rarely perfectly square; the smallest width and longest height give the most reliable inside mount fit.
Check hardware clearance before ordering
Open every crank, lock, or latch fully to confirm the blind’s brackets won’t interfere with normal window operation.
Request a swatch before a large order
Hold a physical sample against the actual window at different times of day before committing to a whole-room order.
Use moisture-resistant material in wet rooms
Faux wood or vinyl holds up far better than real wood or fabric in kitchens, bathrooms, and laundry rooms.
Mount each bay window pane separately
Independent headrails let each angled pane be raised or lowered on its own, matching its own sun exposure.
Double-check before submitting a custom order
Custom-cut blinds are typically final sale; a second measurement pass catches costly transposed numbers.
Blinds sizing questions — answered.
More calculators for every room decision.
Every tool uses professional designer formulas. Free, instant, no sign-up — just enter your room and get the exact answer.
Bookmark HomeStyle Calculator for every window in the house.
From a single bathroom window to a full bay window, our free tools give you the exact blind size and mounting depth before you order.