Find the Right Baseboard Length for Any Room.
Enter your room’s shape, doors, and waste allowance, and get an instant trim length, number of pieces, and cost estimate — using the same perimeter and waste rules trim carpenters rely on. No more running short mid-install or over-ordering material that just sits in the garage.
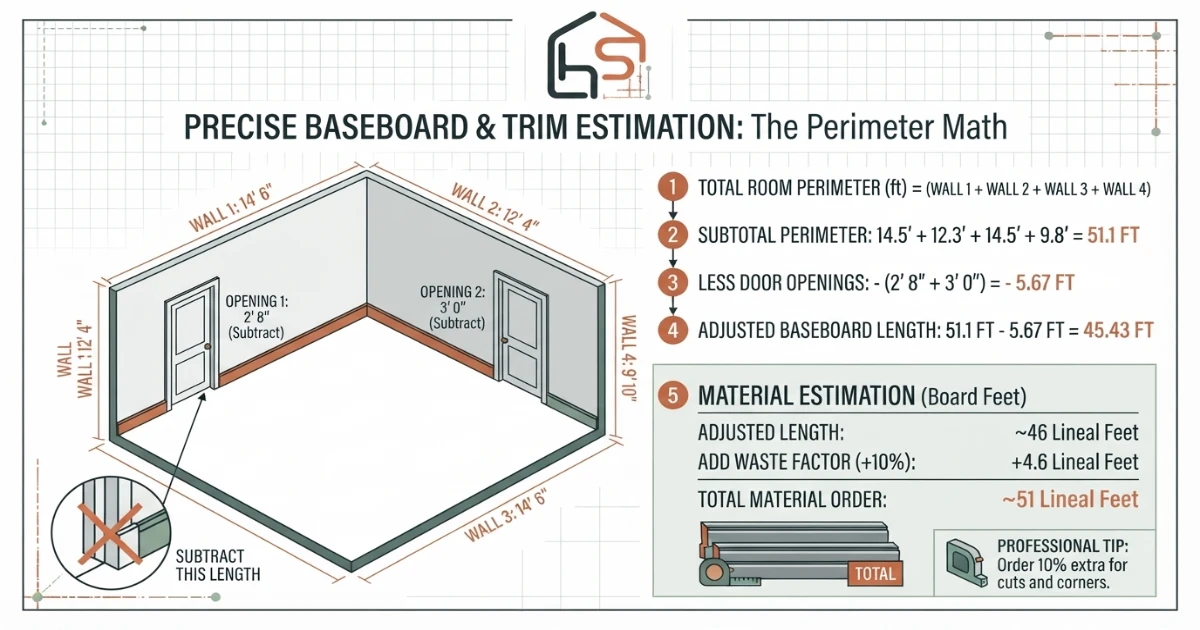
Add up the room’s perimeter, subtract about 2.7 feet for each doorway, then add 10 percent waste for a standard room. Divide the total by your board length, usually 8 feet, to get the number of pieces to buy.
Standard baseboard footage by room size and shape.
These estimates assume a standard 10 percent waste allowance. Use the calculator above for a length matched to your exact room shape, doors, and board size.
| Room Shape | Typical Size | Net Perimeter | Pieces (8 ft boards) | Notes |
|---|---|---|---|---|
| Rectangular | 12×14 ft | ~47 ft | 7 pieces | 2 doors subtracted |
| L-shaped | 12×14 ft equivalent | ~54 ft | 8 pieces | ~15% more wall than rectangular |
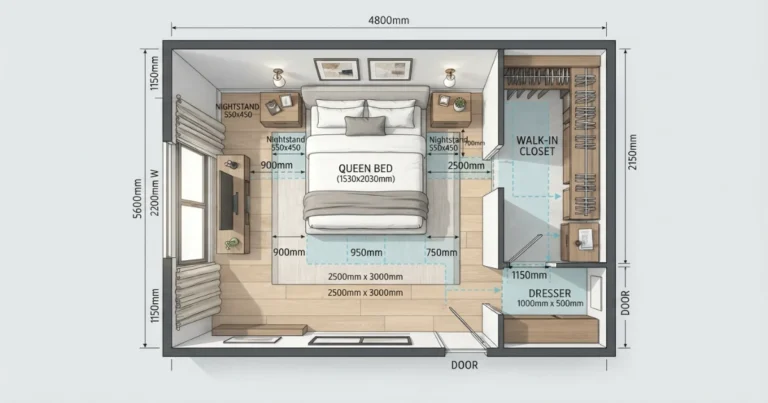
| Room with closet | 12×14 ft + closet | ~57 ft | 8 pieces | Closet perimeter included |
| Small bedroom | 10×10 ft | ~35 ft | 5 pieces | 1 door subtracted |
| Large living room | 16×20 ft | ~69 ft | 9 pieces | 2–3 openings typical |
| Whole floor (multi-room) | ~1,200 sq ft | Varies widely | Sum each room | Calculate room by room |
Four common room shapes — and the formula each one follows.
A room’s shape changes how its perimeter is calculated. Here is what each shape needs and the formula behind it.
Rectangular Room
The simplest case: perimeter equals twice the width plus twice the length, with doorways subtracted directly from that total.
Perimeter: 2×(W+L)L-Shaped Room
Has more wall segments than a rectangle of the same floor area, since the notch adds two extra inside corners and wall lengths.
Add ~15% for notch wallsRoom + Closet
Adds the closet’s interior perimeter to the room’s total, since most finished closets receive baseboard matching the rest of the room.
+10 ft typical for a reach-in closetCustom Perimeter
For irregular rooms, hallways, or multiple connected spaces, enter the total measured perimeter directly instead of a width and length.
Direct perimeter entrySee how baseboard footage changes by room shape.
These steps cover the essentials: measuring the perimeter, subtracting openings, and adding the right waste allowance before you order material.
Measure the perimeter
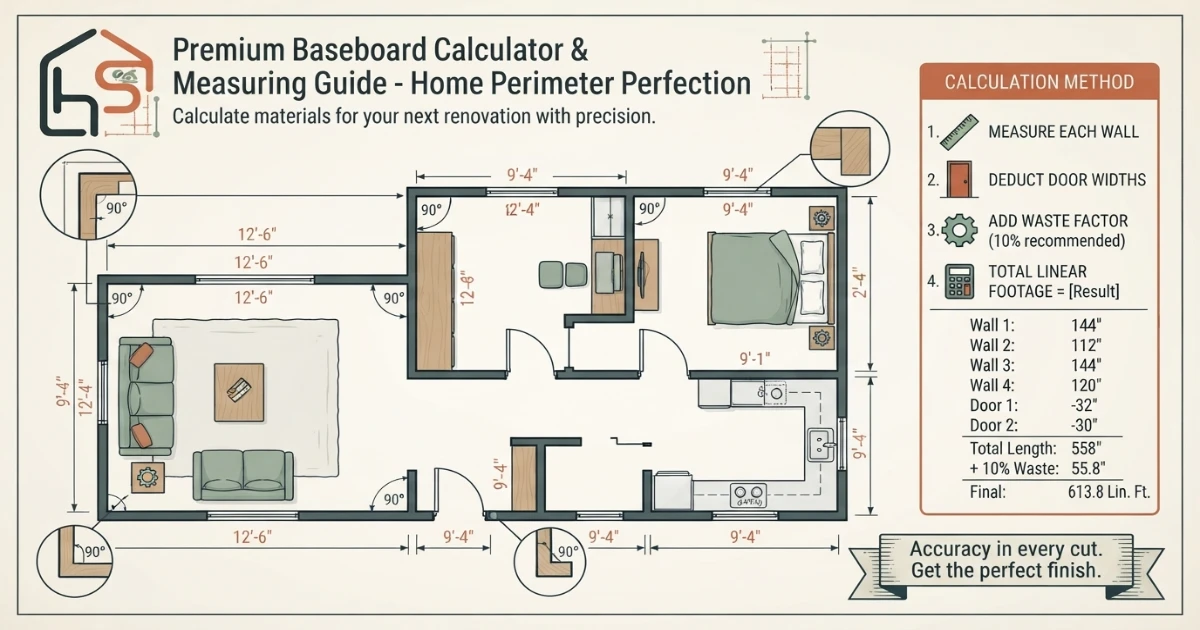
Start with room width and length, or each wall segment for an irregular room, before subtracting doors.
Subtract the doorways
Each doorway opening removes roughly 32 inches of baseboard need from the room’s total perimeter.
Add the right waste allowance
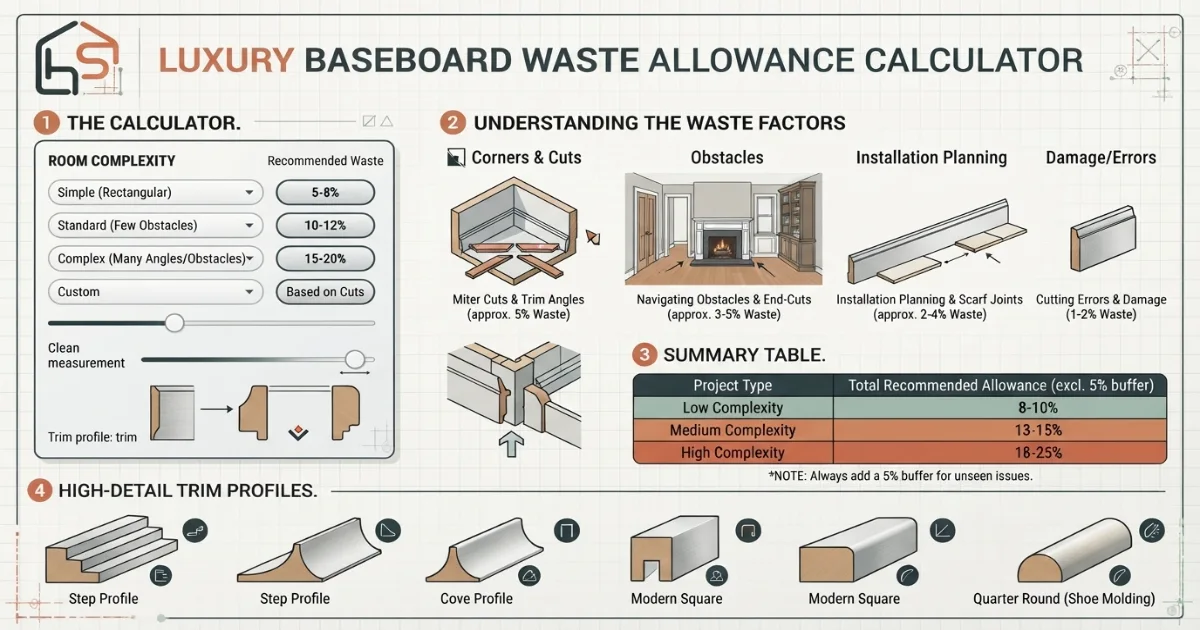
Simple rooms need less extra material than rooms with many corners, angles or mitered returns.
How to calculate baseboard trim — the complete guide.
The most common baseboard ordering mistake is using the room’s floor area instead of its perimeter. A 12 by 14 foot room and a long, narrow 8 by 21 foot room both cover 168 square feet, but the narrow room has a noticeably longer perimeter and needs more baseboard, not the same amount. Perimeter, not floor area, is what actually determines how much trim to buy.
Step 1: Measure the room’s total perimeter
For a simple rectangular room, measure the width and length, then apply the formula: perimeter equals two times the width plus two times the length. For an irregular or L-shaped room, it’s more accurate to measure each individual wall segment with a tape measure and add them together, since a single width-times-length formula doesn’t account for extra inside or outside corners. Round each measurement up to the nearest inch rather than down, since underestimating a wall segment compounds across the whole room.
Step 2: Subtract doorways and large openings
Baseboard doesn’t run across a doorway, so subtract the width of each door opening from the total perimeter. A standard interior door is about 32 inches wide, which rounds to roughly 2.7 feet per doorway once the door casing is factored in. Wider openings, such as an archway into a hallway or an open-concept pass-through, should be subtracted using their actual measured width rather than the standard door estimate, since these openings vary far more in size than a standard prehung door.
Step 3: Decide whether closets need baseboard
Most builders and designers extend baseboard into closet interiors so the finish looks consistent throughout the room, particularly for walk-in closets or any closet without doors that stay closed most of the time. For a small reach-in closet with doors that are usually shut, some homeowners skip interior baseboard to save on material and labor, though this is a matter of preference and budget rather than a strict rule. If including a closet, add its interior perimeter, typically around 8 to 12 feet for a standard reach-in closet, to the room’s total.
Step 4: Add the right waste allowance for the room’s complexity
Waste allowance accounts for miscuts, damaged ends, and the material lost at every mitered corner. A simple rectangular room with four corners and minimal obstacles needs only about 5 percent extra. A standard room with a closet, a few corners, and maybe one tricky cut benefits from 10 percent. A complex room with many angles, bump-outs, or a first attempt at mitering corners should budget 15 percent, since the learning curve on angled cuts often burns through more material than expected.
Step 5: Choose a board length and calculate pieces needed
Baseboard commonly comes in 8, 10, 12, and 16 foot lengths, with 8 foot boards being the most widely stocked and easiest to transport in a standard vehicle or through tight hallways and staircases. Divide the total footage needed, including waste, by the chosen board length and round up to the next whole number, since a partial board still requires purchasing a full piece. Buying slightly longer boards, such as 12 or 16 foot lengths, can reduce the number of seams along long, unbroken walls, which is often worth the extra handling difficulty in a room with few doorways to break up long runs.
Step 6: Plan seam placement before cutting
Where two boards meet along the same wall, a scarf joint, a diagonal cut where one board overlaps the next, hides the seam far better than a simple butt joint, especially once painted. Plan seam locations to fall in less visible areas, such as behind furniture that will stay in place, rather than in the center of an open wall. If using multiple board lengths in the same order, plan which length goes on which wall before starting to cut, rather than cutting reactively room by room.
Step 7: Account for inside and outside corners separately
Inside corners, where two walls meet to form a concave angle, are typically coped rather than mitered for a tighter, more forgiving fit as the wood expands and contracts with humidity. Outside corners, where two walls meet to form a convex angle, such as the corner of a closet jutting into a room, are usually mitered at 45 degrees on each piece. A room with more outside corners than a standard rectangle, such as an L-shaped room or one with a decorative alcove, uses more material per linear foot of actual coverage because of the extra cuts and slightly longer measurement needed at each corner.
Step 8: Calculate an L-shaped room correctly
An L-shaped room can’t be accurately estimated with a single width-times-length perimeter formula, since the notch cut into the rectangle adds two additional wall segments that a simple formula doesn’t capture. The most reliable method is to measure each of the room’s individual walls directly and sum them, though a rough shortcut is to add about 15 percent to the perimeter of the L-shape’s overall bounding rectangle, which approximates the extra length from the notch in most typical room proportions.
Step 9: Handle multiple rooms or a whole-floor project
For a project spanning several rooms or an entire floor, calculate each room’s net perimeter separately rather than trying to sum total square footage and apply a single blanket formula, since rooms of different shapes and door counts need proportionally different amounts of trim. Once each room’s footage is calculated individually, sum the totals and then apply one consistent waste percentage across the combined order, which usually simplifies purchasing into fewer, larger orders of the same board length and profile.
Step 10: Choose a baseboard height and profile appropriate to the room
Standard baseboard height ranges from about 3 to 5.5 inches in most homes, which suits average 8 foot ceilings without overwhelming the wall. Taller baseboard, 7 to 8 inches or more, is common in rooms with 9 or 10 foot ceilings, or in more formal, traditional interiors where a taller, more substantial trim profile complements other detailed millwork like crown molding or wainscoting. Baseboard height doesn’t change the linear footage calculation, only the cost per foot and the visual weight of the finished room.
Step 11: Choose the right material for the room’s conditions
Solid wood baseboard takes paint or stain well and holds up to normal wear, but it’s more prone to warping in humid environments like bathrooms or basements. MDF, or medium-density fiberboard, is a common, less expensive alternative that paints smoothly but swells if it gets wet, making it a poor choice for rooms with frequent moisture exposure. PVC or composite baseboard resists moisture well and suits bathrooms, laundry rooms, or basements prone to occasional dampness, though it typically costs more per foot than MDF.
Step 12: Budget for both material and labor if hiring a professional
Material alone typically runs 1 to 3 dollars per linear foot for basic MDF or pine baseboard, rising to 4 to 8 dollars or more per foot for hardwood or elaborate profiles. Professional installation labor generally adds another 1 to 3 dollars per linear foot on top of material costs, depending on the region and the complexity of the room’s corners and cuts. A do-it-yourself installation saves the labor cost but requires a miter saw, coping saw or coping foot attachment, a nail gun or hammer with finish nails, and enough time to learn coping and mitering technique on the less visible walls first.
Step 13: Prep the walls and floor before installing
Remove existing baseboard carefully with a pry bar and putty knife to avoid damaging the drywall behind it, and patch any gouges before installing new trim. If new flooring is planned, install the flooring first in most cases, then scribe and fit the baseboard to sit just above it, which hides the expansion gap that flooring typically requires along the wall. If baseboard is going in before flooring, leave enough of a gap at the bottom to accommodate the flooring’s thickness plus its expansion gap.
Step 14: Account for radiators, vents, and other wall obstructions
Baseboard often needs to be notched or scribed around floor vents, radiator pipes, or built-in furniture bases that interrupt an otherwise straight wall run. These obstructions don’t necessarily reduce the total linear footage needed, since the baseboard usually still needs to extend on both sides of the obstruction, but they do add cutting complexity that pushes a room toward the higher end of the waste allowance range.
Step 15: Plan for painting or staining before or after installation
Pre-painting or pre-priming baseboard before installation, sometimes called back-priming, protects all sides of the board from moisture and often produces a cleaner finish than painting in place after installation, since it avoids painter’s tape lines and drips onto the floor or wall. If pre-finishing, order slightly more material than the bare calculated total to account for pieces that may need touch-up cuts after test-fitting, particularly on a first coping or mitering attempt.
Step 16: Recheck the total once the room is fully measured
A baseboard estimate calculated from a rough room sketch can differ from the actual perimeter once every wall, closet, and doorway is measured directly with a tape measure. Before finalizing an order, walk the room’s actual perimeter with a tape measure or a measuring wheel, summing each wall segment individually, and compare that figure against the calculator’s estimate to catch any wall that was under- or over-estimated from an initial rough sketch.
Baseboard buying rules that prevent running short mid-install.
A calculator gives the best starting numbers, but the final order still depends on corner style, material choice, and how the room’s obstructions are handled. The rules below cover the details worth checking even after settling on a footage total.
For most rooms, measure the perimeter directly, subtract about 2.7 feet per doorway, add 10 percent waste for a standard room, and round up to the nearest full board at your chosen length rather than ordering the bare calculated minimum.
Perimeter beats floor area
Always calculate from the room’s actual wall lengths, not its square footage, since two rooms of equal area can need very different amounts of trim.
Round up to full boards
A partial board still requires buying a full piece, so round the final footage up to the next whole board rather than ordering the bare minimum.
Match material to room conditions
Choose moisture-resistant material for bathrooms and basements rather than standard MDF, which swells if it gets wet.
Order extra for a first coping attempt
Budget toward the higher end of the waste range if this is a first attempt at coping or mitering corners.
Helpful room planning topics.
Baseboard is usually one piece of a larger finishing project. Once you know your footage, it helps to plan the surrounding elements at the same time — wall paint above it, flooring beneath it, and furniture placement around it. Use these supporting pages from the HomeStyle Calculator homepage to plan the rest of the room.
Six things installers always check before ordering baseboard.
Measure every wall individually
For anything other than a perfect rectangle, measure each wall segment with a tape measure rather than relying on a width-times-length formula.
Cope inside corners, miter outside corners
Coped inside corners hold up better to seasonal wood movement than mitered ones, which can visibly gap over time.
Plan seams behind furniture
Where two boards must meet on the same wall, plan the seam to fall behind a piece of furniture that will stay in place.
Back-prime boards before installing
Priming or painting all sides of the board before installation protects against moisture and produces a cleaner finished edge.
Install flooring before baseboard when possible
Baseboard installed after flooring can be scribed to sit just above it, hiding the flooring’s expansion gap cleanly.
Order a few extra feet for a first attempt
A first attempt at coping or mitering corners often uses more material than expected; budget toward the higher waste percentage.
Baseboard calculation questions — answered.
More calculators for every room decision.
Every tool uses professional designer formulas. Free, instant, no sign-up — just enter your room and get the exact answer.
Bookmark HomeStyle Calculator for every trim project.
From a single bedroom to a whole-floor renovation, our free tools give you the exact footage, pieces, and cost before you order material.