Order the Right Length of Stair Runner.
Enter your step count, tread depth and riser height, and get an instant total runner length, square footage and cost estimate — including the tuck allowance installers rely on so the runner can be shifted down later to hide wear.
Add tread depth and riser height together, multiply by the number of steps, then add roughly 24 inches for tuck allowance plus 5 to 20 percent extra depending on stair complexity and any landing.
Typical runner length by step count.
These estimates assume a 10.5 inch tread, 7.5 inch riser, and a 10 percent waste allowance with no landing. Use the calculator above for a length matched to your exact staircase.
| Step Count | Base Length | With Tuck Allowance | With 10% Waste | Notes |
|---|---|---|---|---|
| 8 steps | 12 ft | 14 ft | 15.4 ft | Short single flight |
| 12 steps | 18 ft | 20 ft | 22 ft | Common single-flight length |
| 14 steps | 21 ft | 23 ft | 25.3 ft | Typical U.S. residential flight |
| 16 steps | 24 ft | 26 ft | 28.6 ft | Taller single-story stairs |
| 18 steps + landing | 27 ft + landing | 29 ft + landing | 31.9 ft + landing | Add landing depth separately |
| 22 steps (2 flights) | 33 ft | 35 ft | 38.5 ft | Confirm landing depth if present |
Four stair runner installation styles — and what to expect from each.
How a runner is installed changes both its finished look and, in some cases, the total length needed. Here’s what each method is built for.
Waterfall
The runner falls straight down the back of each step without following the riser’s angle, leaving a small shadow gap. The most common and budget-friendly installation method.
Standard length calculationCaptured / Rod
The runner is pulled tight into the corner of each tread and riser, usually held with decorative stair rods. Uses slightly more runner to hug each angle precisely.
+3–5% extra length typicalFrench Cap
The runner is stapled and tacked with a finished, capped edge at each step, giving a very clean, tailored look. Often paired with a waterfall or captured layout underneath.
Finish detail, not length driverHollywood / Bullnose
The runner wraps fully over a rounded front nosing edge with no visible tread underneath. Needs a bit of extra length per step to wrap the curved edge.
+5–8% extra length typicalSee how stair runner length builds up, step by step.
These steps cover the essentials: measuring the staircase, accounting for any landing, and adding the tuck allowance before ordering runner material.
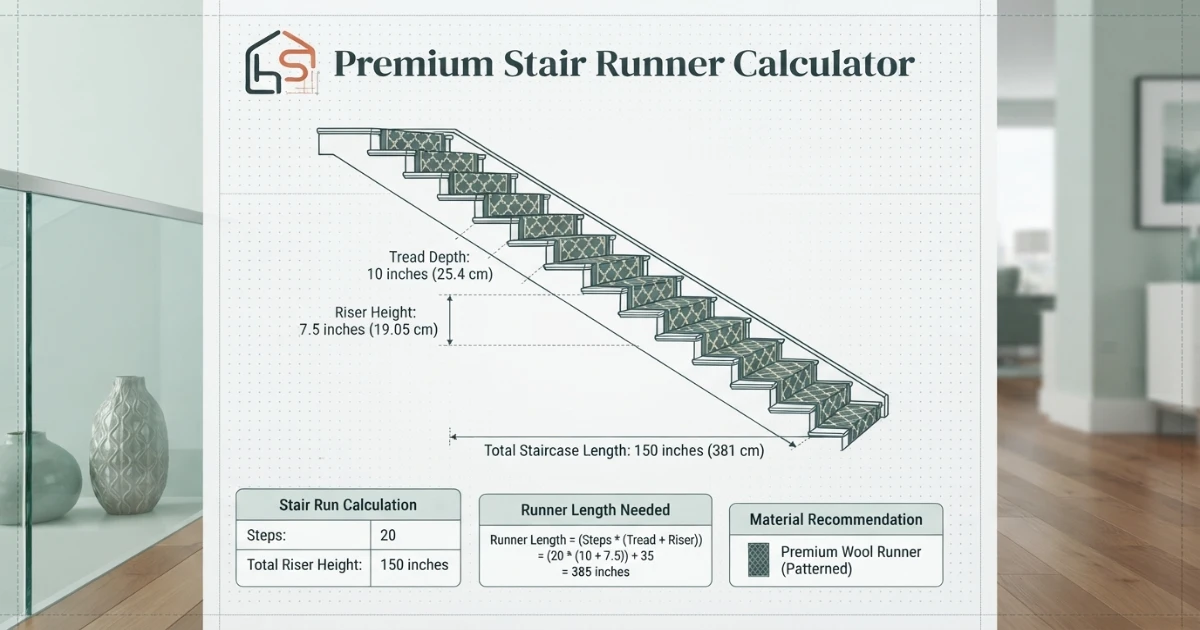
Measure tread and riser
Start with the depth of one tread and the height of one riser before calculating total runner length.
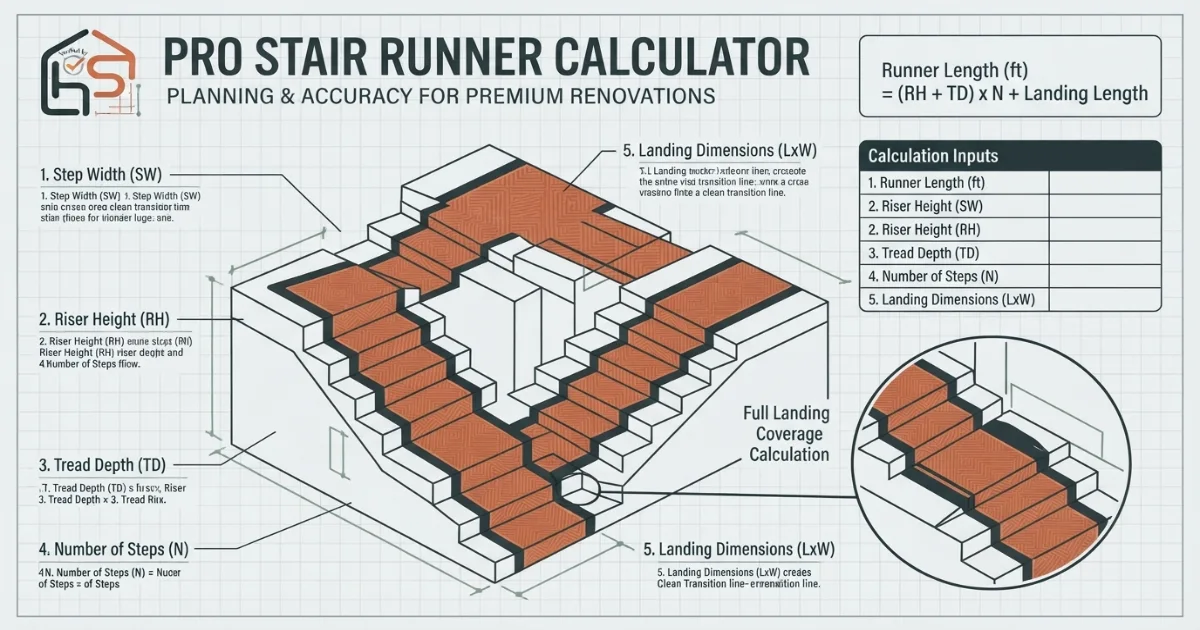
Account for the landing
A landing adds its full depth to the total length as one flat, uninterrupted section between flights.
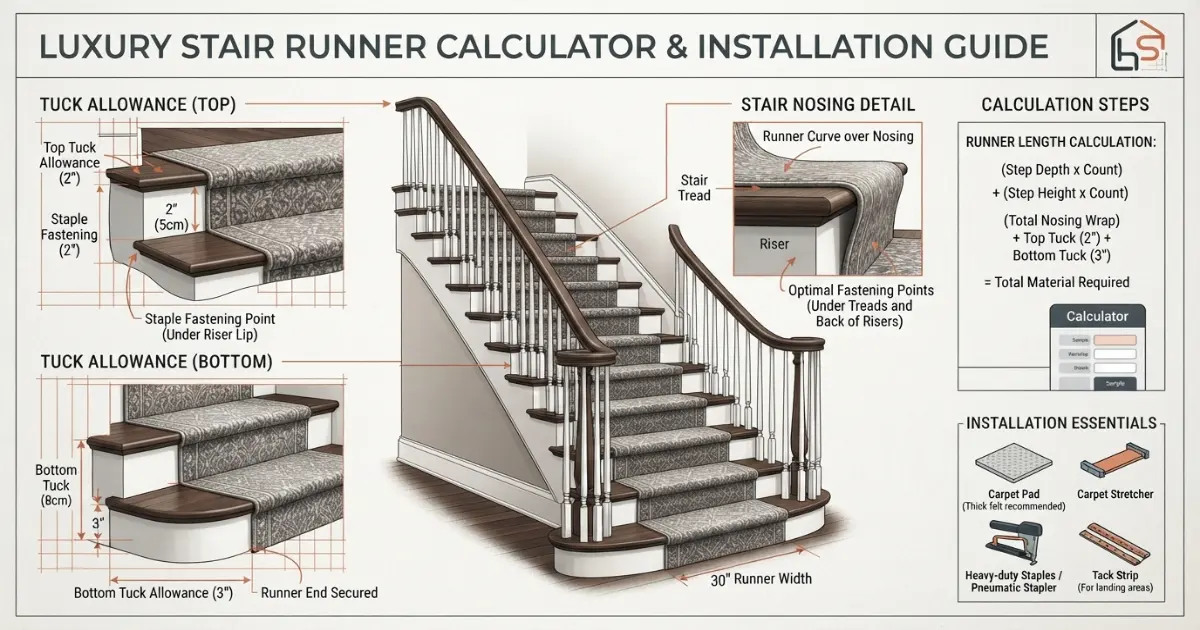
Add the tuck allowance
Extra length folded under at the top and bottom lets the runner be shifted later to hide wear without buying new material.
How to calculate stair runner length — the complete guide.
The most common stair runner ordering mistake is calculating only the flat tread and riser measurements and forgetting the tuck allowance and any landing. A 14-step staircase can easily need two to three feet more runner than the raw tread-and-riser math suggests once tuck allowance, waste, and a landing are all factored in, which is why a careful order accounts for every one of these separately rather than rounding up a single flat number.
A stair runner is one of the most functional upgrades a staircase can get, muffling footstep noise, softening the visual weight of bare wood or painted risers, and adding some slip resistance on an otherwise hard, slippery surface. It’s also a project where getting the yardage wrong is more disruptive than on a flat floor, since a runner that comes up short partway down a flight of stairs is far more visually obvious, and far more awkward to patch, than a rug that’s a few inches smaller than planned. This guide walks through every part of the calculation individually, in the order a stair runner installer would typically work through it.
Step 1: Count every step the runner will actually cover
Start by counting the full number of steps in the staircase, including the bottom step if the runner will start there and the top step if it continues onto the upper floor’s landing or hallway. It’s easy to undercount by one or two steps, particularly on stairs with a tight turn or a step that’s partially hidden by a wall, so walking the full staircase and counting in person, rather than estimating from a floor plan, is the more reliable approach.
Step 2: Measure one tread’s depth accurately
Tread depth is the horizontal measurement of a single step, from the front edge, or nosing, to the back where the riser begins. Most residential stairs use a tread depth between 10 and 11 inches, though older homes and some code variations can run slightly outside that range. Measuring one representative tread directly, rather than assuming a standard figure, avoids compounding a small measurement error across every step in a long flight.
Step 3: Measure one riser’s height accurately
Riser height is the vertical measurement of the face of a single step, from the top of one tread to the top of the next. Standard residential risers run between about 7 and 7.75 inches, with building codes typically capping the maximum height and setting a minimum for safety and consistency. As with tread depth, measuring an actual riser directly is more reliable than relying on a generic assumption, since older or custom staircases sometimes fall outside typical ranges.
Step 4: Understand why tread and riser are added together, not measured separately
A stair runner doesn’t just lie flat along the tread; it also wraps down the face of the riser to connect with the next step below. This means the runner length needed per step is the tread depth plus the riser height combined, not just the tread depth alone. Skipping the riser height in the calculation is one of the most common reasons a stair runner order comes up noticeably short, since it under-counts a meaningful portion of material on every single step.
Step 5: Multiply the per-step length by the total step count
Once tread depth and riser height are added together for a single step, multiply that combined figure by the total number of steps counted in step one. This gives the base runner length needed to cover the staircase’s treads and risers alone, before any landing, tuck allowance, or waste factor is added on top.
Step 6: Add the full depth of any landing separately
A landing, the flat platform between two flights of stairs or at a turn in the staircase, needs its own separate measurement added to the total. Unlike a step, a landing doesn’t have a riser to wrap down, so only its horizontal depth gets added to the running total, measured the same way a tread depth would be measured. Multi-flight staircases with more than one landing need each landing’s depth measured and added individually, since landing depths aren’t always consistent within the same staircase.
Step 7: Understand what a tuck allowance is and why it matters
A tuck allowance is extra runner length, typically around 12 inches at the top of the staircase and another 12 inches at the bottom, that gets folded under and hidden from view rather than being cut flush to the exact calculated length. This might seem like wasted material at first glance, but it serves a specific long-term purpose: when the most heavily walked-on section of a runner starts to show wear, usually a few steps from the top or bottom, the entire runner can be shifted down slightly to move the worn section into the hidden tuck area, extending the runner’s usable life by a year or more without buying new material.
Step 8: Add a waste and complexity allowance based on the staircase shape
Straight staircases with no turns need a relatively modest waste allowance, often around 5 percent, to cover ordinary cutting waste and pattern alignment. Staircases with winder steps, meaning pie-shaped steps that turn a corner without a full landing, or curved staircases, need considerably more, often 15 to 20 percent, since each angled step requires custom cutting and more careful pattern matching than a straight run. Underestimating this allowance on a staircase with turns is one of the most common reasons an installer requests additional material mid-project.
Step 9: Choose a runner width that suits the staircase
Most stair runners come in standard widths between 27 and 32 inches, designed to leave a consistent border of exposed wood or carpet, typically 3 to 4 inches, on each side of a standard 36 inch wide staircase. Wider or narrower staircases may call for a custom width, and some runner materials are available in a wider range of widths than others, so it’s worth confirming available widths for a specific product before finalizing a purchase based on the standard figures alone.
Step 10: Understand how installation style changes the length needed
A waterfall installation, where the runner falls straight down the back of each step without following the exact angle of the riser, uses the standard tread-plus-riser calculation with no significant extra allowance. A captured or stair-rod installation, which pulls the runner tightly into the corner of each tread and riser, typically needs a small additional allowance, often 3 to 5 percent, to accommodate the tighter, more precise fit at each angle. A Hollywood or bullnose installation, where the runner wraps fully over a rounded front nosing edge, needs the most additional length per step, often 5 to 8 percent, to wrap that curved edge cleanly.
Step 11: Factor in padding separately from the runner itself
Most stair runner installations include a padding layer underneath for cushioning, sound dampening, and to help protect the runner from wearing against the hard edge of each step. Padding is typically purchased and calculated separately from the runner material itself, often sold in a roll sized similarly to carpet padding, and its cost and quantity should be budgeted as its own line item rather than assumed to be included in the runner’s price per linear foot.
Step 12: Confirm whether the runner needs directional pattern matching
Solid or subtly textured stair runners can be cut and installed without concern for pattern direction, but a runner with a directional pattern, such as a stripe or a motif with an obvious “up” orientation, needs every step’s cut piece oriented consistently. This is a similar consideration to pattern repeat on upholstery fabric or wallpaper, and it typically adds a modest amount to the overall waste allowance on a patterned runner compared to a solid one.
Step 13: Account for a bottom step that behaves differently
Many staircases have a bottom step, sometimes called a starting step or bullnose step, that’s wider or shaped differently than the rest of the flight, especially in more traditional stair designs. If the runner needs to wrap around a curved or flared bottom step, this step alone may need extra material beyond what the standard tread-plus-riser formula for the rest of the flight accounts for, and it’s worth measuring this step separately if its shape differs noticeably from the others.
Step 14: Decide how far the runner extends onto the upper and lower floors
Some stair runner installations stop exactly at the top and bottom step, while others continue a short distance onto the upper hallway floor or the lower entry floor for a more finished, continuous look. If the runner will extend beyond the stairs themselves, that additional flat floor length needs to be measured and added to the total separately, using the same logic as a landing measurement.
Step 15: Get a professional measurement for winder or curved staircases
While a straight staircase can usually be measured and calculated accurately using the steps above, a staircase with winder steps or a full curve benefits from an in-person measurement by an experienced installer, since the exact cutting pattern for each angled step is difficult to estimate accurately from a written formula alone. Ordering slightly more material than a rough estimate suggests, and confirming the final quantity with the installer before cutting begins, is the safer approach on any staircase with turns.
Step 16: Round the final order up to account for real-world variance
Even after tread depth, riser height, landing depth, tuck allowance, and a waste percentage are all calculated carefully, it’s good practice to round the final runner length up to the next full foot, or slightly beyond, rather than ordering the exact calculated figure. Stair runner material is difficult to source in small top-up quantities from the same dye lot once an installation is underway, so a small buffer at the ordering stage is considerably cheaper than a second shipping charge and a potential dye lot mismatch later.
Ordering rules that prevent a stair runner coming up short.
A calculator gives the best starting numbers, but the final order still depends on staircase shape, installation style and landing details. The rules below cover what’s worth checking before placing a runner order.
Add tread depth and riser height, multiply by step count, add any landing depth, then add roughly 24 inches for tuck allowance and 5 to 20 percent for waste depending on whether the staircase is straight or has winders and turns.
Always include the tuck allowance
Roughly 24 inches of hidden extra length lets the runner be shifted later to hide wear, extending its usable life significantly.
Measure the riser, not just the tread
Forgetting riser height is the most common reason a stair runner order comes up short across a full flight of steps.
Add landing depth as its own line item
A landing doesn’t have a riser, so only its flat depth gets added, measured the same way as a single tread.
Get winder stairs measured in person
Angled and curved steps are difficult to estimate accurately from a formula alone and benefit from a professional on-site measurement.
Helpful flooring and renovation topics.
A stair runner is often planned alongside the flooring it connects to at the top and bottom of the staircase. Use these supporting pages from the HomeStyle Calculator homepage to plan the rest of the space.
Six things stair runner installers always check before starting.
Measure every tread, not just one
Older staircases sometimes have slightly inconsistent tread depths from step to step, so spot-checking a few rather than just one catches this early.
Center the runner before the first staple
Measure and mark the centerline at the top and bottom of the flight first, so the runner stays evenly bordered on both sides down the full staircase.
Pad every step individually
Padding cut to fit each step separately, rather than one continuous strip, holds up better over time and is easier to replace on individual worn steps.
Plan the tuck allowance direction deliberately
Deciding in advance which direction the runner will eventually be shifted keeps the tuck allowance oriented usefully rather than wasted on the wrong end.
Check local code for winder step minimums
Winder and curved stairs often have specific minimum tread depth requirements at the narrow point, which affects how the runner needs to be cut and fitted.
Keep a remnant for future repairs
A small leftover length from the same dye lot makes it possible to repair a damaged section of runner without a visible color mismatch later.
Stair runner questions — answered.
More calculators for every room decision.
Every tool uses professional designer and installer formulas. Free, instant, no sign-up — just enter your measurements and get the exact answer.
Bookmark HomeStyle Calculator for every renovation decision.
From stair runners to flooring to paint, our free tools give you the exact quantity and cost before you order material or book an installer.