Projector screen size for room: Best complete guide
Projector screen size for room planning starts with the viewer’s eye-to-screen distance, not the projector location. A 100-inch screen suits many eight to eleven-foot rooms, while 120 or 135 inches works when the wall, ceiling, throw ratio and image brightness support a more cinematic view.
Projector screen size for room: match viewing distance first, then verify wall and throw fit.
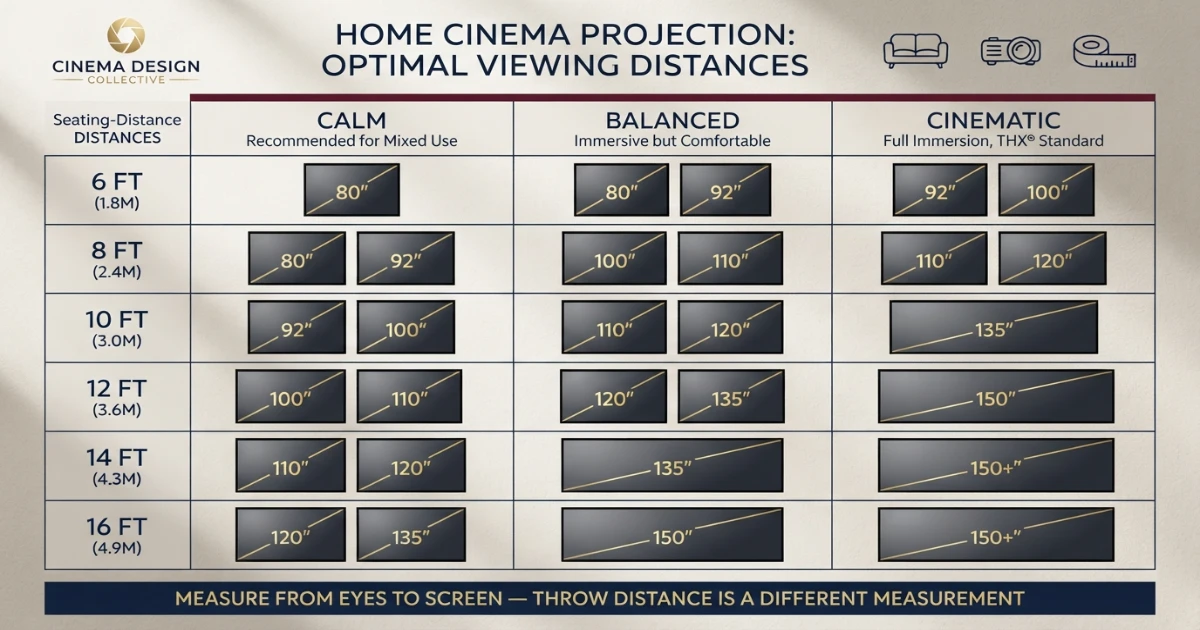
At eight feet, start around 92 to 110 inches. At ten feet, start around 100 to 120 inches. At twelve feet, start around 110 to 135 inches.
Choose the lower end for relaxed mixed viewing and the upper end for a cinematic field of view. Then check clear wall width, screen height, bottom edge, projector throw ratio, lens shift and ambient-light performance.
Compare projector scale with television distance and installation guides
Use the projector calculator below, then compare the result with TV size, room width and mounting-height references.
Projector-screen planning from seating distance to final lens placement
Projector screen size and room-fit calculator
Enter viewer distance, preferred field of view, clear wall dimensions and projector throw ratio. The calculator recommends a common screen and checks installation fit.
Screen and installation fit
Nearest common 16:9 diagonal.
Visible image before frame.
Lens-to-screen estimate.
Image fits entered wall.
A 110-inch 16:9 screen is a balanced starting point from 10 feet. Confirm the exact projector zoom range, lens shift, frame width and brightness before ordering.
Projector screen size for room distance chart
The chart separates calm, balanced and cinematic viewing. Projector screens can feel more comfortable at large sizes because the image is reflected rather than self-emissive, but field of view still controls eye movement and immersion.
| Viewing distance | Calm | Balanced | Cinematic | Typical room |
|---|---|---|---|---|
| 6 ft | 60–72 in | 72–80 in | 80–92 in | Bedroom / compact media nook |
| 7 ft | 72–80 in | 80–92 in | 92–100 in | Small apartment theater |
| 8 ft | 80–92 in | 92–100 in | 100–110 in | Compact living room |
| 9 ft | 92–100 in | 100–110 in | 110–120 in | Small dedicated room |
| 10 ft | 100 in | 100–120 in | 120 in | Typical home theater |
| 11 ft | 100–110 in | 110–120 in | 120–135 in | Medium media room |
| 12 ft | 110–120 in | 120–135 in | 135 in | Medium dedicated room |
| 13 ft | 120 in | 120–135 in | 135–150 in | Large media room |
| 14 ft | 120–135 in | 135 in | 150 in | Large dedicated room |
| 16 ft | 135 in | 150 in | 150–165 in | Extra-large theater |
Measure the room before choosing the screen
A projector screen size for room decision should be based on the real seating position, the uninterrupted screen wall and the projector’s usable lens location.
A projector screen size for room decision needs four independent measurements: viewer distance, clear wall width, clear wall height and available projector position.
Measure from the primary viewer’s eyes to the screen plane. Sofa depth matters because the viewer’s head usually sits several inches in front of the back wall.
Measure clear wall width after subtracting door trim, windows, speakers, columns, curtains and service clearance. A wall can be twelve feet wide but provide far less usable screen space.
Measure floor-to-ceiling height and the usable vertical zone. Furniture, center speakers, subwoofers and planned screen bottom clearance reduce the image height available.
Finally, measure every possible projector-lens location. Ceiling beams, fans, lights and rear shelves can prevent the lens from reaching the required throw distance.
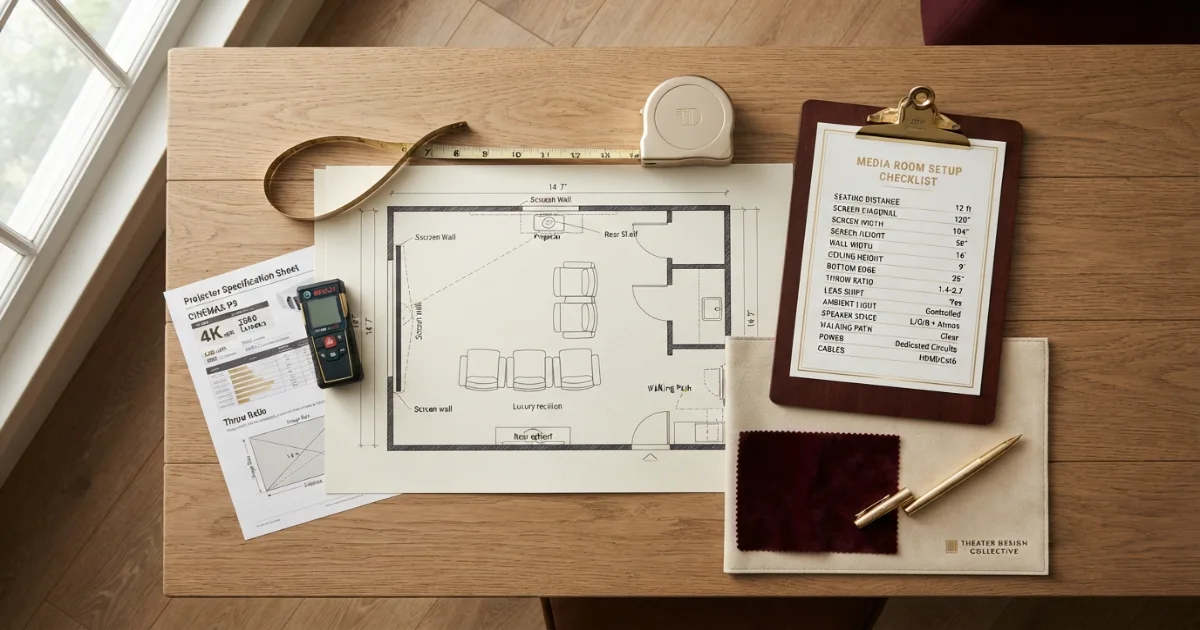
Record the measurements on a simple top and side-view room sketch. This prevents seating distance, screen size and projector placement from being treated as one number.
Projector-screen dimensions by diagonal size
Most home-theater screens use a 16:9 image. The diagonal does not tell you whether the frame fits the wall until it is converted into width and height.
| Diagonal | Image width | Image height | Image area | Planning wall width |
|---|---|---|---|---|
| 80 in | 69.7 in | 39.2 in | 19.0 sq ft | 77.7 in |
| 92 in | 80.2 in | 45.1 in | 25.1 sq ft | 88.2 in |
| 100 in | 87.2 in | 49.0 in | 29.7 sq ft | 95.2 in |
| 110 in | 95.9 in | 53.9 in | 35.9 sq ft | 103.9 in |
| 120 in | 104.6 in | 58.8 in | 42.7 sq ft | 112.6 in |
| 135 in | 117.7 in | 66.2 in | 54.1 sq ft | 125.7 in |
| 150 in | 130.7 in | 73.5 in | 66.8 sq ft | 138.7 in |
The planning-wall column adds only eight inches to image width. Real frames, masking systems and speakers may require more.
A 100-inch image is approximately 87.2 inches wide and 49 inches high. A 120-inch image is roughly 104.6 by 58.8 inches. A 135-inch image is approximately 117.7 by 66.2 inches.
Measure the complete screen product, not only the image opening. Motorized housings can be substantially wider than the visible image.
How field of view controls the experience
Two rooms with the same dimensions can need different screens because viewers prefer different levels of immersion.
Good for mixed television, subtitles and viewers who prefer easy edge scanning.
Strong home-theater impact without making the image dominate every program.
Closer to the immersive cinema-style range used in current TV guidance.
A wider field of view increases the recommended image width at the same seating distance. It also makes compression, motion blur and low-resolution material easier to notice.
Use the closest regular seat when testing. The front row experiences the largest field of view and should not be ignored because the center row looks perfect.
Outline the proposed image and watch familiar content on the blank area using a temporary projection if possible.
Throw ratio: will the projector create the selected image?
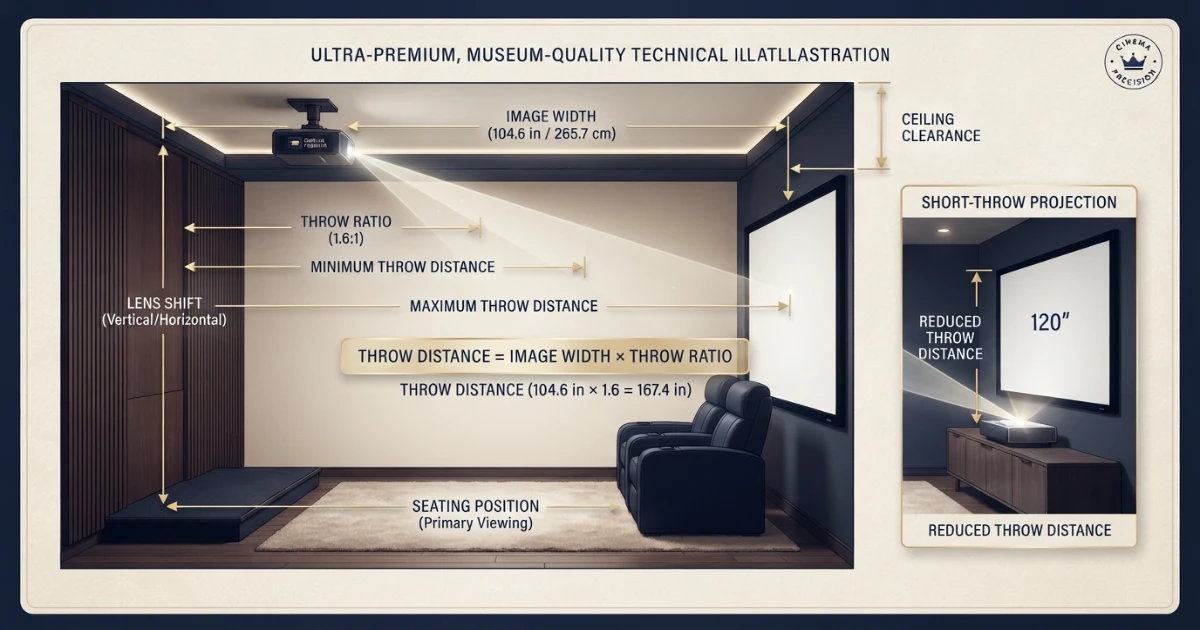
Throw ratio is the relationship between projector-lens distance and image width. BenQ defines the same practical relationship, and Epson publishes model-specific projection-distance tables because zoom, lens and image size change the installation range.
Core throw formula
Use image width, not diagonal size, in the calculation.
A 100-inch 16:9 image is approximately 7.27 feet wide. With a 1.13 throw ratio, the lens needs about 8.2 feet of distance. BenQ uses this same 100-inch example in its small-apartment projector guidance.
A projector with a 1.13–1.47 zoom range would place that 100-inch image at approximately 8.2 to 10.7 feet from the lens.
Throw distance normally begins at the lens, not the rear or front edge of the projector body. Verify the manufacturer diagram for the exact model.
Ultra-short-throw projectors use much smaller throw ratios and sit close to the wall. Their cabinet position and alignment tolerances are different from standard and short-throw projectors.
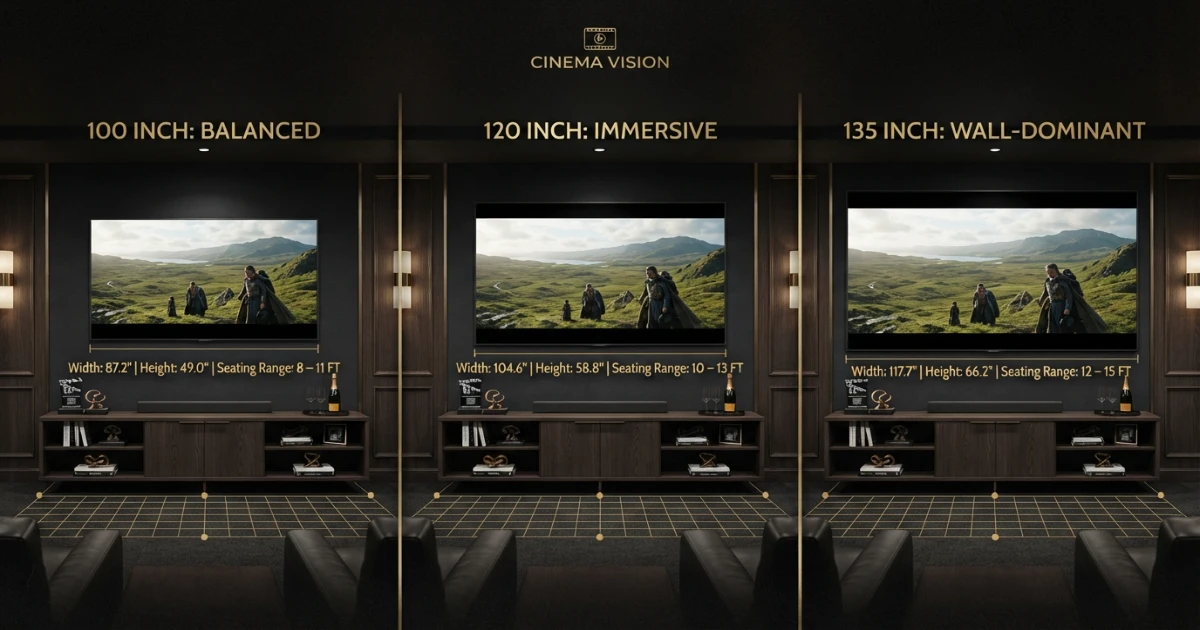
100 vs 120 vs 135-inch projector screen
The right projector screen size for room layouts becomes clearer when 100, 120 and 135-inch screens are outlined at the same viewing distance.
Balanced in many eight to eleven-foot rooms. Image width is about 87.2 inches.
Immersive around ten to thirteen feet. Image width is about 104.6 inches.
Strong dedicated-theater scale around twelve to fifteen feet. Image width is about 117.7 inches.
A 100-inch screen is often easier to illuminate, fit and position. It leaves more room for front speakers and usually creates a lower screen center.
A 120-inch screen adds approximately 44% more image area than a 100-inch screen. The difference feels substantial even though diagonal size rises by only twenty inches.
A 135-inch screen adds another large step in width and height. It may require an acoustically transparent screen so speakers can sit behind the image rather than crowding the sides.
Choose size after considering content quality. Sports, compressed television and lower-resolution sources can look rough on a wall-dominant image.
Ceiling height, image bottom and screen center
Large screens often fail vertically before they fail horizontally. A 120-inch 16:9 image is almost 59 inches high, and the frame adds more.
If the image bottom begins 24 inches above the floor, a 120-inch image top reaches almost 83 inches before the frame. That leaves little room in an eight-foot room.
Keep the image center close to seated eye level when possible, but allow space for a center speaker, media console or front-row sightline.
Do not place the bottom edge too high simply to fit a larger diagonal. Excessive height produces neck strain and can make subtitles uncomfortable.
Measure the ceiling mount, projector body and vertical lens shift. A ceiling-mounted projector can sit above the screen center only when the lens-shift or offset specification permits the geometry.
Keystone correction should not be the primary way to fix poor physical placement because it can reduce usable resolution and image area.
Lens shift, zoom and projector placement
Optical zoom changes image size without moving the projector within the supported throw range. Lens shift moves the image vertically or horizontally without tilting the projector.
These adjustments are model-specific. A large zoom range provides installation flexibility, while limited lens shift demands more precise mounting.
Keep the projector level unless the manufacturer specifies another orientation. Tilting and correcting the image digitally can reduce clarity and create uneven focus.
Check whether the published throw ratio applies to the selected aspect ratio and lens. Interchangeable-lens projectors can have completely different ranges.
Allow access for focus, zoom, filters and service. A projector tightly boxed into cabinetry can overheat or become impossible to maintain.
Ambient light, brightness and screen size
A larger image spreads the projector’s available light over more area. Moving from 100 to 120 inches increases image area by about 44%, so the same projector produces lower luminance.
Dark rooms can support larger screens with less light output. Living rooms with windows and white walls may need stronger light control, a smaller image or an appropriate ambient-light-rejecting screen.
Projector brightness specifications do not translate directly into final screen brightness. Picture mode, calibration, lamp or laser output, zoom position, screen gain and room reflections all matter.
Do not select an oversized screen from a dark showroom demo if the real room is used during daytime.
Test curtains, blinds and wall reflections. Darker front walls and ceilings can improve perceived contrast in a dedicated room.
Screen material, gain and viewing angle
A matte-white screen is versatile and provides broad viewing angles in controlled light. Higher-gain materials direct more light toward the audience but can narrow viewing angles or create visible brightness variation.
Ambient-light-rejecting materials are designed for specific light and projector directions. They must be oriented and installed according to the manufacturer instructions.
Ultra-short-throw projectors require compatible screen structures because light arrives from a steep angle below the image.
An acoustically transparent screen allows speakers behind the image, improving dialogue placement and freeing side-wall width. Perforation or weave can affect brightness and visible texture at close distances.
Order samples when possible and view them in the actual room with the intended projector.
16:9, 2.35:1 and mixed content
Most streaming, television and gaming content uses 16:9, making it the most practical general-purpose screen shape.
A 2.35:1 or 2.40:1 cinemascope screen creates a wide movie presentation but requires planning for 16:9 content, lens memory, masking or unused side areas.
Screen diagonal comparisons can be misleading across aspect ratios. A 120-inch 16:9 screen and a 120-inch 2.35:1 screen have different heights and widths.
Use image width and height rather than diagonal alone when comparing formats.
Rooms with low ceilings may benefit from a wider constant-height setup, while mixed-use rooms usually remain simpler with 16:9.
Speaker placement and screen width
Front speakers placed beside the screen need horizontal space and clearance from corners. A screen that fills the entire wall can force poor speaker placement.
A center speaker below the screen raises the required image bottom. Calculate the resulting center height before ordering.
An acoustically transparent screen can place all front speakers behind the image, but it requires wall depth or a false wall.
Do not hide ordinary speakers behind a solid screen. High frequencies and dialogue clarity can be blocked.
Subwoofer placement is less tied to the screen, but large enclosures still affect walking paths and front-wall layout.
Projector screen size by real room example
Small apartment, seven-foot seat: An 80 to 92-inch screen is balanced. A 100-inch image feels strongly immersive.
Compact living room, eight-foot seat: A 92 or 100-inch screen is a practical starting point. A 110-inch image needs careful wall and brightness checks.
Ten-foot media room: A 100-inch screen is calm, 110 inches is balanced and 120 inches is cinematic.
Twelve-foot dedicated room: A 120-inch screen is balanced, while 135 inches creates stronger theater scale.
Fourteen-foot room: A 135-inch screen is a natural starting point. A 150-inch image needs substantial wall width and light output.
Low eight-foot ceiling: Vertical image height may limit size before wall width does. Check bottom edge and frame height carefully.
Standard, short-throw and ultra-short-throw rooms
Standard-throw projectors usually mount behind or above the seating zone. They often offer flexible zoom and lens shift but need enough room length.
Short-throw projectors create a large image from closer to the wall. They reduce the chance of people crossing the light path but can be more sensitive to wall flatness.
Ultra-short-throw units sit on a cabinet immediately below the image. Furniture depth, cabinet height and compatible screen material become central design constraints.
Do not assume that a short throw ratio automatically means easier installation. Alignment, focus uniformity and screen flatness can become more demanding.
Resolution and content quality
Large projector images expose source quality. Native 4K, high-bitrate discs and well-mastered streaming look cleaner than compressed HD or low-resolution broadcasts.
At the same seating distance, a larger screen reduces pixels per degree and makes artifacts easier to see.
Projector optical quality, focus uniformity and panel alignment also influence detail across the screen.
Gaming requires attention to input lag and refresh modes. A 120-inch image can be spectacular, but slow processing can undermine the experience.
Use the 4K Viewing Distance Guide and TV Size for Gaming Guide for related planning.
Step-by-step projector-screen room process
Use the main eye position, not room length.
Exclude speakers, trim, furniture and required access.
Select a range from the chart.
Include the complete frame or housing.
Check furniture, speakers and vertical viewing angle.
Calculate lens-to-screen minimum and maximum distance.
Use the exact model manual or calculator.
Match brightness and viewing angle to the room.
Protect sound placement, power and signal routes.
Test real content from every seat before ordering.
Common projector-screen size mistakes
- Using room length instead of eye-to-screen distance.
- Confusing viewing distance with projector throw distance.
- Calculating throw distance from diagonal instead of image width.
- Choosing screen diagonal without converting to width and height.
- Ignoring the complete frame or motorized housing.
- Filling the wall without leaving speaker space.
- Choosing a screen too tall for the ceiling and bottom edge.
- Mounting the image center excessively high.
- Ignoring projector zoom, lens shift and offset limits.
- Using keystone correction to rescue poor placement.
- Increasing screen size without checking brightness.
- Choosing screen material without considering light direction.
- Using an ordinary screen with an ultra-short-throw projector.
- Ignoring content resolution and compression.
- Ordering before testing the image outline.
Projector screen size for room buying checklist
- Primary eye-to-screen viewing distance.
- Closest and farthest regular seats.
- Calm, balanced or cinematic preference.
- Selected screen diagonal.
- Visible image width and height.
- Complete frame or housing dimensions.
- Clear wall width and height.
- Screen bottom edge and center height.
- Speaker and furniture clearance.
- Projector minimum and maximum throw ratio.
- Required lens-to-screen throw range.
- Zoom and lens-shift range.
- Ceiling mount position and service access.
- Ambient-light level and control.
- Screen material, gain and viewing cone.
- Projector brightness in the chosen mode.
- Aspect ratio and masking plan.
- Power, HDMI and network routes.
- Walking path and shadow risk.
- Real content tested on the outlined image.
Final answer: projector screen size versus room size
Projector screen size for room planning should begin with eye-to-screen distance. Around 100 inches suits many eight to eleven-foot setups, while 120 inches is a strong choice around ten to thirteen feet.
Use the lower end for mixed television and easier edge scanning. Use the upper end for a dedicated cinema-style experience.
Before buying, convert the diagonal into image width and height, add the frame, check wall and ceiling fit, calculate throw distance from the exact projector ratio and verify brightness, screen material and speaker space.
Comparing a projector with a large TV?
Use the free TV Size Calculator to compare the same field of view at your seating distance.
Official projector and viewing references
Two projector-screen categories to compare
Verify complete dimensions, aspect ratio, mounting method and projector compatibility before ordering.
Fixed-Frame 16:9 Projector Screens
Compare 100, 120 and 135-inch screens by complete frame size, material and mounting depth.
- Check image and frame dimensions
- Match material to room light
- Verify wall structure
Motorized Projector Screens
Compare housing width, drop length, power location, controls and complete installation clearance.
- Check housing dimensions
- Confirm drop and black border
- Plan power and service access
Affiliate disclosure: As an Amazon Associate, HomeStyle Calculator may earn from qualifying purchases. Product specifications, prices and availability can change.
Projector screen size for room FAQs
What projector screen size is best for a room?
The best size depends primarily on eye-to-screen distance and usable wall dimensions. Around 100 inches suits many 8 to 11-foot rooms, while 120 inches works well around 10 to 13 feet for a more cinematic view.
How big should a projector screen be for a 10-foot room?
When the viewing distance is about 10 feet, a 100 to 120-inch 16:9 screen is a practical range. Choose the lower end for a calmer view and the upper end for stronger immersion.
How far should I sit from a 120-inch projector screen?
A practical range is roughly 10 to 13 feet depending on preferred field of view, content quality and eyesight.
What are the dimensions of a 100-inch projector screen?
A 16:9 100-inch image is approximately 87.2 inches wide and 49.0 inches high before adding the screen frame or border.
What are the dimensions of a 120-inch projector screen?
A 16:9 120-inch image is approximately 104.6 inches wide and 58.8 inches high before the frame.
How do I calculate projector throw distance?
Multiply image width by the projector’s throw ratio. A 100-inch 16:9 image is about 7.27 feet wide, so a 1.13 throw ratio needs roughly 8.2 feet from lens to screen.
Is viewing distance the same as projector throw distance?
No. Viewing distance is measured from the viewer’s eyes to the screen. Throw distance is measured from the projector lens to the image surface.
Can a 120-inch screen fit on a 10-foot-wide wall?
The visible image is about 104.6 inches wide, leaving approximately 15.4 inches before adding a frame. It can fit, but exact frame width, speakers, trim and service clearance must be checked.
How high should a projector screen be mounted?
Keep the image center close to seated eye level when possible. The bottom edge often needs to remain above furniture or speakers, so calculate the resulting vertical viewing angle.
Does ambient light change the ideal screen size?
Yes. A larger image spreads the projector’s light over more area, reducing image brightness. Bright rooms may need a smaller screen, stronger light control or a suitable screen material.