How high to hang curtains: the designer rule.
Compare the classic 4-to-6-inch rise, the two-thirds rule and a near-ceiling mount. Then calculate the exact fabric-top height, rod position, panel length, fullness and panel count for your own window.
Place the finished fabric 4–6 inches above the frame—or 2–4 inches below the ceiling for a taller look.
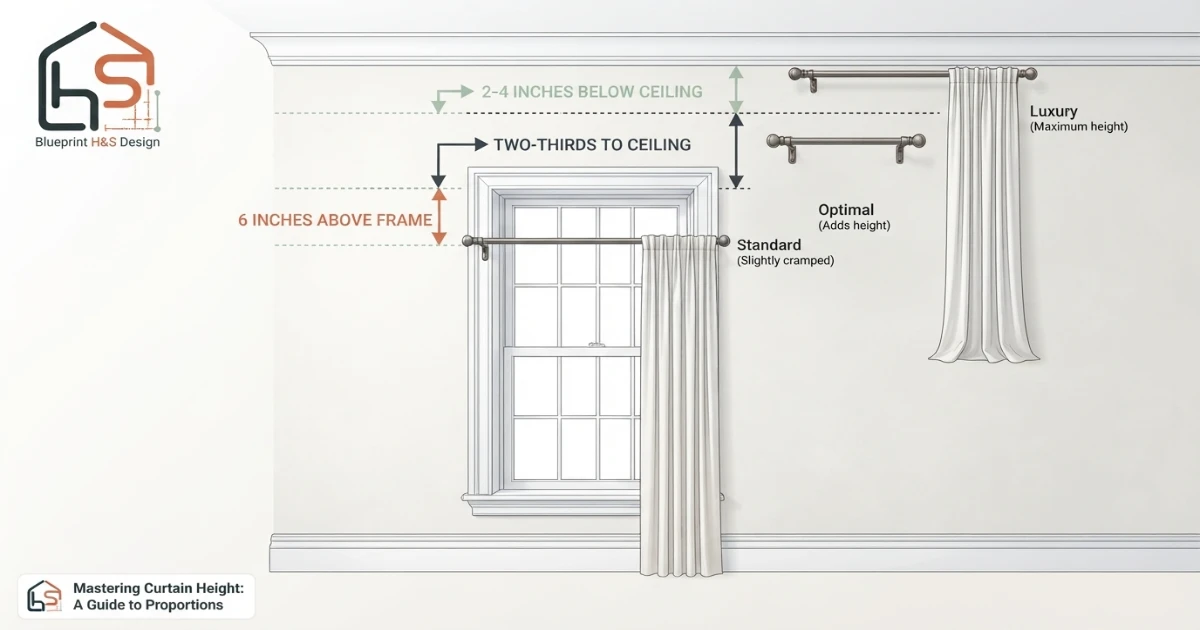
To decide how high to hang curtains, compare three marks: six inches above the frame, two-thirds of the open gap, and two to four inches below the ceiling or crown molding. Choose the highest practical line that works with the panel length, header and floor finish.
Always convert the chosen fabric-top line into the correct rod height. Rings, clips, hooks, grommets and pockets position the fabric differently relative to the rod.
Choose the next page based on the decision you are making
Set the mounting line first, then calculate width, finished length and panel quantity without mixing horizontal and vertical measurements.
Rod-height decisions from first measurement to final installation
Curtain rod-height and panel-length calculator
Enter the real room and window measurements, choose a design position and header, and get the fabric-top height, rod-center height, panel drop, rod width and even panel count.
Two-thirds mounting plan
10.7 in above frame
Clip rings place fabric below rod
Compare with 90 or 95 in panels
120 in total fabric
Rounded to an even center-opening set
152 cm rod width
The proposed line is high enough to strengthen the window without crowding the ceiling.
See why the fabric-top line matters more than the old rod holes
These image slots are ready for branded WebP visuals. Each one supports a distinct measurement or installation decision rather than repeating the hero.
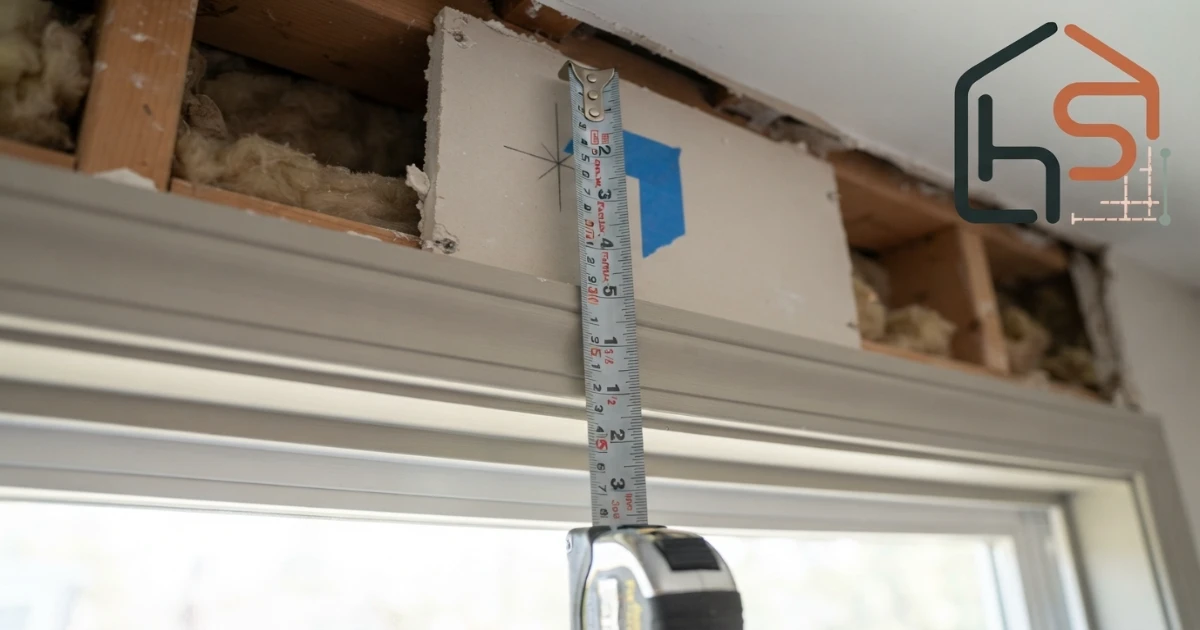
How high to hang curtains without guessing
The best height is the one that connects the window to the room, works with an available curtain length and leaves enough space for the header and hardware. Use the three-position comparison instead of copying a universal number from a photograph.
How high to hang curtains: the designer rule explained
The most useful designer rule is not one fixed number. It is a hierarchy of three positions. Start by marking the top of the window frame, the bottom of any crown molding and the finished ceiling line. A classic installation places the top of the finished curtain fabric about 4 to 6 inches above the frame. A proportional installation places it about two-thirds of the way through the open wall space. A near-ceiling installation leaves roughly 2 to 4 inches below the ceiling or molding.
The right choice depends on the wall, not only the glass. A low window with a large blank area above it often benefits from a higher treatment because the long vertical fabric line visually reconnects the window with the room. A window already close to the ceiling may need only a small rise. Crown molding, ceiling tracks, transoms, radiators, built-ins and nearby furniture can change the practical answer.
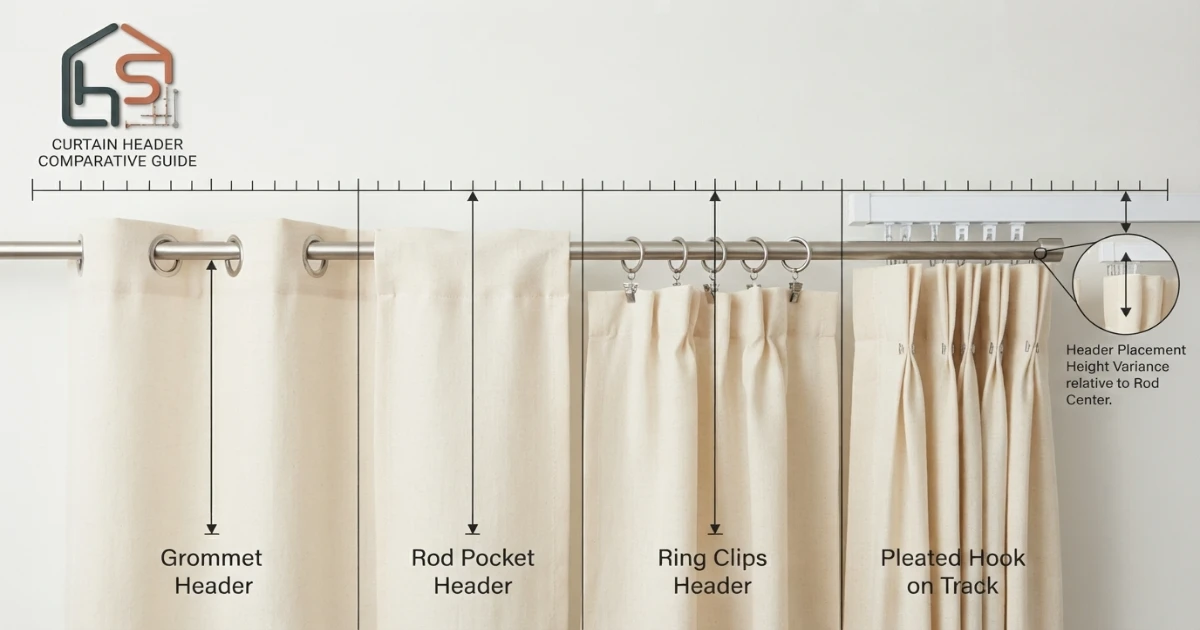
When deciding how high to hang curtains, mark the proposed top of the finished fabric rather than only the center of the rod. Ring clips place fabric below the rod. Grommet and rod-pocket curtains usually extend above the rod center. A track or pleated hook creates another offset. The visible fabric line is what changes the room proportion, so that is the measurement that should control the plan.
The working rule
Compare three marks: 6 inches above the frame, two-thirds of the open wall gap, and 2 to 4 inches below the ceiling or molding. Choose the mark that produces the best proportion and can be matched by a real panel length and header.
Compare three positions when deciding how high to hang curtains
A classic 4-to-6-inch rise is reliable when the space above the window is modest, the room is casual or existing panel lengths limit the mounting height. It adds separation from the frame without making the treatment feel disconnected from the window. This position is also easier when wall anchors must avoid a steel lintel or when a deep cornice occupies the upper wall.
The two-thirds position is a proportional bridge between the frame and ceiling. Measure the clear vertical gap, multiply it by roughly 0.67 and add that result to the frame-top height. This method responds to the room instead of applying the same six-inch rise everywhere. It is especially useful when the gap is 12 to 24 inches and a near-ceiling mark feels too severe.
A near-ceiling treatment creates the strongest vertical effect. It is often the preferred choice in living rooms, bedrooms and dining rooms where long panels can run to the floor. Leave enough clearance for mounting plates, finials, rings and crown molding. Near-ceiling does not mean pressing the rod into the ceiling; the hardware still needs usable wall structure and space to operate.
| Position | Fabric-top target | Best use | Main check |
|---|---|---|---|
| Classic rise | 4–6 in above frame | Compact gaps, casual rooms, standard panels | Does it still look connected to the ceiling? |
| Two-thirds rule | About 67% through open gap | Balanced proportion between frame and ceiling | Can the chosen panel length reach the floor? |
| Near ceiling | 2–4 in below ceiling or molding | Taller visual line and larger-looking window | Bracket, finial and molding clearance |
Measurements that decide how high to hang curtains
Accurate height begins with five vertical measurements: finished floor to ceiling, finished floor to the top of the window frame, frame top to ceiling or molding, finished floor to the sill and finished floor to any obstruction such as a radiator or counter. Measure at the left, center and right of the treatment area because floors and ceilings are not always level.
Record the shortest floor-to-ceiling reading when planning curtains that float above the floor. A panel that clears one side can drag on the other when the floor rises. For a floor kiss or custom hem, keep all three readings so the installer can level the finished bottom after the rod is mounted.
Measure the clear wall width on both sides of the window as well. A high rod still needs enough horizontal space for stack-back. The complete Measure Window for Curtains guide explains frame width, finished rod width, return depth and grouped-window measurements in detail.
Record the frame, ceiling gap, return depth and nearby obstructions in Measure Window for Curtains before choosing the final mounting line.
- Use a rigid metal tape rather than a soft sewing tape.
- Measure from finished flooring, not subfloor or an estimated baseboard line.
- Identify the bottom of crown molding as the practical ceiling boundary.
- Note alarms, vents, sconces, cabinets and doors near the mounting zone.
- Photograph every marked measurement before removing painter’s tape.
Use the window-to-ceiling gap to decide how high to hang curtains
The open wall gap is measured from the top edge of the window frame to the underside of crown molding or the visible ceiling line. It is not measured from the top of the glass. A thick casing can add several inches, so using the glass line places the rod lower than intended.
When the gap is less than about 8 inches, a classic rise and near-ceiling position may be almost the same. Leave enough room for the brackets and do not force a decorative finial into molding. When the gap is 8 to 16 inches, compare a 4-to-6-inch rise with a near-ceiling mark. When the gap is larger, the two-thirds rule helps prevent the rod from floating in the middle without a clear relationship to either the window or ceiling.
Use painter’s tape to mark all three options across the full proposed rod width. Step back to the room entrance, sit at the normal viewing height and photograph the wall. A short pencil mark beside one bracket does not communicate the finished horizontal line as clearly as a complete tape strip.
The classic rule for how high to hang curtains
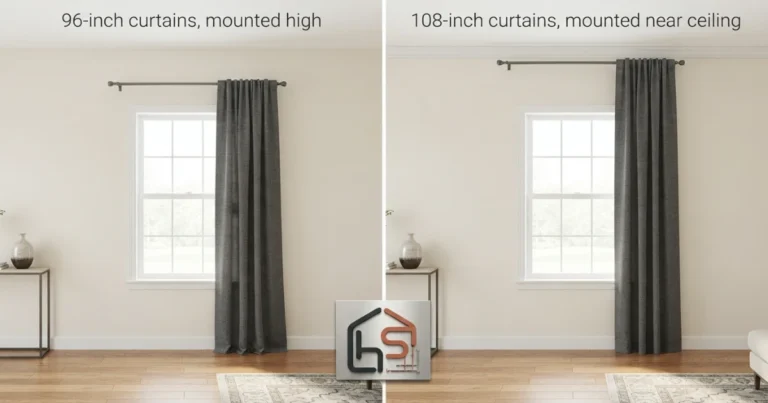
The classic rule remains useful because many ready-made curtain lengths are designed around common ceiling heights and conventional rod positions. In an eight-foot room, a 90- or 96-inch panel may determine whether a six-inch rise or near-ceiling mount is practical. The 8-foot ceiling curtain guide shows how those lengths relate to the finished floor.
Choose a classic rise when the top wall contains a deep beam, picture rail, angled ceiling or difficult substrate. It can also suit a kitchen window above a counter where floor-length curtains are not part of the design. The position should be repeated consistently across windows that share the same wall or open-plan sightline.
Avoid interpreting “4 to 6 inches” as a command to put the rod exactly six inches above every frame. If only seven inches exist below the molding, six inches may crowd the hardware. If twenty-eight inches exist, six inches may leave a large unused wall gap and visually shorten the treatment.
The two-thirds rule for how high to hang curtains
Subtract the frame-top height from the ceiling or molding height to find the open gap. Multiply that gap by 0.67, then add the result to the frame-top height. For a frame top at 82 inches and a ceiling at 96 inches, the open gap is 14 inches. Two-thirds is about 9.4 inches, placing the fabric top around 91.4 inches above the floor.
The calculation gives a visual starting line, not the rod-center height. Convert it using the header. If ring clips place the fabric 1.5 inches below the rod, the rod center needs to sit about 1.5 inches above the calculated fabric top. If a grommet panel rises 1.5 inches above the rod center, the rod center sits below the fabric-top mark.
This proportional method is particularly helpful when matching windows with different frame heights in the same room. In most cases, the rods should share one strong horizontal line if the windows are visually related. Calculate each opening, then decide whether a common line creates a calmer result than following every frame individually.
When near-ceiling is the right answer for how high to hang curtains
A near-ceiling mount can make a modest window feel taller because the fabric begins close to the room’s upper boundary and continues to the floor. It also creates more room above the glass for the curtain header, helping the open panels clear more of the window when the rod extends beyond the frame.
Leave roughly 2 to 4 inches below a plain ceiling, or work below the bottom edge of crown molding. The exact clearance depends on the bracket plate, finial diameter, ring size and access needed for a drill or screwdriver. Ceiling-mounted tracks can sit directly on the ceiling, but the hanging point of the fabric will still be slightly below the track.
Near-ceiling mounting is most effective when the panels are long enough to finish correctly at the floor. Do not mount the rod high and accept curtains hovering several inches above the floor merely to follow a design trend. Panel length and floor finish must be solved together through the Curtain Length Guide or the calculator on this page.
Rod height versus fabric top when deciding how high to hang curtains
Retail instructions often refer to rod height, but the visible design is created by the top edge or first pleat of the curtain. The difference between those two lines can exceed two inches. With clip rings, the rod may be above the fabric. With grommets, the fabric extends above the rod. With a rod pocket and header ruffle, even more material can rise above it.
Mark the desired fabric top first. Read the product diagram or attach a sample ring, hook or grommet panel to the rod. Measure the vertical offset and move the rod-center mark accordingly. This small step prevents a common failure: installing the rod perfectly, then discovering that the fabric top lands too low or presses into the ceiling.
| Header | Typical relationship | What to measure | Planning note |
|---|---|---|---|
| Grommet | Fabric extends above rod center | Top edge to hem | Rod center sits below the desired fabric top |
| Rod pocket | Fabric may rise above pocket | Top edge, pocket and hem | Check header ruffle depth |
| Clip rings | Fabric begins below rod | Clip grip to hem | Rod must sit above fabric-top mark |
| Pleated hooks / track | Hook and carrier create drop | Hook point to hem | Use the installed carrier position |
Calculate panel length after deciding how high to hang curtains
Once the fabric-top mark is chosen, measure vertically to the floor finish. A half-inch float subtracts half an inch from the floor-level drop. A floor kiss ends at the finished floor. A soft break adds roughly 1 to 2 inches, while a puddle adds more according to the desired style and fabric behavior.
Compare the calculated drop with standard retail lengths, but do not round blindly. A 93-inch required drop may be achieved with 96-inch curtains and a three-inch hem, adjustable hooks or a small break. An 89-inch required drop may suit 90-inch panels. The calculator reports the closest common size and the amount of alteration or extra fabric.
For ceiling-specific examples, compare the published guides for 9-foot ceilings and 10-foot ceilings. Those pages explain why a ceiling label alone does not decide the panel length: the fabric-top gap, header and floor finish also matter.
After setting the fabric-top position, choose the floor finish in the Curtain Length Guide and calculate the exact drop in the Curtain Size Calculator.
| Ceiling | High fabric-top example | Floor-kiss drop | Likely retail comparison |
|---|---|---|---|
| 8 ft / 96 in | 2 in below ceiling | 94 in | 90, 95 or 96 in |
| 9 ft / 108 in | 3 in below ceiling | 105 in | 96 or 108 in |
| 10 ft / 120 in | 4 in below ceiling | 116 in | 108 or 120 in |
| 11 ft / 132 in | 4 in below ceiling | 128 in | 120, 132 or custom |
Set rod width after choosing the mounting height
Height and width work together. Extending the rod beyond the frame allows open panels to stack on the wall rather than cover the glass. A starting extension of about 6 inches per side works for many ordinary windows. Deep folds, wide panels and bulky blackout lining may need 8 to 12 inches per side.
Measure available wall space before selecting finials. The usable rod length is not always the same as the advertised decorative width because finials add width beyond the brackets. On a corner window, door-adjacent window or narrow wall return, one side may need less extension than the other.
Use the Curtain Size Calculator for a broader size recommendation. On this page, the rod-height calculator also estimates finished rod width, fabric width and even panel count so the vertical and horizontal plan stay connected.
Use How Wide Should Curtains Be to convert the finished rod width into a fullness ratio, panel count and package quantity.
Calculate fullness and the number of panels
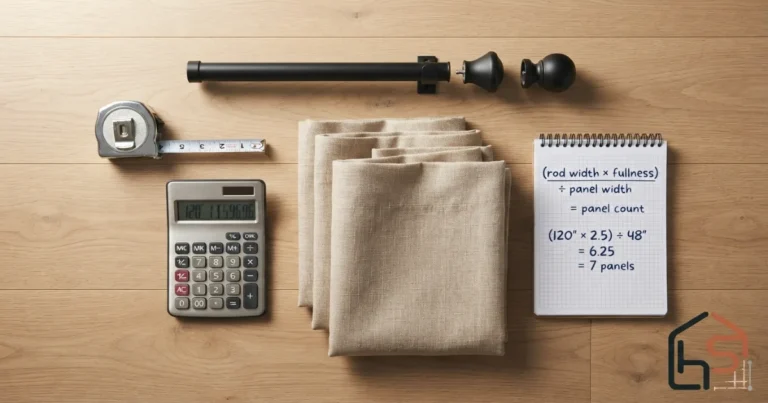
Fullness describes the ratio between the flat finished fabric width and the finished rod width. At 2× fullness, a 72-inch rod needs about 144 inches of total finished fabric width. A lighter 1.5× ratio creates fewer folds. A 2.5× ratio creates a richer treatment and may be helpful for sheers or formal pleats.
Divide total required fabric width by the finished width of one panel. Product listings may state width per panel or total width per pair, so read carefully. Round up, then round an odd result to the next even number when the curtains open from the center. A one-way sliding treatment can use an odd number if the header and track support it.
Do not reduce fullness to compensate for a rod mounted too wide. If the wall requires substantial stack-back, add panels. Sparse curtains stretched across a wide rod look flat when closed and may fail to provide privacy at the edges.
Keep height and width as separate calculations: this guide sets the vertical line, while the curtain fullness guide handles the horizontal fabric requirement.
How high to hang curtains at different ceiling heights
In an eight-foot room, the frame-to-ceiling gap may be small, so a six-inch rise and near-ceiling mount can be nearly identical. Panel availability becomes important because 84, 90, 95 and 96-inch lengths create different top lines. Measure the required drop rather than choosing 96 inches automatically.
With nine-foot ceilings, a near-ceiling mount often points toward 108-inch panels, while 96-inch panels can suit a lower rod or a deliberate float. In ten-foot rooms, 108-inch panels often support a high wall mount and 120-inch panels support a near-ceiling or ceiling-track plan. These are comparisons, not guarantees.
Very tall rooms do not require the rod to sit at the absolute ceiling. A long blank wall above a normal window can make full-height curtains expensive and difficult to operate. Use the two-thirds rule, architectural alignment with adjacent doors or a custom cornice to create a controlled top line.
Compare the finished drop with the dedicated guides for 8-foot ceilings, 9-foot ceilings and 10-foot ceilings.
Header adjustments after deciding how high to hang curtains
Before drilling, assemble one complete hardware section on the floor. Attach the bracket, rod, ring and hook or feed a sample panel through the grommet or pocket. Measure the distance from the bracket reference point to the top of the finished fabric. Transfer that offset to the wall marks.
Heavy curtains need brackets fixed into studs, suitable anchors or solid blocking. A center support may be required for a wide rod. The desired height is not useful if the mounting surface cannot support the load. Locate framing before finalizing a line that places every bracket over an unsuitable cavity or a steel lintel.
Keep the rod level even when the ceiling or window casing is not. In a visibly sloped room, decide whether the treatment should align with the floor, ceiling or a shared architectural datum. Curtains that finish at the floor usually need the rod level to the finished floor rather than copied from a crooked frame.
Room conditions that change how high to hang curtains
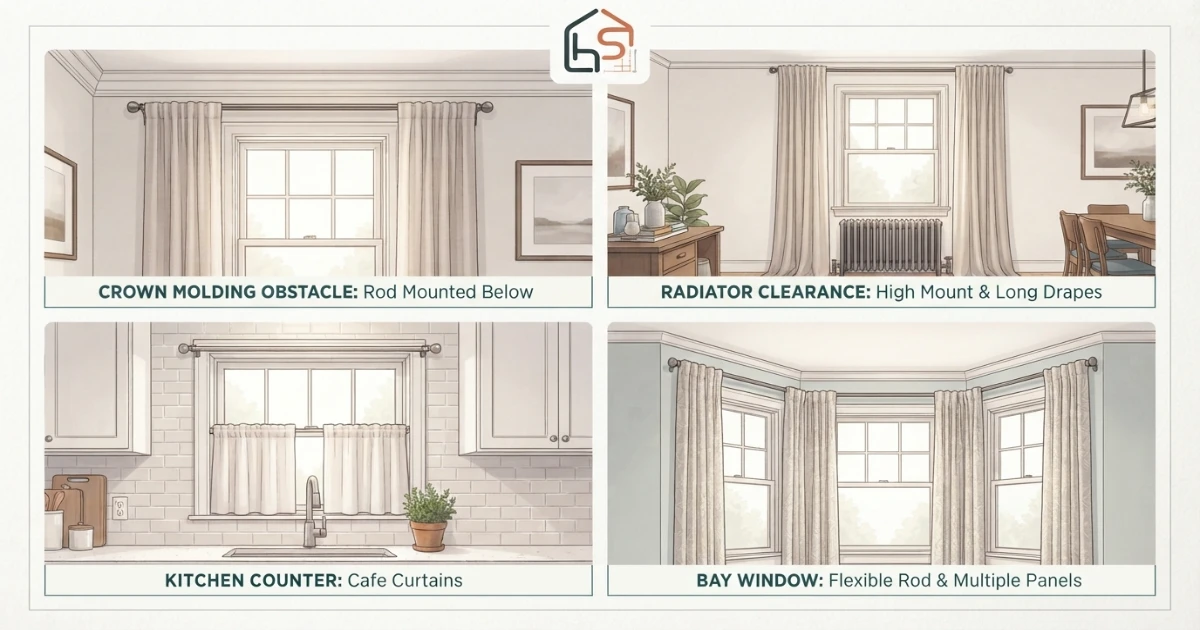
Radiators, baseboard heaters and wall vents require clearance. A high rod with floor-length fabric may direct curtains over a heat source, which is inappropriate even when the proportions look attractive. Use sill or apron length, a rigid shade or a treatment that finishes safely above the obstruction.
Kitchen counters and bathroom fixtures also change the lower finish. The rod may still sit high, but the curtain length should respond to moisture, splashes and daily access. In a nursery or child’s room, prioritize cordless window coverings and keep cords and loops inaccessible. The U.S. Consumer Product Safety Commission promotes cordless options for homes where children may be present.
Crown molding, picture rails and decorative plaster should be treated as architecture rather than obstacles to drill through casually. Mount below the feature, use a ceiling track where appropriate or consult an installer before cutting historic material. On bay and corner windows, tracks can provide a cleaner shared height than separate rods with colliding finials.
In bedrooms, test the rod and panel stack against furniture in the Bedroom Layout Planner. In living rooms, confirm sofa clearance with the Sofa Size Calculator.
| Condition | Height response | Length response | Primary check |
|---|---|---|---|
| Crown molding | Mount below molding or use ceiling track | Measure from actual hook point | Bracket and drill clearance |
| Radiator / heater | Height may remain high | End safely above obstruction | Heat and airflow clearance |
| Counter or desk | Use proportionate rise | Sill or apron length | Work-surface access |
| Bay / corner window | Keep one continuous top line | Measure every floor point | Track bends and panel movement |
| Sloped ceiling | Choose one intentional datum | Custom or leveled hems | Floor, ceiling and frame alignment |
Common mistakes when deciding how high to hang curtains
The first mistake is measuring from the top of the glass instead of the top of the frame. The second is choosing a rod line without confirming panel length. The third is treating rod center and fabric top as the same point. Together, these errors can shift the visible curtain line several inches from the intended design.
Another mistake is installing each window independently in an open room. Windows with slightly different casing heights can produce a row of uneven rods. Establish a shared laser line and check whether one common fabric-top height works across the group. Consistency often matters more than following the exact same distance above every frame.
Do not ignore the floor. Thick carpet, uneven boards and rugs beneath the curtain path change the practical bottom line. Measure after final flooring is installed. Open nearby doors, drawers and furniture before choosing a puddle that may block movement.
- Do not buy panels before selecting the fabric-top and floor-finish marks.
- Do not assume every 96-inch panel has the same header measurement.
- Do not place brackets where finials collide with a wall or cabinet.
- Do not let open curtains cover large portions of the glass through inadequate stack-back.
- Do not use a low rod merely because the previous hardware holes are convenient.
How high to hang curtains for blackout and layered treatments
Blackout performance depends on overlap around the window, not just fabric opacity. A higher rod helps cover the top of the casing, while wider extension reduces side gaps. A wraparound rod can return the curtains toward the wall. Layering with a shade or blind can improve control where light enters around the panel edges.
Measure the depth of the existing shade headrail before selecting bracket projection. The curtain hardware must clear handles, blinds and trim without pushing the fabric forward awkwardly. ENERGY STAR provides background information about residential windows and climate-appropriate window performance; the curtain plan should preserve normal operation, ventilation and maintenance access.
Washable or shrink-prone curtains should be cleaned according to the label before final hemming when the manufacturer recommends it. IKEA’s curtain guidance emphasizes careful measurement and allowing for the finished length before cutting or hemming. Test one panel when possible before altering an entire set.
For blackout treatments, use the Curtain Size Calculator to coordinate height with rod returns, overlap, fullness and panel count.
Final checklist after deciding how high to hang curtains
Stand back and confirm the proposed top line from the main room entrance. Check that it aligns intentionally with nearby doors, artwork, built-ins and other windows. Confirm the rod extends far enough for stack-back, then test the finial clearance on both sides.
Recalculate the panel drop from the real fabric hanging point. Confirm the listed product length and width, the number of panels in each package and the header construction. Mark every bracket with a level or laser line, locate studs or choose suitable anchors, and drill only after the complete treatment has been checked.
After hanging, let the fabric relax before making a final hem. Steam or press it according to the care label, train the folds and remeasure the bottom at several points. Small adjustments to hooks or rings can often correct the finish without moving the entire rod.
Save the finished mounting height, rod width and panel drop, then verify the complete order in the Curtain Size Calculator before drilling or buying hardware.
Two products that make curtain-rod placement easier
The calculator provides the measurements. These tools help transfer those measurements accurately and support the finished curtains.
Laser Level for Curtain Rod Installation
A laser level helps keep multiple brackets and nearby windows on one consistent horizontal line.
- Useful for grouped windows and long rods
- Check visible range and mounting accessories
- Confirm level calibration before drilling
Heavy-Duty Adjustable Curtain Rod
Compare the calculator’s rod-width result with a rod’s actual adjustable range, bracket depth and weight rating.
- Choose enough extension for stack-back
- Use center support on wide spans
- Confirm compatibility with the curtain header
Affiliate disclosure: As an Amazon Associate, HomeStyle Calculator may earn from qualifying purchases. Prices, specifications and availability can change; review the current listing before ordering.
Questions about curtain mounting height
How high should I hang curtains above a window?
A practical starting point is to place the top of the finished curtain fabric about 4 to 6 inches above the window frame. For a taller architectural look, place the fabric top about 2 to 4 inches below the ceiling or crown molding. Measure from the finished floor to the actual fabric hanging point before buying panels.
Should curtain rods be closer to the ceiling or the window?
In many living rooms and bedrooms, a higher rod makes the window appear taller and gives the curtains a longer, cleaner line. Keep enough clearance below the ceiling or crown molding for brackets, rings and finials. A lower position may be better above counters, radiators or unusually low windows.
What is the two-thirds rule for curtain rod height?
Measure the open wall space between the top of the window frame and the ceiling or molding. Place the top of the finished fabric about two-thirds of the way up that gap. It is a useful proportional option when a near-ceiling mount feels too high and a fixed 4-to-6-inch rise feels too low.
Do I measure curtain length from the rod or from the rings?
Measure from the point where the fabric actually begins. For ring clips, measure from the clip grip. For pleated hooks, measure from the hook connection. For grommets or rod pockets, use the product diagram because part of the fabric may sit above the rod center.
How far should a curtain rod extend beyond the window?
A common starting range is 4 to 8 inches beyond each side of the frame. Six inches per side works for many windows. Wider extension creates better stack-back so open curtains cover less glass, but the wall must have enough clear space for brackets and finials.
Should curtains touch the floor?
For an easy tailored finish, let curtains clear the floor by about one-half inch or just kiss the floor. A soft break adds roughly 1 to 2 inches, while a puddle adds more fabric. Choose the finish before calculating the panel length because it changes the required drop.
How high should blackout curtains be hung?
Blackout curtains can use the same visual height rules, but light control also depends on overlap. Mount the rod high enough to cover the top of the frame and extend it beyond both sides. A wraparound rod or layered shade can reduce light gaps more effectively than height alone.
How many curtain panels do I need?
Multiply the finished rod width by the desired fullness ratio, then divide by the finished width of one panel and round up. For a balanced pair that opens from the center, round an odd result up to the next even number. Panel count depends on rod width and fullness, not mounting height.
Turn the selected height into a complete curtain order
Calculate the finished rod width, panel drop, fullness and panel count before buying hardware or curtains.